What does a Garden Gnome do when she is not gardening, in the kitchen or doing genealogy? Well the answer might just surprise you so read the entries to find out more. This blog focuses on everything we do to make our house a home. There will be a strong emphasis on home energy efficiency and do-it-yourself (DIY) projects. At the same time there will also be crafts, knitting and crocheting projects along with any other little tips we do to create that down to earth, I want to be here home. Please enjoy your visit :)


Sunday, May 19, 2013

Curbing Our Dust Problem

Dust can be an issue in any home.  Some houses tend to be dustier than others due to location, age and interior features.  An old house with lath plaster walls will be dustier than a newer home with plastered walls as will a house with a lot of textiles or pets.  Increased household activity can cause dust to become airborne while indoor air currents can cause the dust to form dust bunnies, the bane of many homemakers.  Our home was built in 1994.  The walls are drywall and one selling feature for us was the absence of carpeting.  I quickly discovered that a home with all hard flooring did not mean less dust.  If anything, the dust is more apparent because it has nowhere to hide.

dust
After moving in, I realized the floors needed daily attention to keep them dust free.  There is a farmer's field behind us which is only a problem when the farmer is tilling or harvesting so I simply keep the windows shut then.  I came up with several solutions to control dust in our home including the use of both wet and dry mops.  I use the Bissell steam mop for floors as well.

About three weeks ago, I noticed the dust of the floors getting worse which really didn't make a lot of sense.  It was still cold enough that I hadn't had the windows opened and it had been over a week since we had had a larger get together.  Still, where I had been able to keep the floors looking nice by dusting each morning, the dust balls were quickly growing into the size of dust tumbleweeds.  I resorted to sweeping the upper level floors morning and night but within a half hour of sweeping, they looked like they hadn't been touched.  I was getting frustrated so mentioned to my husband that we might have to install an air cleaner on the furnace.  I set about researching for furnace air cleaners when I cam across a site that listed several ways to reduce dust in the house.  The author indicated that in most cases a furnace air cleaner was not worth spending the money on.  One of his suggestions was using a higher filtering furnace filter.  We already use the 3M allergen control filters so I went down to the furnace to check the filter.

dirty furnace filter
Oh my gosh!  I discovered the furnace filter was beyond being dirty.  It was clogged as you can see from the picture.  Clearly we had somehow forgotten to change out the furnace filter.  Actually, forgetting this important task is rather easy since it is not something you see on a regular basis and it is even easier when you spend time between two houses.  I know we changed a furnace filter back in December but it must have been at our vacation home.  At any rate, I did find the problem.

I turned off the furnace then went to the hardware store for a replacement.  With the new filter in place, I turned the furnace back on and set about removing as much dust as possible from the floors and furniture. I swept all the floors to remove the larger dust bunnies then vacuumed and finally used the wet mop.  Then I went through the house and damp dusted the furniture.  Once the dusting was finished, I turned the furnace back on.  The following morning, the floors were considerably better.  There were no large dust bunnies, just a light coating of dust.  I am using the wet mop with a vinegar and water solution each morning just to keep the dust knocked down even though it doesn't really need it.  At least the floors are back to looking normal rather than living in a dust bowl!


Friday, May 3, 2013

The Master Bedroom Bedding Thus Far

In anticipation of the arrival of our new bedroom furniture, I did a bit of shopping for bedroom accessories. Well, in hindsight I should have made different choices but at least the lamps and yarn for the new crocheted bedspread in progress were spot on.  Unfortunately, a couple of the purchases did not work out as planned which means back to the drawing board.  In the meantime, the bedding is usable.

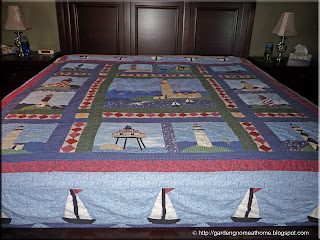
the lighthouse quilt
My husband is funny about quilts.  Years ago before we finished having kids, I splurged on a beautiful handmade quilt to replace my childhood handmade quilt that he so loved.  It had more than seen better days.  Thirty years later and the quilt I splurged on is as close to being a rag as it can get although I am considering salvaging the top to have it re-quilted if possible.  My husband bought the lighthouse quilt about five years ago.  It matched the theme of our previous house along with the navy blue bedding including dust ruffle. While the lighthouse quilt actually matches the room nicely with all the colours from my colour theme appearing, it does not match the curtains that have a fair amount of yellow tones in them along with more of a tropical theme than a nautical one.  However, my husband insists on having this quilt which is fine as it will be covered with a plain quilt then the crocheted bedspread.

temporary bedding layout
The taupe 1,200 thread count bedsheets fit perfectly, matching the planned colour scheme.  However, my husband does not like the feel of them.  He claims they are too soft!  He likes the red set, as shown on two of the pillows.  It is a harsher feeling set likely an 800 thread count.  So, I'm back to shopping for taupe sheets.  I knew the duvet (foot of bed) would not fit as it is queen size but put it there to see if we wanted anything there or not.  It's a nice look for winter but a lot will depend on how the crocheted bedspread looks when it is finished.

I'm just playing with pillow arrangements.  The two back (taupe) pillows are the new king size pillows.  The two middle (red) are queen size as is the blue striped one.  The three smaller cushions were a real bargain bought for the inside not the ivory removable covering.  I wanted pillow forms to cover in crochet to match the bedspread.  Pillow forms for that size are $7.99 each but I found the cushions at Jysk (a bed, bath, home store) for $2.99 so bought them to cover in crochet.  I'm still tinkering with the pillows.  At any rate, I need to buy two more king size pillows.  So, the room is still only partly finished.


Thursday, May 2, 2013

The New Master Bedroom Furniture!

Our new master bedroom is from Vaughan-Bassett's  Reflections Furniture Collection.  It consists of a king size sleigh storage bed, two nightstands and triple dresser (7 drawers) with mirror in a dark cherry finish.   The two bottom drawers of the triple dresser and the drawers in the sleigh bed have cedar bottoms.  The style is classic luxury with an air of regal splendor.  This furniture will really look quite lovely in the master bedroom!  A five drawer chest (41" W x 19" D x 57" H) is available but we decided to wait and see if we could fit in another piece if needed later.   

setting up the new bed frame in master bedroom
We chose a storage bed because it would give us storage to replace some of what we would be losing by eliminating the highboy.  The sleigh storage bed is set up in much the same way as a waterbed.  The frame is set up first and because the frame is both large and heavy, it is positioned where desired first.  Once the main side rails are attached to the headboard and foot board, a wood centre support T is placed on the floor beneath where the slats will be attached.  The slats that are attached to two material bands are pulled out from the foot of the bed to the head.  Each slat is then securely screwed into the side rails.  The mattress rests on the slats, eliminating the need for a separate box spring.

master bedroom furniture set up
One of the complaints we had heard about memory foam mattresses is they were hot.  That is the last thing either of us want when sleeping!  Yet the idea of a memory foam for comfort was rather appealing.  We chose a Valentino Therapedic International EcoGel® king size mattress.  This mattress offers an ideal balance of comfort and support.  The soy-based gel memory foam reduces pressure points while keeping you cool. 

The set-up of the furniture took about an hour and a half.  The delivery men moved the old highboy downstairs, moved the queen bed set and frame into the guest room and set it up, and did the complete set-up of the master bedroom furniture.  Once the set-up was complete, we had to dust the furniture then it was time to make the bed.  Of note, this bed is high.  The top of the mattress is 30½" - inches from the floor.  The furniture does fill the room nicely so we are glad we didn't buy the chest at the same time.  I don't think we really have room for it.  The picture really doesn't do the furniture justice as it is quite impressive!


Wednesday, May 1, 2013

The Final Master Bedroom Prep on Day of Furniture Arrival

We have dealt with a small Mom & Pop furniture and appliance store for decades.  We did not hesitate to buy our new bedroom furniture from them.  They are very, very good to deal with.  The only downside is on some items like our bedroom furniture is, they have to order it in which takes time.  While the time frame is usually two to three weeks, delays can happen and that was the case with our bedroom furniture.  We received the call on Wednesday (April 24, 2013) that they would be delivering our furniture that Friday.   It was time for the final prep of the room.

east wall mainly cleared except for bed
Most of the master bedroom had been cleaned out.  We moved our triple dresser to the guest room and the two chairs to the games room.  The highboy was cleaned out ready for the delivery men to move it downstairs for us. The delivery men are really good!  The move the old furniture, bring in the new furniture and set up both.  They take away old furniture and appliances if desired and they remove any packaging the new furniture came in.

That morning, I stripped the bed then just covered it with the duvet to keep any dust off the mattress until they arrived.  I removed everything from the make shift night stands then stacked the baskets in the corner.  The lettering on the east wall was rather easy to remove by simply peeling off.  I was surprised that it did not leave any marks at all, not bad for a quick bit of personality from the dollar store!

west wall cleared
The sewing machine and antique trunk remained in the room.  At this time, I turned my attention to the floor.  I did a good sweeping and oh my gosh, true to form the dust was bad (more on that in a later post) even though the floors are dusted daily.  After sweeping, I dry dusted the floor.  I was going to wash the entire floor but instead, washed just where the bed was going.  I knew the deliverymen would have their shoes on so decided that washing the floor after the install would be a better option.  After taking this picture, I decided to move the sewing machine in front of the closet doors just to give them extra room for bringing in the new furniture.  With that, there was nothing left to do in the room until the delivery men arrived.