What does a Garden Gnome do when she is not gardening, in the kitchen or doing genealogy? Well the answer might just surprise you so read the entries to find out more. This blog focuses on everything we do to make our house a home. There will be a strong emphasis on home energy efficiency and do-it-yourself (DIY) projects. At the same time there will also be crafts, knitting and crocheting projects along with any other little tips we do to create that down to earth, I want to be here home. Please enjoy your visit :)


Monday, August 30, 2010

Two More Styles of LED Emergency Lights

A couple of days ago I posted about the new lantern style LED emergency light we added to our emergency preparedness supplies.  LED lights are perfect for emergency lights because there is no flame, they are battery friendly and the bulbs never need replacement so you don't have keep replacement bulbs on hand.  On average each LED last about 100,000 hours which means each LED run for 24 hours per day would last 4, 167 days or 11 years on average.  The manufacturers have made these types of lights so that they have more than one LED so even if one diode goes out the rest will continue to light up until they too  fail.  The downside to LED lighting is they do eventually end up in the landfill but at a much lower rate than a CFL light

push style LED light
Easy stick on LED lights that use 3 AAA batteries are widely available even at the dollar stores in single packs or in triple packs in department stores.  Essentially these light fixtures are meant for temporary use in places where running electrical wiring is not as convenient (eg. closets, under cabinets, in cabinets, etc.).  They come with an easy stick on base that can go anywhere and they are small enough to fit anywhere.  Most of them have 3 LED lights.  The outer covering comes in a variety of colours.  Once the base is pressed into place you replace the top portion with the LED lights.  The light is turned on by simply pushing on it which makes this type of emergency lighting ideal for every room of the house.

It is small, compact, comes in a variety of colour and it is inexpensive.  The light can be installed near the light switch in every room so it is as simple that in the event of a power failure there is always a back-up light source.  One can be easily installed in your vehicle or boat and because the stick on there is no danger of them getting lost in the glove compartment.  Turn on or off as needed.  There is no searching for flashlights or other alternative lighting during a power outage.  The only thing you have to do is check from time to time to be sure the batteries are charged.

24 LED light
We are advid campers turned boaters so know one of the first places to look for emergency preparedness supplies is in the camping section of any department store.  I spotted this great 24 LED camp light with hanger that can be used to light up the interior of dining tents as well as regular tents.  This LED light puts out a considerable more light than the 3 LED diode versions.  What is really nice about this light is it could easily be hung from a hook in a main living area in the house to provide evening lighting during a power outage.  It can also be installed in a more permanent location using two sided tape.  This fixture would be great for emergency lighting in the family room where everyone is gathered giving enough light to perhaps play a board game until the power comes back on.

Both of these safe, supplemental emergency lighting fixtures will operate on rechargeable batteries that can be recharged using a solar powered battery recharger.  This is important during prolonged periods of power outages.  More importantly they are very low cost solutions that can be attached in convenient locations throughout the house.  The smaller ones will cost between $1 and $2 each costing less that $20 to have one in every room of your house.  The larger one will cost about $8.  In addition to the cost of the fixtures you will have to buy rechargeable batteries (highly recommended) but I also recommend keeping a small supply of regular alkaline batteries on hand for emergency purposes in the event there isn't enough solar power to recharge the rechargeable batteries if needed.

Garden Gnome
©2006-2010


Thursday, August 26, 2010

New LED Lantern Added to Our Emergency Preparedness Supplies

We are always on the lookout for items to add to our emergency preparedness supplies.  Lighting using LEDs is perfect for emergency preparedness because the LEDs don't draw a lot of energy meaning your batteries last a lot long.  The lights are fairly bright but not the same as regular CFL lightbulbs.  Still when the power is out they provide enough light that you can get around by.  They are safe to use anywhere without a fire risk so are perfect for homes with children and pets.  I'm currently working on installing a push style LED light in each room of the house so if the power is out we still have a bit of light as needed that can supplement candles and the battery operated Coleman lantern and camp lamps. 

super-bright 12-LED indoor/outdoor lantern
My husband brought home this cute LED super-bright 12-LED indoor/outdoor lantern by Illumibeam.  It is about 8½- inches tall and designed like the traditional camp lanterns.  The lantern can be operated using 4 "D" batteries using the holder or it can be plugged in using a 6 V adapter.  It is not deep enough to use 6 V battery. We have rechargeable "D" cell batteries that can be charged using our solar battery chargers.  The lantern has a dimmable control for the long-life LED lights (100,000 hours) which is a nice battery saving feature.

This lantern is a nice addition to our emergency preparedness supplies.  I especially like that it is portable.  This is very important in the case of the event of emergency evacuation.  Not only that a portable lantern means you can take it wherever you need the light.  Now I need to do a bit of stocking up on rechargeable batteries but I'm holding off until I see how the start of our solar system install goes.

Garden Gnome
©2006-2010


Tuesday, August 24, 2010

Refrigerator Water and Ice Dispenser

We bought our Whirlpool refrigerator model ED2FHEXSQ2 in early 2006.  It was bought specifically to fit the only spot available in the kitchen of our last house where there were both tight height and width restrictions. There are still a few models available that are shorter but many of them lack the features we wanted.  When I finally found a model that fit the space we had with the features I called the appliance place we deal with and had them order it in. It ended up being a wise purchase as it just fits in this kitchen.  New home builders have gone to a shorter cabinet over the refrigerator so the appliance manufacturers have responded by making refrigerators higher, wider and deeper.  While the new design size of the refrigerators fit well with new homes, fitting them into older homes can mean a major kitchen makeover to get them to fit but in some cases the space is too restricted that even a makeover won''t help get the newer fridges into the space.  This was the position we found ourselves in. 

water deposits on dispenser
I really like the refrigerator.  It has a lot of great features like extra lighting and glass cantilever shelving.  My husband's request as a refrigerator feature was an indoor water and ice dispenser.  There is a filter in the bottom of the refrigerator  that filters water to the fridge.  We had no problems at the old house that had a larger Culligan water filtration system under the sink.  We don't have the additional water filtration system here.

I started noticing that the drip tray (ridged portion) looked like it had adhesive residue on it.  Despite cleaning it got worse.  Then the guides developed brownish streaks (red arrows) that I thought was normal dirt but they wouldn't come off even with a Mr. Clean Magic eraser.  The streaks felt hard and crusty yet wouldn't flake off.  The other day I was doing a bit of blog hopping and came across a post about water deposits.  Well this was not new to me but for some reason it had not dawned on me that the problem with the water and ice dispenser was water deposits! 

soaking the dispenser guides
I removed the drip tray then set it in the sink and filled it with 5% acetic acid white vinegar.  I let it sit for 15 minutes then washed it.  All of the brownish markings were gone.  So I rigged up a coffee cup filled with vinegar propped up by two canning lid boxes to soak each of the guides as pictured.  I let each guide sit in the full strength vinegar for 15 minutes.  It was a rather low tech solution but it worked.  The guides were residue free with only the wipe of a dishcloth.  Now that I know what is causing the problem I can take the necessary steps to prevent and correct any future problems.  The left over vinegar did not go to waste either as I used it in the dishwasher to clean out any deposits. 

dispenser cleaned up
Pictured is the refrigerator water and ice dispenser after using the vinegar treatment.  I'm quite pleased with the way it cleaned up.  I routinely clean with a 1:1 vinegar to water solution so it will be as simple as spraying the dispenser when I do the counters. 

It might be time to consider installing an under sink or whole house water filtration system here as well.  I thought our area had soft water so water deposits have not been a huge issue but looking at the one shower head that needs replacing which we will do when we renovate the bathroom, water deposits may be a bit of a problem than I thought. 

Garden Gnome
©2006-2010


Sunday, August 22, 2010

Replacing a Stove Burner

bog pot burner

Well I can finally say I wore out a burner with canning.  I have a  Jenn-Air slide in range with various cartridges giving me the ability to grill indoors, save energy for day to day cooking and coil cartridges for canning.  I bought the heavy, reinforced burner element specifically for canning with my stove.  Late last year I noticed it arching a bit but with a bit of a twist the arching stopped.  I never thought much of of but when I mentioned it to my husband about a month ago he said that was dangerous and I should not have used the burner.  I went online to order a new burner since I will be very busy canning especially tomatoes this time of year. 

Pictured is the old burner to the right.  The contacts on the old burner were seared and the insulation around them was definitely a deteriorated (arrow).  More importantly the element itself was loose allowing movement over the reinforced base.  The new burner does not move over the reinforced base.  The problem really becomes the heavy canners themselves.  It is hard to move a canner from the element without using a sliding motion.  That sliding motion will eventually cause the entire burner to fail.  The fact that the burner performed well for over 5 years is almost amazing considering how heavy the canners are.  The new burner is in place and performing nicely.  We are going to try being a bit more conscious of not sliding the caanners over the burner. 

Garden Gnome
©2006-2010


Thursday, August 19, 2010

The Leak

Well, it was bound to happen and for some reason lately all of our housing problems have involved water leaks!  We got the dreaded call from one of our vacation home neighbours that there was a water leak at our vacation house.  My husband immediately called the resort manager to have the leak taken care.  Apparently it is a rather common problem in the resort and we were told to call the utility company to remind them we had had a leak if there were any charges.  We got the bill today and was sickened to see 1.200 gallons of water had been used!  In terms of cost is was only $10.48 but heavens that amount of fresh water going to waste is just horrible in my eyes.  So I called the utility company and they said the leak must have been on the house side otherwise it would not have registered on the meter.  Anything on the house side of the meter is the customer's responsibility.  That's fair enough as it is the same thing here in Canada so no big surprise.  At any rate the problem has been repaired by the park so we will likely have a small repair bill when we get down there the next visit although we have had no notification of any type of bill. 

We now find ourselves in the same position many Canadian snowbirds who own property outside of Canada face year round.   We have to rely on good neighbours and the resort itself for these types of problems given the distance the vacation home (US) is from our permanent home in Canada.  It isn't like we can just drop, run and be there within a few minutes or even an hour or so.  We are very lucky we bought in this community where not only the resort itself looks out for residents the neighbours do too!

Garden Gnome
©2006-2010


Saturday, August 14, 2010

Nonstick Fry Pan

nonstick fry pan

While I do use nonstick bakeware it has been years since I gave up on nonstick pots and pans preferring instead to use stainless steel or cast iron.  Nonstick especially Teflon® has come under fire because of possible off gassing that can cause respiratory and other health problems.  Other than two fry pans I gave up on nonstick for pots and pans well before those warnings ever came out.  However as a home cook who loves to cook I like having a couple of nonstick frypans in different sizes.  Nonstick reduces the need for oil and gives excellent results for certain foods like eggs. 

Here's where I ran into a problem.  Back when I got rid of my nonstick I bought 2 nice Lagostina International fry pans on sale but they weren't cheap!  I looked after them too with not using metal tools in them and always hand washing.  The larger one failed after a couple of years of use so I replaced it with another that also failed.  My husband brought home a KitchenAid nonstick frypan (~ $60) to replace the Lagostina.  Despite careful care the other day I was to the point of being tempted to get out a piece of steel wool.  I was very disappointed as KitchenAid is one of my favourite brands.  That fry pan is not even a full 2 years old!  It has never been in the dishwasher or had metal utensils in it nor has it been abused by using high temperatures yet the coating failed!

A couple of months ago I bought a 12" commercial grade nonstick fry pan from Sam's Club to replace the last Lagostina.  This was a heavy-guage, aluminum frypan with cast stainless steel handle (with removable silicone grip) and Eclipse® nonstick coating.  The frypan is NSF certified as well.  It cost me about $20 but the frypan is quite heavy and so far has performed as expected to the point I bought another one last night.  It was a 10" frypan for $15.64.  For less than the replacement cost of one KitchenAid I ended up with 2 heavy duty, commercial grade nonstick frypans.  Hopefully that will be the last of having to replace them!

Garden Gnome
©2006-2010


Wednesday, August 11, 2010

It's That Time of Year

Summer is half over here!  The gardening is producing nicely and I've been busy restocking the pantry with lots of home canned goodies.  Today I'm canning maple blueberry conserves, peach lavender jam and peach chutney.  As I've been getting all my supplies ready my mind has been wandering towards how the new TOU hydro prices that will come into effect in our area on September 8 will affect us.  At the same time the price of natural gas will likely see some type of increase just in time for the heating season.  The added new HST of 8% extra on home heating fuel is also a concern. 

While the canner runs churning out good food for the year or so to come I use my down time to identify a few projects that need being done before winter  giving a higher priority to those that will help save a bit of hydro or natural gas.  Topping the list are 2 on demand water heaters, one of which will eliminate about and 70' run to get hot water to the kitchen.  I am also hoping to get one solar tube installed and the first part of our solar system.  We are also planning on installing storm doors on the house.  So the winterizing ideas are coming in full tilt right now while the caulking gun is seeing a bit more action.

Garden Gnome
©2006-2010


Tuesday, August 10, 2010

Replacing Metal Single Use Canning Lids with Tattler Reusable Lids

home canned green beans
Home Canned Organic Green Beans
August 6, 2010 

Food preservation and reducing energy consumption are two ongoing household activities here.  August tends to be one of the busiest months for home canning although it spills over into September as well.  A few days ago I canned organic green beans purchased from a local organic farm.  The white lids are a special type of reusable canning lid called Tattler.  I bought 3 dozen to run several tests before committing to making a larger purchase.  If I am pleased with results of the Tattler lids and preliminary results have been quite impressive I will be phasing out the metal single use lids for all canning except jars intended for gift giving.  Each Tattler lid is 8 X the cost of the metal lids at my lowest price which means each lid will have to be reused at least 8 times before I realize a payback.  Why is this important?
  • Concern has been expressed that at some point the metal single use Snap lids will not be available.  Like many home canners I am concerned about this problem.  Switching to a reusable lid ensures I have a way to can even if the metal lids become unavailable.
  • All canning lids in North America are coated with a plastic that contains Bisphenol-A (BPA).  The reusable lids while made of a heavy plastic aare BPA free.
  • Using reusable lids will greatly reduce the metal and packaging for coming into our house.  I can somewhere between 1,000 and 1,400 jars of food each year.  All my jars are reusable which means I keep that amount of plastic and metal food containers from coming into the house.  A reusable lid simply makes a lot of sense.  I question why this hasn't caught on before especially since the company has been in business since 1976.
  • The regular metal Snap lids weigh about half that of the Tattler reusables.  However, since Tattler lids are reusable they are only shipped once unlike the shipping costs involved with keeping a supply of Snap lids on hand.  The shipping costs are built into the Snap lids but because they are an ongoing purchase the effects of shipping adds to our carbon footprint.
  • I estimate I will need at least 500 Tattler reusable lids but in reality will buy 600 to provide a safety net.  While I can 1,000 and 1,400 jars of food each year there is not that number of jars just sitting on the shelves waiting to be used.  The reason for this is the food is rotated and once I get a box or two of empty jars during the off season I will fill them with something else.  Now the beauty of this is as the jars become empty so too will the lids and rubber rings so I won't have to worry about.  The lids and rubber rings can go right into the box so the reusable lids won't create a storage problem.  If anything they will reduce the number of disposable metal lids I need to keep on hand.
  • Switching to reusable lids adds one more level of self-sufficiency.  I won't be dependent on the stores to carry the lids or having to find a supplier.
  •  Cost is always a factor in home canning.  I pay on average $150 annually for canning lids that are single use.  A 500 pack size of the Tattler reusable lids will cost me $300 plus what I've already spent.  On the surface that looks like a pay back period of 2 uses but it isn't as I figure it will take 8 uses to realize the payback which really means about 2 years of use.  I will still have to buy a few packages of metal lids each year for jars given as gifts but that should reduce my cost to under the $10 mark.
Garden Gnome
©2006-2010


Monday, August 9, 2010

The Recycling Myth

recycle

We have all heard the mantra reduce, reuse, recycle.  Somewhere along the way the concept has been lost though.  The emphasis has been put on recycling while ignoring the other two fundamental ideals for moving towards a greener lifestyle.  Many municipalities have some type of recycling program and some even make recycling mandatory refusing to pick up any trash that contains recyclable materials.  There is no consistency to recycling programs though.  In some municipalities like Guelph, Ontario there is very little that can't be recycled.  Waste is divided into wet, dry and garbage.  Even dirty disposable diapers go into the recycle bin.  In other communities thing like tin foil and plastic food containers are not allowed in the recycle bin.  The real problem with recycling is it has become a touchy, feely I'm doing something good for the environment yet an out of sight out of mind activity.  Like our neighbours we put out our blue bin on collection day.  A nice truck comes by to empty our bin.  Unlike our neighbours our recycle bin doesn't get put out on a regular basis because there isn't the need.  The reason why there isn't the need is because we focus on reducing and reusing instead.  Why?

Recycling:
  • costs more in terms of energy and carbon foot print than it saves.  Those huge trucks that empty the recycle bin add to air pollution through their exhaust and they use fossil fuels to operate.  Quite often recycled waste is sent to a facility where it is burned to create electricity which adds to air pollution via transporting and emmisions.
  • costs in terms of taxation.  Part of your property taxes goes towards the municipal recycling program so you are paying to recycle.  Some communities even charge a monthly fee or price per bag to pick-up trash or recycleable materials.  Even if you are renting your money is going towards the cost of recycling through your rent.
  • solves only part of the problem. Recycling in some ways actually encourages more consumption and less reusing because the premise is the container or paper can go into the recycle bin.  So rather than reusing the item it gets put to the curb.
Garden Gnome
©2006-2010


Sunday, August 8, 2010

It Was One of Those Weekends

I would have loved to be able to share pictures and tell you how we accomplished at least one project on our to do list this weekend.  The reality is despite the best of intentions no projects were worked on around the house this weekend.  The closest we came is my husband brought home paint chips for the sunporch staircase. On the bright side we have started packing for our fall trip to the vacation home.  That means some of the clutter from here is getting shifted but at the same time some of the clutter was just completely out the door.  All in all it ended up being a quiet, work on the house weekend with no major projects started but still accomplishing something.

Garden Gnome
©2006-2010


Saturday, August 7, 2010

Camouflaging the Pit and Clean-out

Last weekend we worked on the lower patio replacing the pavers that had been removed for the drainage problems.  The problem we were left with was how to deal with the pit that has 3 lines running into it and the clean-out.  We have the option of connecting the 3 storm lines then filling in the pit however if any of the lines became plugged we would have to dig them up and repair.  Leaving an access to these drains is a logical solution.  However, I thought it would be nice to camouflage the pit and clean-out so that corner looks nice while still allowing access should a problem arise.

camouflaging the pit and clean-out
I came up with the idea of building a planter box with the remaining pavers.  The base is pavers turned on their narrow side.  The ledge is formed by laying pavers on their wide flat side.  Pictured is the idea in progress.  There weren't enough pavers to complete the project so my husband is going to take a paver to the lumber store to see if we can get a match.  I only need 5 or 6 pavers to finish the project to finish the other two sides.  The top layer ledge on the retaining wall side will rest on the cement base of the retaining wall.  The pavers as they sit now are not mortared into place yet but will be once the final design has been determined.  Once the walls are finished we will cut a piece of thick plywood to sit on the inside of the planter on the cement base surrounding the pit.  I'll paint it on both sides then add two handles for easy removal.  Then we will build a shallow, self-watering planter liner to fit inside that will sit on the plywood cover.  I will likely plant variegated pothos in the planter that will spill over nicely to soften the hard edges and can be brought indoors for the winter.  I will like add a second cover to sit on the ledge for the winter to prevent any debris and snow from gathering inside the planter. 

Garden Gnome
©2006-2010


Friday, August 6, 2010

Pressure Washer

Many outside surfaces can be cleaned using eco-friendly soap and a garden hose with a spray nozzel or brush attachment.  Our last house was vinyl sided that was sadly in need of pressure washing.  We had it pressure washed for $200 which was an excellent discount because it was done through one of our friends who owns the pressure washing business.    A couple of years ago Canadian Tire had a pressure washer on sale for $129.99 so I made the executive decision to buy it.  The reasoning was that a pressure washer would take care of a lot of the outside cleaning needed here including vehicles without having to hire it out.

Simoniz 1600 PSI pressure washer
The pressure washer is a Simoniz 0091S 1600 PSI unit.  It is light weight enough that I can wheel it around.  The pressure is strong enough to easily clean windows, trim and it does a nice job on the vehicles.  I like that it is fairly compact so storage isn't an issue either.  There are a couple of sprayer attachments and a separate hose to hook up to a cleaning solution.

Pressure washing is an easy DIY project for cleaning most outside surfaces.  It easily removes built-up grim, moss and mildews with little effort.  Some items though cannot stand up to the pressure of pressure washing as the poor little gnome by the window found out.  He now needs a new suit of clothes.  Pressure washing can also loosen older mortar, strip any loose paint and damage vegetation.  So caution should be used when directing the pressure washer spray.

brick cleaned by power washer
Our property is heavily treed which means we have light moss and mildew on some exterior surfaces.  Normally we get enough air circulation and dry enough weather during the summer months that neither moss or mildew presents much of a problem.  This spring brought more rain than originally predicted.  Over the past month we have had high heat and humidity followed by a fair number of afternoon/evening thunderstorms.  Some of these thunderstorms have been quite violent.  The result this year is we are seeing moss and mildew growing on surfaces we normally would not see.   Pictured is the window sill that has been partially cleaned of both moss (top) and mildew (facing).  The pressure washer makes quick work of cleaning surfaces of both without using any cleaning agents. 

wood cleaned by power washer
The pressure washer is working to clean our current staircase project.  I was surprised at how well it removed loose paint while cleaning exposed wood quite effectively.  I'm actually impressed enough that I am considering trying to return the staircase to natural wood which would look quite nice.  Once we do a bit more cleaning on the staircase we will know whether we can get the wood to a point it could be stained then varathaned.  I'm almost thinking a two toned wood stain might work depending on how the wood comes out.  Painting is likely the more feasable option. 

Garden Gnome
©2006-2010


Thursday, August 5, 2010

Next House Project - The Sunporch Staircase

The sunporch above the lower level covered patio has an entrance from the outside.  This gives a bit more versatility than just having an entrance from the inside.  I've decided the next house project will be sprucing up this stair case.  It is quite solid so there are no structural issues but it in need of a good cleaning and updated painting.

sunporch staircase
The original paint colours for the house is black and white which I feel are just a bit too harsh against our brick.  The problem is we have both wood and aluminum trim (facia, soffets, some window trime) and three older replacement windows and 2 sets of patio doors that are white.  I would like to move towards a taupe and green colour scheme for outside trim features.  This presents a bit of a problem.  We could replace all the older replacement windows with wood inside/outside windows to match the rest of the house then paint the colour of choice or I can figure out a way to work with the white.  The old fashioned white and dark green combination is one option.  I'm wondering if white and taupe would work together as well leaving the dark green or blue as the accent colours for the doors.  At any rate the black is just too harsh so that is definitely out. 

I also don't like the rubber stair treads.  Painted stairs can be slippery so I understand the need for traction.  I saw a product that can be sprinkled onto wet paint that will give the step traction without the need for treads.  I would also like to add some type of lighting feature as there is no outdoor lighting to light up the staircase.  Rope lighting is one option going under the railing lip or around the underneath of the landing.  Another option is to install a fixture at the top of the door.  So we have a few decisions to make.  We've started the prep work but the humidity levels are to high to do any painting which gives a few days to decide on lighting and colours.

Garden Gnome
©2006-2010


Wednesday, August 4, 2010

We Finally Patched the Patio

Now that we have taken the house off the market we have decided to focus on getting a lot of projects done around the house.  We moved here in June of 2007 and by October discovered drainage problems.  In March of 2008 we had a major yard disruption to fix the drains running from the house to the municipal sewers.   We had hoped that would solve our problems but we were wrong.  In August of 2009 we had flooding in the house and by September of 2009 we had trenched from the house to the water's edge to completely correct the drainage problems.  Essentially all of the storm drains and runoff run from the top of our property to the water.  The slope of the property combined with a collapsed drainage system and improperly draining downspouts created erosion around the lower level of the house.  When the trench was installed we were told to leave it to settle for a year.  This past weekend my husband decided to repair where the trench had gone through on the lower patio.

opened with bricks off patio
The sidewalk leading to the lower patio, patio itself and the two retaining walls really need to be ripped out, built back up then redone.  However, that would be major repair work right now and since the problem that caused it has been eliminated we can postpone that job for awhile yet. 

The lower patio is inter laid pavers.  This is not my ideal choice for paving in our area but it was the way the patio was when we bought the house.  What happens is moisture gets into the ground then freezes causing the pavers to shift and buckle.  Compounding the problem with drainage issues that resulted in more water than normal around this area cause more shifting.  The patio pavers could easily be removed then the ground leveled out, resanded and the pavers replaced.  We are debating doing this but we are also debating redoing the back to enclose the lower patio as well so until we are ready to do the retaining wall repairs we decided a temporary fix would work.

sand layer
Once we leveled off the dirt from the opening we laid a nice layer of play sand.  Pictured is the snd layer just as my husband started it.  He used a board to level it.  Sand acts as a bit of a cushion for the pavers.  At the same time the sand fills the spaces between the pavers stopping them from shifting.  Replacing the pavers was not difficult or even time consuming.  We ended up with a few pavers left over.  The reason being we decided not to cut pavers for the end section and not to pave over the pit.  My husband reasoned that using cement would be a better solution that would give a bit more support while looking clean and finished.  Most of the cement will be covered with potted plants as well so aesthetically it will look nice.

fresh cement patch
The fieldstone brick retainer walls at each end of the patio need to be redone.  They have cracks from years of drainage issues that were ongoing well before we bought the house.  The decision whether to fix or replace will be made when we decide whether or not we are redoing the upper sunporch and building in the lower level patio.  The two spaces when redone would provide a considerable amount of solar heat in the winter !

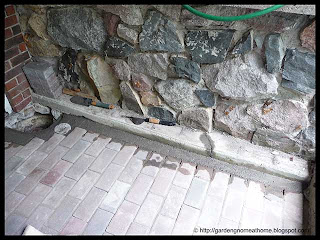
My husband used hydraulic cement in the pit and quick set cement for the patch along the retainer wall and around the pit.  The new drain cleanout is near the pit.  It is hard to tell in the picture but he created a lowered edge around the pit so we can put a cover on it. 

cement patch sanded in
Once the cement had set up for 24 hours we started applying more play sand to fill in any cracks and crevices.  Apparently a few earwigs were not very happy with this turn of events which pleased me somewhat because not they might move on elsewhere.  Pictured is the section after the sand had been swept into the cracks for the first application.  We intend to repeat the sand sweep in the fall and again in the spring to counteract any minor erosion that may occur over winter.  We are keeping the extra pavers as well in case we simply decide to level the the lower patio.

It really is a bad time of year to be doing this type of work.  The weather has been very hot and humid so the moisture seems to be lingering under the patio pavers.  The patio gets very little direct sun so takes a long time to dry.  The humidity has caused condensation around the cracks to in the morning it looks like the cracks are wet. 

Garden Gnome
©2006-2010


Tuesday, August 3, 2010

Frugality Verses Sustainability

Yesterday while blog hopping I came across a blog post asking the question "are frugal and sustainable mutually exclusive?".  The author admitted to subscribing to a newspaper to get coupons then recycling the paper that they considered wasteful.  The author said they sent away for samples and gave an example of getting two single serve packets of mayonnaise.  The author said they buy whatever they can get the best deal on but doesn't buy anything with phosphates in it, occasionally buys a small package of meat that was not humanely treated or chocolate grown with slave labour.  Finally the author sends for coupons and rebates.  There are a lot of fundamental concepts going on in this post but frugality and sustainability are not there.

My comments on the post: Using coupons is neither frugal or sustainable.  For the most part coupons are for higher priced brand name products that in many cases are over packaged.  Coupons are printed on paper that has been made from trees using a process that has a large carbon footprint.  A frugal person and one interested in sustainable living would not use coupons.  Buying foods produced in humane ways or not using slave labour are ethical and socially responsible morals.  Unless you grow the food yourself or personally know the farmer/producer well you have no idea as to their animal husbandry, hired help policies or use of synthetic chemicals.  The choice to not use products containing phosphates is a personal and eco-friendly decision.  However, if you use laundry soap which most people do while no phosphate is added, trace amounts may be present due to normal manufacturing conditions (from the Ivory laundry detergent box).  Unless specifically marked all dishwasher detergent contains phosphates with some heavy duty dishwasher tabs containing as much as 8% phosphates.  Finally recycling is better than having the item go to a landfill but simply putting an item into the blue box for cubside picked up is not eco-friendly.


Frugality and sustainability do interact nicely when done properly.  For example as a frugal person living in Ontario I am very concerned over the rising cost of electricity.  The frugal choice is to move off the grid by going solar which would effectively eliminate the electric bill.  At the same time this is a sustainable choice because solar once installed keeps producing with no further costs.  Home heating is another concern so choosing to use a renewable source for heating is both frugal and sustainable.  When it comes to foods it is frugal to grow as much as possible organically with a high portion of the fruits and vegetables being heirloom varieties for seed collection for the following year making the garden sustainable.  Hybrid varieties do not breed true and while the seeds can be collected you might not be happy with the results.  Foods should be home canned, home dried, home cured or home frozen to eliminate cans and excess packaging.  This is the least expensive way of food storage.  For example a 14 oz can of brown beans in the grocery store costs about 79¢ but a 500 ml (16 oz) jar of home canned brown beans costs about 10¢.  However the home canned is eco-friendly in that it removes the effects of transportation from farm to factory to grocery store and eliminates excess packaging.  Foods that you can't produce yourself should be purchased from organic local growers as close to your home as possible and within a 100 km radius of your home.   This is both a frugal and sustainable practice.  Riding a bicycle to work or other activities is both frugal and sustainable providing you are physically able.  The list of how integrating frugality into sustainability is quite extensive.    Anytime you integrate sustainability into frugality you are bound to save money while treading lighter on the environment!

Garden Gnome
©2006-2010


Monday, August 2, 2010

Final House Sale Update

After a huge spit and shine the real estate agent took another couple through the house last week.  I was seriously insulted hearing the feedback.  The main complaint was the outside staircase leading to the sunporch needed painting!  Give it a rest!  Any painting needed is the last thing anyone should look at when buying a house.  After a bit of discussion and knowing we are under contract with the real estate until the end of August we have decided to take our house off the market.  I took the sign down yesterday.  The real estate can hold us to not selling via any other agents or privately until August 30.  Now technically we can get out of that contract because the house has been listed longer than 90 days but we've decided not to sell via any other means so it really doesn't matter.  

The decision to remove our house from the market was not taken lightly.  Over the past month we have had more than one discussion about it.  On the weekend we did a bit more work on the house specifically the lower patio [more to come on that] and we spent a considerable amount of time on the dock.  Not selling the house means not reducing the daily commute but it also means life will get back to normal as normal can be.  We can now focus on this house and the vacation house creating the homes we want them to be.

Garden Gnome
©2006-2010