What does a Garden Gnome do when she is not gardening, in the kitchen or doing genealogy? Well the answer might just surprise you so read the entries to find out more. This blog focuses on everything we do to make our house a home. There will be a strong emphasis on home energy efficiency and do-it-yourself (DIY) projects. At the same time there will also be crafts, knitting and crocheting projects along with any other little tips we do to create that down to earth, I want to be here home. Please enjoy your visit :)


Showing posts with label DIY. Show all posts

Wednesday, January 27, 2016

The Nature of The Beast in DIY Home Automation

By now the 'awesome' home automation hubs and devices under the Christmas tree have given way to frustration and perhaps even anger.  The DIY home automation hubs are advertised as easy to set up when in fact they aren't.  The devices simply need connect to the hub which should take seconds but in fact can easily eat through a whole day if not more.  That is the nature of the beast in DIY home automation!  The truth is DIY home automation is not easy to set up or add to and it is far from being dependable.

I've been using SmartThings since May 2015, switching to their Hub 2 in September 2015.  Hub 2 has several features that aren't found in their first hub.  That meant manually migrating all of my devices from Hub 1 to Hub 2, no easy feat considering how time consuming it was.  Once up and running though, everything worked smoothly until December when we were at our vacation home in Florida and the hub needed rebooting.  Hub 2 has battery backup so a reboot means removing the batteries as well as unplugging, something that wasn't possible to do from a distance.  I wasn't pleased but resigned myself to not being able to control our house until we got home and that every single light in the house would be on.  They are all LED lights so while a tick off, they wouldn't drive the cost of hydro up much if left on.  Then three days later, everything started working properly with hub showing back online.  A few days later, the kids confirmed all was working.  Then a hub update came on January 21 so things were wonky again but stabilized quickly only to start acting up again.  This morning scheduled events and motion activated events weren't working and still aren't.  Again, this is an annoyance and very much the nature of the beast in DIY home automation.

My mantra with our DIY home automation system is "nothing critical gets connected".  That means our Nest (furnace) and home security system is not connected to our DIY home automation system.  I haven't added any connected locks so there is no concern over breaching our home security.  I don't have any heaters on the home automation system.  I have a Bunn My Cafe connected via an Aeon Labs smart plug that has an auto-off feature but that's it. 

In short:
A DIY home automation system will go down anytime there is an interruption in its power supply unless there is battery backup or if there is an interruption in internet connection.   What many don't realize is each time an firmware update is pushed to the hub, the hub goes down and it may even need a manual reset if the update does not go as planned.  Every time there an update for the app, there may be a disruption in the function of your home automation system.  If there are any changes to the servers, the your system may also be affected.  Then there are the gremlins like schedules and routines suddenly not working or even a particular brand of device not working.  In all, it is a challenge.

I haven't let this discourage me.  I'm currently waiting for the system to stabilize then will be adding two new devices: D-Link DCS-942L Day/Night Camera, Enerwave Ceiling Mounted PIR motion sensor.  I was caught a bit by the update while still trying to get my Aeon Labs Multisensor 6 set up properly.  It's hard to troubleshoot when the system itself is still having problems.  Both the camera and multisensor require adding custom device types and smart apps in the IDE.  I'll share my experiences with these devices once they are up and running.


Tuesday, September 29, 2015

The Brains of Our Smart Home

Yesterday, I shared a few more thoughts on our smart home.  I honestly would have set up my X-10 components in this house.  Even though it is an old (1970's) technology it does still work although there can be problems with dirty signals.  We bought our Nest the first year here and it was love at first sight!  Unlike traditional programmable thermostats, the Nest can also be controlled via a cell phone app which became a huge benefit.  We have no kids or pets at home so staying overnight on a whim is normal.  If using a traditional programmable thermostat, the temperature would be set to the schedule but with Nest the temperature settings is automatically set to "away" or it can be manually adjusted through the app.  Last year heading home from our vacation home, the anticipated two day trip ended up being a straight drive though so we simply used the app to warm the house by the time we arrived home.  This had me itching to be able to do the same thing with other home automation.

The brains behind the connected home automation is a hub.  Devices are paired to the hub.  The devices communicate to the hub which deciphers the signal, sends it to the cloud which then sends back a signal causing the device to perform as desired.  The hub essentially allows remote access to the devices.  When you are away from home and want to control a device manually, you open the app and tap on the desired device to turn on, off or dim.  This sends a signal to the cloud which sends to the hub at your house which sends the signal to the device to perform as desired.  All this happens in seconds.  Some hubs are propriety (Iris, Staples D-Link), some are Z-wave only (Vera) and some like Wink and SmartThings are capable of controlling multi-brand, multi-language (ZigBee, Z-wave, Bluetooth, WiFi).  It is also compatible with IFTTT app for additional rules and schedules.  Wink only controls ZigBee, Z-wave and some WiFi but be warned that its parent company has filed bankruptcy and Wink is for sale so this is not one to invest money in.   

SmartThings Hub 1 and Hub 2
My first hub was Wink and less than two weeks later I was a victim of the great Winkening.  I returned the Wink hub and immediately ordered SmartThings Hub 1 (black & white box, on right middle picture, left on bottom picture).  SmartThings Hub 1 can control a large number of multi-brand ZigBee, Z-wave and WiFi devices. Certain devices use their own hub (eg. Phillips Hue) that can also be controlled by SmartThings.  What makes SmartThings unique is the community supported SmartApps and ability to create your own custom SmartApps using Groovy.  You can even tweak existing SmartApps!  Let's say you want a device to perform a certain action like using an open/close sensor to turn on a light when the mail arrives, simply look for a SmartApp, add it then configure.  If you can find SmartApp then you can either write one yourself using the developer's tools on the IDE (website) or ask in the community forums.  They are a wealth of knowledge, always happy to help.  SmartThings support is one of the best there is too!

A smartphone (iOS 6, Android OS 4.0) and internet connection is required for the setup of the hub.   I downloaded the SmartThings App then set up my SmartThings Hub 1 (ZigBee, Z-wave, WiFi).  It came with an ethernet cord for a secure connection and power cord.  When first connected, the hub updated then was ready to connect devices.  I only had 3 bulbs at that time, a GE Link and 2 Cree.  They paired nicely so I was off shopping.  What I really liked was being able to customize.  PEQ motion sensors (made by Centralite) were on sale for $19.99 so I checked the forums to find they worked with SmartThings even though they aren't on the list.  I bought 3 motion sensors, three more Cree bulbs and three-way switch which brought immediate home automation with lights being controlled by motion/occupancy rather than just schedules.  SmartThings Hub 2 was announced shortly after I got my Hub 1, with a expected third quart release.  It was delayed but I knew I was going to buy it anyway.  In the meantime, I continued adding devices to my system. 

I pre-ordered SmartThings Hub 2 (ZigBee, Z-Wave, Bluetooth,WiFi) on Sep 9 and was pleasantly surprised when it arrived six days later.  Hub 2 (colour box top, middle left, bottom right) has an updated square design and updated features like battery back-up.  It came with an ethernet cable, power cord and 4 AA batteries.  There is LED indicator light on the front of the hub for a quick visual of hub status.  Hub 2 has two USB ports for local image storage and offers the coveted local control.  It is limited local control but still an improvement.  Like Hub 1, a smartphone (iOS 7+, Android OS 4.0+, Windows Phone 8.1+) and internet connection is required to setup the hub.  The hub software will be updated during the process before any devices can be added.  The updated app has "Smart Monitor" which can be armed (away, stay) and disarmed similar to a home security system which is a nice feature.  Devices (things) once paired can be placed in rooms making it easy to find them for control.  The devices can be controlled manually, via SmartApps, and Routines. 

Currently there is no migration tool for moving devices from Hub 1 to Hub 2.  This becomes a project with larger number of devices.  I had a problem with the app recognizing the hub even though the hub was showing in the IDE.  Despite trying several solutions, I had to get help from support.  Once they solved that problem, I had most of my 30 devices up and running.  I had to redo my schedules and rules but in one way that was a good thing as it helped clean up my configurations a bit.  Other than that, the migration was rather smooth.

Of note, you cannot use two hubs in the same location.  That means there will likely be a lot of Hub 1 for sale in the near future.  There is no need to upgrade to or even start with Hub 2 unless you want the new features Hub 2 has to offer.   Rumour has it that Hub 3 is already in the works so some with Hub 1 are holding out for it. 

Next up: components of our smart home


Monday, September 28, 2015

Moving Forward With Our Smart Home

Back in June, I wrote a few thoughts on a connected home aka smart home.   I have recently migrated our devices over to SmartThings Hub 2 from SmartThings Hub 1.  I'll post pictures of some of our devices with their pros and cons but in the meantime, I would like to extend my thoughts on a connected home.

A smart home consists of the use of technology and certain devices to automate actions in the house but it is so much more.  Even a small amount of home automation can save you time and money as has already been shown by refrigerators, dishwashers and washing machines.  These appliances are automated, they save both time and money but in the true sense of a smart home, they really are standard issue.  The devices used in smart homes, talk to each other via ZigBee, Z-wave, BlueTooth, or WiFi.  Even the older X-10 can be incorporated into smart homes.  In order for the devices to communicate with each other they require a hub and that is where things can get confusing.  If you want dependable smart home control of lighting, music, alarm systems and monitoring then it is best to go with a professional service like Control4 or Homeseer.  If you want a dependable but limited DIY home automation system then Staples D-Link, Loew's Iris or Vera (Z-wave) propriety systems are a good choice.  If you want to have complete control and flexibility, then SmartThings is the winner hands down.  Wink owned by Quirky was a contender but Quirky has filed for bankruptcy and Wink is up for sale so it's future is unknown.  There are some stand-alone devices (thermostats, speakers, lights) that do not require a hub and can be controlled via their own app.

I started with X-10 years ago and have been dabbling in home automation ever since.  These are exciting yet frustrating times for many in the home automation field.  The reality is, home automation especially inexpensive DIY is in its infancy.  Now, that 'inexpensive' is relative as your investment can really add up.  Sure the hub only cost $99 but a single 3-pole Z-wave switch costs $65 plus installation if you can't do-it-yourself.  That single 3-pole switch really is automated although it can be controlled via SmartApps in the app, like a rather fancy timer with remote access.  The real magic comes from adding proximity and/or motion sensors so that switch which controls those lights works without touching the switch or app based on occupancy or proximity.  Each motion costs about $40 and bulbs $20 so a quick calculation reveals that it doesn't take long to have $1,000 plus invested in your home automation system.

I currently have 30 connected devices (bulbs, wired switches, plug-in outlets, bulbs, motion sensors, open/closed sensors) not counting my iBeacons plus the hub.  The Nest thermostat, Sonos speakers and security system are independent of our home automation system.  I highly recommend not incorporating your existing security system into your home automation for several reasons but both Nest and Sonos can be connected if desired.  Some of my devices have multiple functions reporting temperature, humidity, light level and/or energy use, and battery levels in addition to their main function.  Rules can be set up based on these additional functions so a switch that is used to turn on or off a small appliance can also be set to turn that appliance off once a certain amount of energy has been used.  Most of our lights are now controlled in some manner, mainly presence but also scheduling.  We receive notifications if there are weather warnings in our area or if the windows have been left open and rain is coming.  We get notifications when the temperature reports of a couple of the motion sensors are too hot or too cold.  These could also be set to turn Nest on or off.  We get notifications when the motions are triggered when we are away so we know when the house has been checked or plants watered.  More importantly, we know if there is an issue like a water leak at the house that needs to be checked so we can get someone there.   The house is genofenced so certain actions and reports are based on our proximity to our house rather than proximity within the house.  I have three devices (switches, bulb) to connect yet and plans for more shortly.  With each addition, our house gains function working for us, making things more comfortable. 

All this said and as pleased as what I am with what I've been able to accomplish thus far with home automation there are some drawbacks.  DIY home automation is certainly not plug and play, forget about it.  The DIY home automation has been cloud based meaning you must have internet for it to work.  That can be problematic in many areas where the internet connect is not stable.  SmartThings just introduced limited local control with Hub 2.  Prior to that if the internet when down or SmartThings was down, then schedules and app control did not work.  Now, if either is down those devices using SmartApps under local control will remain functional.  A device is paired to the hub in order to control it.  Some devices (especially GE Link bulbs) lose their pairing so have to be manually paired again.  Another problem is poling where the app will show a light is on when it is actually off and visa versa.  The only time I notice poling problems is when the hydro flickers off.  This is not a real problem with the bulbs as they are LED so low energy use but it can be a problem with switches used to control small appliances.  Many are using the smart switches to power their televisions on and off but this is similar to hitting the power button on your computer rather than shutting down.  There are reports of damaging televisions using smart switches so I wouldn't recommend using one.  I also don't recommend using a smart switch on an already smart appliance (programmable appliance).  Use a smart switch to make a dumb appliance smart but not a smart appliance smarter. 

My biggest pet peeve with home automation is I don't want to see the devices.  In other words I want the convenience and effects without seeing the how-it's-done.  The connected bulbs (Cree, GE Link, Wemo) are the same size and shape as an incandescent light bulb.  The Cree has a vent system but otherwise looks like a normal bulb.  Wired in outlets and switches are great but they do have a little LED indicator light some may not like.  Otherwise, they fit right in.  Plug-in outlets are bulky and while versatile, suitable only for areas where they won't be seen but can still pick up the mesh network.  Motion sensors and open/close sensors are the most problematic to hide.  Both have to be accessible to change batteries as well.  Cameras have the wires that can be problematic to hide as well. 

Next up, I'll introduce you to some of our smart devices and tell you how I'm using them to make our home a smart home. 


Wednesday, June 24, 2015

Thoughts on a Connected Home aka Smart Home

As mentioned previously, I have been interested in home automation for as long as I can remember.  In many ways, homes have been automated for a few decades thanks to washing machines, dryers, dishwashers and timers.  Even small appliances quickly became automated simply by the addition of timers.  Aside of plug in timers and timer equipped small appliances, home automation was and still is not very much of a DIY.  Strictly speaking home automation is the control of lighting, heating, cooling, and entertainment via devices that go through a main contoller, usually wired.  The new generation of home automation takes that a step further by using smart devices that can control each other via means of a hub and controller (eg. smart phone, tablet).  More importantly this new generation allows the control of your devices wirelessly from anywhere you have internet connection.  In most cases, only the hub is connected to your router although at least one hub connects to the router wirelessly.

We have had a Nest thermostat for about three years now.  It has its own app.  The Nest is a treat to use, has paid for itself and it has been virtually problem free except when the Wink hub booted Nest offline even though Nest was always kept separate from Wink.  We've had Sonos for about a year and a half with no problems at all.  It has its own app.  Both Nest and Sonos are smart devices that don't talk to each other and have separate app controls.  Wink was a huge disaster so I switched over to SmartThings which controls Z-wave and ZigBee devices.  It has added control for Belkin Wemo (WiFi) as well as numerous other brands like Aeon Labs, Ecolink and GE.  Both Apple and Google are doing their version of home automation and then there is Lowe's Iris and Staples Connect, both using a propriety version of ZigBee.  Herein lies the problem and it is a huge problem for consumers.  It doesn't take long before you have four or five apps just for home automation taking up a lot of valuable space on your space limited cell phone not to mention the aggravation of having to click one app for HVAC, another for music, another for lighting and yet another for locks. 

We currently have Nest thermostat, Sonos 3, Sonos 1, 5 motion (1 Ecolink, 4 PEQ), 1 GE bulb, 3 Wemo bulbs, 5 Cree bulbs, GE 3-way switch, and GE on/off switch installed as part of our home automation.  We have 2 PEQ motions, 1 PEQ tripper and 1 Cree bulb to install yet.  Two GE plug in switches and a GE on/off switch are on their way.  All rooms are automated to some degree, some more than others.  We have two Quirky products: egg minder and spotter.  We use four apps: Nest, Sonos, SmartThings, Wink; but that will go to three quickly the way Wink is going.  SmartThings can control Sonos but not Nest yet.  So here are a few tips:

  1.  follow home automation forums, Facebook pages, Twitter - These resources can be a wealth of information especially for the how-tos and troubleshooting.  They are also ideal for keeping up to date with what's new in home automation and where the great sales are.  Twitter is especially useful for outage notifications.
  2. do not buy all your devices at once -  Buy the hub and one or two devices.  Add to that as the need arises.  Focus on need first then fill in with your wants.
  3. shop the sales - If you are willing to wait, some of the sales can be quite good.  I picked up the PEQ motion sensors for half price at Best Buy!  The plug GE plug in switches were also $50 off on Amazon.  Keep an eye on Best Buy, Lowes, Amazon and eBay. 
  4. avoid Wink like the plague - This all talk, broken promises company is nothing but a headache with the hub continuously going down, having to reconnect devices multiple times often daily for some, dwindling customer support and failure to deliver.  The second major outage was just last night, on the heels of the first a month ago!
  5. opt for a hub that supports numerous protocols (eg. Z-wave, ZigBee, WiFi, Bluetooth) - SmartThings is quickly proving itself to be stable as is Vera.  SmartThings allows the most as far as customizing with SmartApps using your own code or templates as well as published SmartLab apps.  Be aware there are a lot of home automation brands coming onto the market but they haven't proved themselves. 
  6. stay away from any propriety protocols (eg. Staples Connect, Iris) - Some components will work with other systems while others won't.  If that system is eliminated like Revolv, you will be left high and dry with a bunch of devices that won't work with anything else.  Some of these systems have monthly subscription fees as well.
  7. keep home security system separate - Home automation devices will increase your home security but do not use them as a security system and do not tie your existing home security system into your home automation.  The last thing you want to deal with is doors that are unlocked when the app says they are locked!


Thursday, February 5, 2015

Briggs & Stratton Simplicity 1226L Snowblower

We have been talking of buying a snowblower ever since our third house that had a huge driveway.  Our fifth house was rural with a very, very long driveway so before our first winter hit there, we discussed it again.  However, one of our neighbours cleared all the driveways on our short street with his tractor so we never did buy one.  We've been in this house almost four years.  Each year gets rougher clearing the driveway so until now we have hired it out even though a couple of our neighbours have cleared it for us a few times.  We are getting older, noticing both the cold and work of winter.  Yesterday, we bit the bullet and bought a snowblower.

Briggs Stratton Simplicity 1226L snowblower
Mother Nature decided to grace us with an abundance of snow Superbowl Sunday.  My husband shoveled enough of a path to get to the road then walked to work.  He called to have our guy come out to clear it but his truck was broke down.  On to plan B, a snowblower.  The time to buy a snowblower is not when there is almost three feet of snow on the ground and folks are still trying to dig out!  He made a few phone calls. 

One of our friends had a snowblower for sale.  It had only been used three times so my husband bought it.  He went over with the truck and they both brought it back on a trailer.  The snowblower is a Briggs & Stratton Simplicity 1226L dual-stage, self-propelled  model.  It has an electric start with recoil back-up.  The clearing path is 26 - inches (66 cm) and 40 ft (12.19 m) maximum throwing distance. 
The guys gave me a brief tutorial, left the snowblower running then left as I set about clearing the drive.  The snowblower is heavy, much heavier and considerably bulkier than a lawn mower.  It took a bit of getting used to but once I got the hang of it, the clearing was fairly easy.  Then it ran out of gas so I texted my husband who had just left from dropping off the trailer when the brake lines blew in the truck so I had to go rescue him.  He dropped me off then went for gas.  We had gas tank but no gas since our lawnmower is battery operated.  Once back, it was time to finish the driveway.

The snow was quite deep.  I had cleared the sidewalk portion (bottom right) by hand.  The worst part to clear was at the road where the plow had gone buy pushing a lot of snow into the driveway.  I was rather pleased with the final results especially since we have interlocking brick that is not quite as smooth as an asphalt or cement surface. 

It started snowing again last night and by morning there was a fair amount of accumulation so my husband cleared out the driveway again with the snowblower.  Then he cleared our elderly neighbour's and a friend's driveways.  It took about 45 minutes to clear the three driveways.  Although the snow held off during the day, it was back to snowing in the evening.  At this rate, the snowblower is going to get a lot of use!

I found the snowblower easy enough to use in theory but harder to use in practice.  I'm petite so even though the snowblower is self-propelling, I sure felt the effects.  Much of the soreness was more than likely due to hand shoveling as I had done a fair amount, the sidewalk and almost half of the driveway.   I can't advise on what to look for when buying a snowblower other than buy quality.  A snowblower will need both maintenance and repairs but should last a number of years when cared for properly.  Size does matter as a friend of ours bought a small snowblower that can barely do his short driveway after heavy snowfall but is suitable for lighter snowfall.  A snowblower will lessen the need for manual snow removal although some hand shoveling will still be needed.  At any rate, a snowblower is definitely a worthwhile investment!


Wednesday, February 4, 2015

Easy Indoor Clotheline Follow-up

We replaced the existing indoor clothesline with an easy DIY clothesline when we installed the dry bar cabinets.  Our solution was simply a removable, heavy wooden dowel spanning the distance between the closet and furnace room walls set into brackets.  The total cost for this quick project was under $10.  The true test to whether this solution would meet our needs came with the first couple of uses.

easy DIY indoor clothesline in use
We don't hang a lot of clothes but certain items for one reason or another are always air dried, usually on plastic clothes hangers.  There may only be four or five articles that need hanging in our average sized dark load unless it is athletic wear that comprises the entire load.  Once dried, the clothes are easily transferred to the appropriate closet. 

My concern was reducing the drying space from the existing 30' to about 4'.  Even though we never used the entire 30', the space was there if needed.  I hung nine articles of clothing from a large dark load which is about the average.  There was plenty of room for the clothes.  By morning, the clothes were dried ready to be put away.

Overall, this very simple, low cost, DIY solution meets our indoor drying needs nicely.  I leave a hanger on the rod to hang wet T-towels and dishcloths that are then placed in the laundry basket until there is enough for a load.  We have extra capacity, front loading washer and dryer so I do a load of laundry about once a week to ten days.  It takes awhile to accumulate enough whites for a full load! 


Monday, January 26, 2015

Easy Indoor Clothesline Solution

Quite often one project leads to another.  So it was in the utility room.  The previous owners of our house installed a cord indoor clothesline that spanned the distance between the far wall of the utility room to the wall where we recently installed the dry bar cabinets.  This gave us about 30 feet of drying space. 

old indoor clotheslineThe line did not detract so was visible when not in use which really wasn't a problem.  The closet doors cleared the line so the only issue was aesthetics.  We removed the mounting strip for the clothesline when we installed the cabinets.  The line wasn't much but looked so much nicer gone!  We decided to take the old clothesline down. 

Still, we needed a solution for drying clothes indoors.  There are certain items that we always hang to dry rather than put in the dryer.  We have a very flimsy folding rack that isn't suitable for hanging much of anything.  The space really isn't big enough to leave a rack sitting out for any length of time.  At the same time, we knew any solution would take up valuable space in the small room.

new indoor cloghesline
Our first thought was to install a rod on the end wall over the end of the washer but that would only give us about 4 feet of usable drying space without climbing over the washer.  Instead, we installed a rod between the closet and furnace room walls.  The rod is a 1- inch wooden dowel that can be easily lifted out of the mounting brackets if desired.   I think I will look for a plastic cover meant for shower rods to cover the wood mainly for looks but also to protect the wood from getting wet. 

Four feet of drying space does not seem like a lot especially in comparison to the old 30 feet span.  However, I hung a few clothes in the lower level bathroom while we were working on the cabinets.  That was ample room so the new rod should work fine.  I may add a fold down drying rack on the end wall if necessary.

The wall needs patching which will be a small project.  I also plan on painting the trim and replacing the closet doors.  As mentioned in yesterday's post, the ceiling tile needs replacing it's in the jar for weekend projects.  I'll be working on decluttering the closet this week!  We are also in the process of converting a lower level room into a home gym so I'll be busy painting too. 


Sunday, January 25, 2015

Dry Bar Cabinets Installed

While I have plans of painting a couple of rooms, we are working on several smaller, weekend projects over the next few weeks.  The utility room is L-shaped with the refrigerator and dry bar spanning the wall adjacent to the entrance.  The back, long arm of the L has a large double door closet, the washer and dryer.  Across from the washer and dryer is the very small furnace room that really is just big enough for the furnace, hot water tank, central vacuum canister and shallow shelving.

The total area is small but for the most part quite functional.   It does need a bit of organizing and could use a fresh coat of paint.  The ceiling is a drop ceiling.  Some of the tiles need replacing, another of our planned easy weekend projects.  We would like to update the lighting as well.  It is currently two fluorescent double bulb fixtures in the L-shape and a bare bulb fixture in the furnace room.  All come on at the same time.  The ample sized closet is very much lacking in light so we would also like to add lighting there.  So there are a number of small, inexpensive projects planned that will make the space better suited to our needs.

dry bar area before cabinets installed
We brought our relatively new (bought in 2005) Whirlpool refrigerator to our new home in 2011.  We installed it just inside the entrance to the utility room.  Then as luck would have it, my husband found a base cabinet with countertop included on clearance at Home Hardware.  He installed it the same day creating a much needed dry bar.  We do a lot of entertaining so need the extra storage space for that purpose.  And so the dry bar sat where it quick became the perfect hotspot for horizontal clutter.  There was the fear that glasses would accidentally get knocked off during heavy use.  The horizontal clutter spilled onto the top of the refrigerator.  In short, the dry bar while providing much needed storage was not functioning in the way we envisioned it.

dry bar cabinets installed
My husband went to Home Depot where he found pre-finished cabinets.  He bought two of the cabinets for an easy, DIY solution to our dry bar area clutter problem.  They were very easy to assemble and hang.  Doors are available for the cabinets.  We decided to leave the cabinets open for the time being to see how we like it.  My concern is of course dust even though we like the way the cabinets look without the doors.

Once the cabinets were installed, we washed them down and started organizing the glassware.  We also took the opportunity to do a bit of decluttering.  Some of the glassware went into the donation bin.   That little bit of decluttering has spurred the start of house-wide decluttering.


Saturday, January 3, 2015

Houzz Interior Design Ideas App

I use my iPhone for a multitude of tasks in addition to communication.  It is my key tool for health and fitness as well as entertainment!  I want to add finer detail to our home so am constantly looking for different ideas.  It was only a matter of time before I discover home design apps on the App Store (Apple). 

Houzz app
I installed Houzz Interior Design Ideas from the App Store.  This is an easy to use free app full of high end decorating ideas.  The app will ask if you want to sign-up but you don't really have to unless buying from them.  Certain items in some of the design photos have little green sales tags on them that you can click to add to your shopping cart.  I signed up even though I don't plan on buying.  Signing up also allows you to save the ideas you are interested in.  A screenshot is an alternative way to save without signing up.  I've used screenshot to have the ideas at my fingertips when shopping.  This app does not give any instructions or methods for recreating the look.  That's up to you.  It is basically an idea resource for home decorating. 

Don't let the fact that these are high end ideas discourage you.  A lot of these ideas can be duplicated for a fraction of the cost if you DIY.  When you first open the app a full sized image of a design idea (eg. full room, focal point, colour theme, landscaping, interior, exterior) is shown.  Swiping to the left shows the next image and so on.  You can go back and review a previous image as well.  I tend to focus more on specific design elements because I already have vague ideas of what I want.  All in all, I think this is a great little app that will help me get the look I'm after.


Sunday, March 24, 2013

Replacing Our Kitchen Range Hood

We bought this house in September 2011.  Within the first two weeks installed a new natural gas range and replaced the dishwasher.  Then we left for our vacation home in Florida for three weeks, home long enough to do some unpacking and organizing as well as a bit of home canning then we were back to Florida for most of December.  When we returned home, I turned my attention to choosing colours for our new home and repainting a couple of rooms.  Although I had plans to repaint all the rooms before spring, that didn't happen but I did get three finished, the guest bedroom, upper level bathroom and kitchen.

The kitchen was painted a cool taupe when we bought the house.  A friend of ours is a cabinet maker and finisher so he is doing a lot of custom woodworking for us.  He make a shelf for over the sink just to the far left but visible in the last picture.  We custom matched the paint for the walls to our dinnerware thanks to our friends at Home Hardware.  Once the walls were finished, our friend built in the bulkhead and added trim around the ceiling.  We had panel curtains hung.  My husband installed a food waste disposal just in time for the busiest part of the canning year.  I home can year round but mid-May through mid-October is very busy.  The kitchen sat that way through the busy canning season and three trips to our vacation home.  I was sick most of January and February so got little done as far as painting and decorating.  That changed with March when I was once again on my feet ready to tackle a few new projects. 

old disgusting white range hood
The existing range hood was about as disgusting as you could get!  I took household ammonia to it and still could not get the thing clean.  Not only that, when the northerly winds blew there was enough draft coming in the range hood to move the panel curtains.  I removed the vent screen, covered it with tin foil then put it back into place just to keep the cold air out.  So, I went to Rona Building Centre for a replacement, identical to it except black for $49.99 that was in their flyer to find that it had been discontinued.  The search was on.

In fairness, I seldom use a range hood.  I had no range hood in our first two houses, a range hood in the third house, no range hood in the fourth but then installed the down draft system on the Jenn-Air range that was also moved to our fifth house.  I prefer the down draft system over a range hood but we bought a natural gas range for this house that doesn't have a down draft system.  Replacing the range hood, in my mind, was more a matter of aesthetics.

We were restricted as far as size both width from the cabinet width and height due to the way the ceramic tile had been installed.  We could not go to a range hood wider than 30 - inches or deeper than 6 - inches.  I saw a nice thin line model I really liked but then we would be left with a gap between the tile and the hood.  I finally decided on the Broan-NuTone HDN64 Series 30 - inch, 180 CFM 7.5 Sones range hood in black for $79.99.  Sones is the measurement of the sound level the unit produces.  At 7.5 Sones this model is considerably louder than some higher end models that produce only 0.9 Sones.  This model has two fan speeds and two settings for the light brightness controlled by rocker switches.  It does have a nice, basic design (black with platinum lettering) that I thought would match well with the kitchen range and blend nicely with the rest of the room. 

baffle on new range hood
The new range hood could be installed ducted to the outdoors or non-ducted.  It has a damper (included) to prevent cold air from entering when installed ducted.  If installed non-ducted, the hood requires an additional charcoal filter sold separately.

The damper was very easy to install on the top of the range hood.  My husband removed the knock-out on the top of the range hood then screwed the damper into position with the provided self tapping screws.  The baffle plate was slid into place behind the grille on the front of the range hood.  The slot where the baffle plate went is just visible to the right side at the top just behind the logo on the front of the range hood.

space where old range hood was removed
In order to install the new range hood, my husband turned the power off.  Then he removed the old range hood.  I washed the area well.  I then painted the smaller wall just to make sure there would be no wall showing that didn't match the main wall colour.  It took two coats but dried quite quickly.  I likely could have skipped this step but just wanted to be sure.   As you can see, rather than cut the tile as it should have been, the previous owners didn't.  That in itself would have presented a problem had we decided to use a range hood that wasn't as deep, not that it could not have been solved, just it would have been more work to install. 

old and new range hoods together
If you look closely you can see how dirty and stained the old range hood was.  More importantly the actual baffle was missing on the damper (top of old range hood to the left).  This explains why the cold air was pouring in when the wind blew.  Under normal use, there is no way the baffle would just go missing so it must have broke off when they removed the range hood to install the tile.  Why on earth they replaced the range hood without the baffle on the damper is a mystery but then why they would have reinstalled a range hood in such poor condition is beyond me.  It should have been replaced when they did the tiling.

Once the paint was dry to the touch, it was time to install the range hood.  My husband carefully placed the range hood in place and made the necessary connections.  Then he secured the unit temporarily to test the connections by turning on the power.  All was well so he turned off the power, finished securing the range hood and turned the power back on. 

new range hood installed
The new range hood really looks nice!  I used a Sylvania 8W LED bulb (450 lumens) instead of the GE 13W CFL (825 lumens).  Essentially, it was like replacing a 60W incandescent bulb with a 50W bulb.   We were already saving 47W by using a CFL rather than a 60W incandescent but now we will will be saving another 5W.  In this day and age of energy conservation, that is a good savings.  I am rather pleased with the light output as well.  The range hood light is mainly used as task and occasionally evening  lighting.

So, we are one step closer to finishing the kitchen.  When our friend installed the bulkhead enclosure, it was more of a taupe tone than golden oak.  He is going to redo the cabinets to match.  He is also going to cut the extra marble tile we found in the garage to fill the gap under the new dishwasher.  That leaves us with replacing the microwave oven, the sink and faucet.  With any luck our kitchen will be completely finished in the next month or so.


Monday, March 18, 2013

Our House is a Mess!

I would love to say our house is always neat, tidy and ready for unexpected company at any given moment.  The reality is, it isn't.  That's because I am a chronic multi-tasker with many, many projects on the go (knitting, crocheting, home decorating, home food preservation).  I'm a high volume canner which by definition creates a multitude of messes.  We are also working on the house so there are a lot of DIY projects that create a bit of chaos and mess. 

This past couple of weeks, my husband hung new drapes in two rooms and replaced the range hood, both of which I will go into further detail.  Then, I finally had enough of how our dining room table was looking so decided it was a good time to refinish it (more details to come).  While that project is moving along nicely, I'm getting little done in the way of housework and gearing towards my annual spring cleaning.  So today, I took action and got out my trusty timer to go back onto my 15 minute routine.  I'm focusing mainly on the morning hours (9 AM to noon) to do this, freeing up the afternoons for blogging, knitting/crocheting and cooking.  I'm up a lot earlier than that but unless under a crunch usually don't do much housework other than laundry before 9 AM.

The 15 minute routine is my modification of the 15 minute declutter from my Flylady days.  Her idea was to set the timer and do whatever you could in your zone in 15 minutes.  The month was divided into zones so for the first week of the month you only focused on zone 1 which I think was the entrance.  That never worked for me but mind you she was/is giving advice to individuals with severe clutter problems bordering on hoarder issues.  So while the zone thing never worked for me, the modified 15 minute routine did as did the 27 Fling Boogie.  For that, you grab a garbage bag then as fast as you can toss 27 pieces of trash into the bag, then toss the bag.  Once it is in the bag it can't come out.  I modified that a bit as well to meet my needs. 

I take the timer to any room and it doesn't matter which one, set it and do as much as I can in 15 minutes.  When the timer goes off, I have a 15 minute timed break which is much needed due to health.  Then I repeat the process.  So far today, I've hit the utility room, pantry, kitchen, master bedroom and living room.  I can't believe what a difference just 15 minutes can make in any room.  It is not a perfect system and the house will take two or three days to get back to normal but it is a system that is working well for me.  I'm looking forward to getting order restored in our house!


Tuesday, January 1, 2013

Our Vacation Home Kitchen Range Repairs

Happy New Year!


We spent three weeks in May (one week in Aruba, 2 in Florida), three weeks in October and three weeks Nov 29 through December 20 at our vacation home in Florida.  It had been rented out January through April of 2012.  I was absolutely disgusted by how we found our vacation home when we arrived in May.  Despite the cleaners being in apparently three times, the floors were dirty, the bathrooms had not been touched especially the mirrors, the stove and backsplash had not been cleaned and the list goes on.  We arrived with friends of ours so I hit the floor running just so they could use the guest washroom.  The problem in May was we had guests and the side trip to Aruba so little time to go through the house properly looking for damage.  During the October trip, we had my husband's sister and son, took them to the airport and picked up the guys the same day.  They stayed for a week.  We dropped them off at the airport and the next day left at 7 AM in the morning to meet up with a couple of our kids at Disney World for a couple of days.

On the second day of our October trip, we found out from neighbours that the agent in charge of rentals had been in our house several times, once with a plumber ALL without our permission.  In this case, there is no need for a viewing other than pictures because the tenants are usually from the northern states or Canada so aren't there to do any viewing and at most they rent for one or two months, but usually only a month.  It isn't like it is a long term rental situation or they are looking to buy.  My husband replaced the dead bolts to prevent any unauthorized entry while we were there and because we were coming back in December, we could leave our personal belongings out including food in the fridge and cupboards.  The deadbolts the park has the key to will only be on our home when it is available for rent with the new deadbolts (agent doesn't have key) on the rest of the year.  Finally, during our December trip I had time to do a full inspection and believe me, I was not happy!

damaged drip bowls on our vacation home stove
Our vacation home is a 3 bedroom, 2 bathroom manufactured home, manufactured in November 2007 and assembled in it's current location in the spring of 2008.  The gentleman that owned it was hardly ever home and he lost it so the home sat empty for a year and a half when we bought it without seeing more than pictures, in March of 2010.  During our first visit in May of 2010, I took a lot of pictures.

The Whirlpool electric range was in perfect condition with the exception of one small chip that we repaired that trip.  Other than that there were no chips on any of the grey porcelain drip bowls.  Much to my dismay, I discovered all four of the drip pans were chipped during our May trip even though there had been no chips prior to the 2012 rental period!  An online search showed replacement cost of $13 for each of the 6 - inch drip bowls and $40 for each of the 8 - inch drip bowls.  In the big picture, $106 to repair the drip bowls wasn't too bad but they would likely get chipped again with the next renters.  The bottom line is, even when renting someones home and even at a premium price ($2,200 per month January through April), they really don't care if they cause any damages. [As a result of damages, we now have a neighbour that will go through our house and let us know of any damages so the renters' credit card (mandatory requirement if renting through the park) will be charged the day after they vacate if there are any damages.  Both of the 2012 renters will not be allowed to rent from us again.]

replacement drip bowls
We decided to replace the drip bowls with chrome drip bowls that we found at Lowes.  The first set didn't fit properly so my husband took them back and bought ones that actually said Whirlpool on the label.  They cost us $19.99 for the four of them which is considerably less expensive than the porcelain drip bowls.

I'm hoping that we get a couple of years out of them which isn't an unreasonable expectation providing they are cared for.  The nice thing is, the chrome drip bowls won't chip and they should clean up fairly easily.  Realistically, we have already put replacing the drip bowls on our annual repair list.

an overlooked area of the stove that should be cleaned
Electric stoves have an open space between the outside of the top of the oven and the stove top.  Unfortunately, many folks over look this area when cleaning electric ranges even though it can get a bit gunky from overflowing pots, spills, grease splatters and crumbs.  The reason this happens is regular drip bowls have a hole in the centre and another hole where the burner connects through into the socket.  That means foods and liquids can find their way onto this surface which can cause odours, attract pests (eg. ants, mice) and in severe build-up create a fire hazard.

Our vacation home stove is cleaned from top to bottom at the end of each stay.  It is also cleaned by the paid cleaners each time a renter leaves.  However, and this will be an issue to discuss with the agent, this problem area had not been cleaned.  I removed the burners and drip bowls then gave this space a good scrubbing.  It didn't take long to clean it up but this is one area that should be cleaned every other week.

new drip bowls in place
Once the stove was cleaned up, I put the new drip bowls in place and popped the burners in.  I personally would have liked to stay with the grey porcelain but quite frankly the chrome looks clean and fresh.  We won't have to worry about chipping either so it was a nice, inexpensive solution to a problem.  We are likely the only ones that will know the original drip bowls were grey porcelain anyway.  Renters want things clean, neat and tidy even though some renters don't leave our home in the same condition they found it.  At any rate, I think the solution looks nice while being practical.

cleaning out the storage compartment
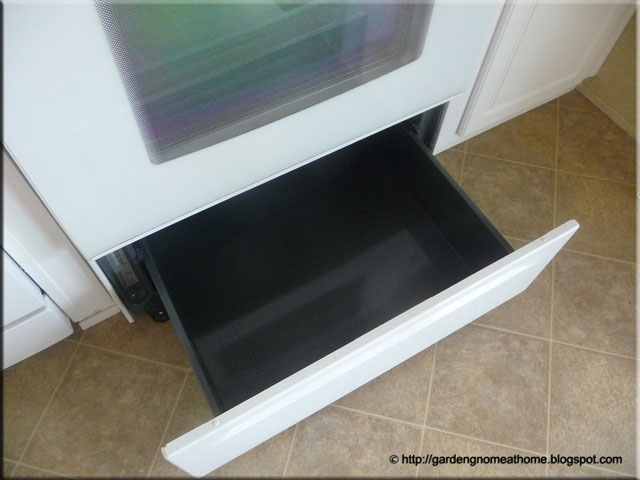
Many ranges have storage drawers underneath the over that are suitable for baking sheets and that type of thing.  I've only had one stove (JennAir down draft) that didn't have a storage drawer.  Storage drawers are another overlooked area for cleaning.  Yet they can get drips and crumbs in them from regular cooking. It is an area that should be regularly wiped down whenever cleaning the stove.

When we closed up our vacation home in December 2011, that storage drawer was squeaky clean along with anything that was in it.  I had to wash all the baking sheets and bakeware then vacuum out the storage drawer before washing it.  Once the storage drawer was dried, I gave it a good spray of rubbing alcohol to kill any remaining germs while seriously curing out the last renters.

a bit of rusting on the storage drawer
As I was cleaning I noticed a ridge of rusting on the inside of the storage drawer front.  Florida is moist and humid so that means potential moisture problems including rusting and mould that can happen very quickly.  Moisture problems can cause a significant amount of damage in a very short period of time.  That means you always have to be on the outlook for any signs of moisture damage.  We always leave the AC set to control any moisture when we aren't there.  The problem is we cannot force a renter to leave the AC on if they don't want to so we have to be extra careful when checking for moisture damage.

I honestly have only seen rust on a kitchen range twice.  The first was due to oven cleaner dripping into the storage drawer resulting in a couple of blisters that started to rust in our ancient Admiral (bought in late 1980's) and the area noted at our vacation home.  I know the rust was not there when we bought the house and I don't recall seeing it in December of 2011 even though I recall cleaning the storage drawer.  I cleaned off the rust with a wire brush, washed and let the area dry well including using a blow dryer to be sure it was dried.  Then I used a Rustoleum rust guard appliance paint to repaint the surface.  I used three coats so the area is well protected.  It's on my list of things to re-check during our next visit.


Tuesday, August 21, 2012

Insinkerator® Badger® 5 (Model 5-86) Food Waste Disposal

I recently wrote about our new gaburator aka food waste disposal.    It is an Insinkerator® Badger® 5 (Model 5-86) half HP unit that was bought on sale and installed as a DIY project.  We have had food waste disposal units in two of our owned homes as well as our vacation home.  A food waste disposal is a wonderful asset when doing a lot of cooking and home canning especially in an urban setting.  Don't get me wrong as a food disposal unit is not meant to see how much food you can put down it, it is meant as a tool to help you manage kitchen waste. 

food waste disposal installed
It took about two hours for my husband to install the food waste disposal.  He had to run wiring for the switch, cut into the existing plumbing then reconnect the sinks and dishwasher.  It was fairly straight forward with no real problems other than having to go to the hardware store for a part he needed.

As you can see, the food waste disposal does take up a bit of room in the cabinet under the sink but really it isn't too bad.  There is still plenty of room for storage.  I don't keep a lot under the sink to begin with.

The garbage bin is part of a recycling series of bins available at Home Hardware.  The flip lids are colour coded as to the type of recycle material to put in.  We only had room for the one bin which is fine as our larger recycle bins are in the attached garage just off the landing.  The food waste disposal in combination with the compost bin, black box and blue box has reduced our actual waste that goes to the curb to mainly packaging that can't be recycled and bones.  The larger bones go to our friend's dog so at least they don't go into the waste.

I processed 10 dozen ears of corn shortly after the food waste disposal was installed so it wasn't a good week to judge our waste reduction.  Still we didn't have a full pail of garbage at the curb which was down from our normal but in fairness we are still unpacking and decluttering so there is a bit more waste than normal.  Last week I did a bushel of peaches and started tomatoes.  I put out less than a full kitchen bag of actual waste to the curb for this morning's waste collection.  I still want to reduce further.  More on that to come...

Garden Gnome
©2006-2012


Wednesday, July 25, 2012

New Garburator aka Food Waste Disposal Installed

My husband installed the new garburator (food waste disposal) today.  It is an Insikerator® Badger® 5 that we bought on sale and installed as a DIY project.  I did take a couple of pictures but really all they show it it installed.  The installation was problem free taking only a couple of hours.  This is a half HP unit, that will more than satisfy our needs.

We wanted a garburator as we have had them in the past.  Even though they do use electricity they are an eco-friendly alternative to transporting food waste to landfills if you have that option.  They cover any excess food waste during the busiest home canning season that cannot easily be added to the home compost bin.  Garburators are great for disposing of leftover table scraps and plate scrapings that cannot easily be used in another dish and they will handle meats bits, fatty foods and bones as well. 

Our goal is to reduce our household waste to under one kitchen garbage bag of actual waste per month.  Between the compost bin and [trust me in an urban setting we would produce way too much compost] the garburator we should essentially have no smelly garbage at all.  That means if we miss a week or two of curbside waste collection or forget to put it out before an extended stay at our vacation home, any garbage in the garage is not going to attract rodents or other wildlife and it won't smell.  I am really looking forward to odour free household waste!

Garden Gnome
©2006-2012


Wednesday, June 27, 2012

Lock Those Windows to Reduce Air Infiltration

Our first home was a duplex with fairly decent windows then we bought our turn of the century home.  It had old wood windows with no locks on them and storm windows to make them a bit more energy efficient.  By storm windows, I mean storm windows.  We took the glass storms off when the nicer weather hit, replacing them with screens and visa versa when the cooler weather hit.  Now this was the way it was when I was growing up so I thought that was the norm.  We lived there for eleven years, tolerating all of the drafts.  When we bought our next house, a back-split in a nice subdivision, I discovered windows don't need to be drafty.  Fast forward to this house, built in 1994.  The windows have built-in locks.

Window locks are more than providing security.  I have a lot of problems with my ears so aside of the intense itching, certain noises seriously hurt my ears and they don't have to be loud either.  Think, the low hum of the refrigerator or that low whistling of air coming in a window just cracked open.  Shortly after moving in, we had the AC on and all the windows shut.  I could hear a whistling that almost drove me nuts trying to find where it was coming from.  Eventually I tracked it down to our bedroom where we had shut but not locked the window.  What was happening is the AC was causing a small amount of air to be sucked in that window.  I locked the window and the noise went away.  Most would not ever have noticed the slight whistle but because my ears are so sensitive, I noticed it. 

Locking your windows when using your HVAC system saves you money.  The lock pulls the window tighter, creating a more effective seal preventing air leakage or air infiltration.  If your windows do not have locks and they should for security purposes, it is quite an easy and inexpensive DIY project.  So do take advantage of window locks to help save a bit of energy and money using your HVAC system.

Garden Gnome
©2006-2012


Sunday, June 24, 2012

Ten Home Improvements That Reduce Air Conditioning Costs

There is no doubt about it, the cost of electricity is continuing to climb.  We now have TOU pricing with the highest rate falling between 11 AM and 5 PM from May 1 to October 31.  Unfortunately, this covers the hottest time of the day (12 PM to 4 PM) precisely when air conditioning is needed the most.  There are several low to moderate cost home improvements that can help reduce your air conditioning costs.  Here are a few of them:

  1. If your HVAC is older than 20 years the recommendation is to replace it with new, energy efficient models that use less electricity.  There are grants available in Ontario to help offset the cost of replacement if doing both at the same time. (about $7,000 to $15,000)
  2. If your furnace is working fine and under 20 years old, you can replace the AC unit only. (about $2,000 to $3,000, professionally installed)
  3. If your HVAC is newer than 20 years old but has the older style blower motor, it is possible to replace the motor with a new, energy efficient one that uses less electricity. (about $100 to $350, DIY)  Savings on this replace will be about $500 per year.
  4. Plant shade trees strategically to help shade the house.  (about $50 to $1,000 depending on size of tree).  Larger trees will need a backhoe to plant them (about $200 for one man, 2 hours labour)
  5. Plant non-invasive flowering vines (eg. clematis, climbing roses) on trellises on the east and west walls of your home.  (about $50 per trellis, $15 per plant) This will help shade the walls keeping the interior of your house cooler.  Do not plant invasive or damaging vines like English ivy or Trumpet vine on your house as both attract mosquitoes and spiders.  Both damage exterior surfaces of your house and English ivy in particular attracts rodents.
  6. Install solar window film to lessen solar gain in the summer and thermal loss during the winter.  (about $300, DIY to $1,000, installed depending on number of windows and sizes).
  7. Seal your house to prevent cooled air from leaking out or hot air from entering into your home.  (about $2 per tube of caulk, DIY)  Weather strip doors and windows to prevent air leakage. (about $10 to $30 per door, $5 per window)
  8. Replacement windows can greatly reduce both your heating and cooling costs.  If you can't retrofit your windows with weather stripping, caulk or second pane of window, consider replacing them with energy efficient, double or triple pane windows.  Whole house window replacement (about $3,000 to $5,000) can be a DIY project or you have have them professionally installed usually in one day.  
  9. Install awnings on your windows and doors.  This is an age old method of shading windows and doors.  They can be wood, aluminum or fabric and some are retractable.  You can install them on all your windows if you want a uniform look although awnings installed on north facing windows will make those rooms considerably darker, or install just on problem windows and doors like an south, east or west facing patio door.  Not only does an awning installed on a patio door shade the room indoors, it creates a shaded outdoor sitting area as well.  (about $200 per window depending on size)
  10. Install a seasonal gazebo off your patio doors.  This will shade the patio giving you a nice outdoor dining or sitting area while also shading the interior of the room.  (about $400, DIY)
Garden Gnome
©2006-2012


Tuesday, May 1, 2012

Genie SilentMax 1000 Garage Door Opener

We had a garage door opener on the detached garages at our last three homes.  There was a garage door opener at our new house when we bought it last September.  A garage door is more than a simple convenience especially for homes with attached garages where it becomes a security feature.  Garages are a common target for thieves looking for power tools or other quick, grab and run items.  An attached garage allows a thief to gain entry into your house under the cover of the garage itself.  The thief can actually take their time breaking into your home because they can't be seen by others in your neighbourhood.  A garage door opener prevents the garage door from being manually opened from the exterior of the garage, adding that extra bit of security in addition to ensuring the garage door is always locked when closed. 

old Chamberlain 1/2 HP garage door opener
Our new home has an attached garage with the main garage door for vehicle entry, an exterior door to the backyard and an entrance door into the house.  Both doors have locking handsets and dead bolts that were replaced when we removed in.  The only ones with keys to either door and the rest of the house for that matter are the ones we have given keys to.

The existing garage door opener was a Chamberlain 1/2 HP The Protractor System (chain driven).  It worked fairly well when we first moved in but then started acting up once the weather turned cold.  When the garage door failed to work we thought a piece of ice had frozen to the chain drive.  We unplugged the unit and let it sit until a warmer day but the garage door opener refused to work.  Our solution was to replace the garage door.

new Genie 3/4 HP garage door opener
This house has really been about being at the right place at the right time.  In this case it was a sale at Canadian Tire that came right when we needed it.  We bought the Genie SilentMax 1000 (Model 3042) belt driven garage door opener that was on sale for $189.99 plus GST/HST.  The regular price was $369.99.  This garage door opener has a lot of nice features like Intellicode®2  which encrypts the access code and continuously changes it each time the remote is used with the garage door opener responding to each new code only once.  It has Sure-Lock™ and is HomeLink®/Car2U® compatible as well as Watch Dog™ Monitoring System that monitors the Safe-T-Beam system to ensure proper functionality that will automatically stop and reverse a closing door if a problem is detected.

Installing a garage door opener is a DIY project and it is a bit easier if there was a garage door already installed.  The old opener is removed, the new one installed in its place using the same wiring.  We did not install the garage door opener as my husband was extremely busy at the office so our friend and crew who is doing our custom work, installed it for us.

Genie garage door opener installed
The Genie is belt driven.  Unlike the Chamberlain garage door opener that was loud enough to wake me, the Genie cannot be heard in the master bedroom.  In fact, it can barely be heard in the upper living room just off the entrance landing leading to the garage.  The garage door can be opened using the new keypad outside, the on wall console in the garage or via the remote controls.  We have HomeLink® in one of our vehicles but haven't programmed it yet.

Over all the install was problem-free and straight forward.  We are quite pleased with the results.  As you can see, the garage ceiling needs a bit of work but that will be a summer or fall  project once we get the indoor work finished.

Garden Gnome
©2006-2012


Tuesday, March 20, 2012

Introducing Simple Solutions

Last week I posted a simple solution.  Quite often in homemaking and decorating, simple and inexpensive solutions are all that is needed to make your home a bit more comfortable.  I'm tagging these under the label of simple solutions.  For the most part, these simple solutions are inexpensive and easy DIY projects designed to solve those little, irritating and nagging problems faced by homemakers.  Please watch that label for new posts.

Garden Gnome
©2006-2012


Monday, January 30, 2012

Nixing the Smell of Paint

I tend to use acrylic laytex paint whenever possible.  While this paint is not as low odour as the newer eco-friendly paints with no VOCs, it has a lot lower odour than oil based enamel paints.  I have extensive experience with the acrylic laytex paints, limited experiences with enamel paints and no experience with the eco-friendly paints.  My winter project is painting every room in the house and given my druthers I would have tried the eco-friendly paints except my local Home Hardware has had no feedback at all on these paints other than they are not selling well.  So I went with the tried and true Beautitone acrylic laytex paint.

Acrylic laytex paints are wonderful to work with and they are easy to clean-up but there is still a smell.  Unfortunately the odour can bother those like me with sinus and asthma, more so when the windows can't be opened to rid the house of the odour.  I use two techniques to help rid the house of acrylic latex paint odour:

  • exhaust fans - An exhaust fan can be quite beneficial in removing odour from painting.  This can be quite effective at removing odour during the painting process.  The downside to using exhaust fans is they suck out the heat along with the odour.  
  • a bowl of vinegar - A bowl of white vinegar neutralizes the paint odour.  Place a bowl with about an inch of white vinegar in the room while painting and leave it there a couple of days.  It really does help.

Garden Gnome
©2006-2012


Sunday, January 29, 2012

Problems with Red Paint

I have spent the last couple of weeks getting close and personal with paint.  My winter project is to paint the entire interior of our new home.  The main bathroom was first and is completed with the exception of the custom made trim for the tub recess.  Last Monday I started the kitchen that was originally supposed to be a pale taupe but thanks to my husband is now the same colour as our dinnerware, a deep and rich burgundy.  After almost a full week of working on the kitchen, I'm exhausted.  The room is turning out to be absolutely gorgeous (pictures to come shortly) but talk about a major pain in the keester!  The real problem lies with the red paint itself.

Paints colours are mixed in a base of clear, white, medium or dark.  Now the bathroom, a pale taupe mixed in a base of white covered nicely in two coats.  The burgundy in the kitchen was mixed in a base of clear.  The result was a thinner paint taking three coats to cover.  Red in general when it comes to paint is just a royal pain.  It needs a grey base coat primer if going over lighter colours and don't even think about skipping the primer unless you want to paint the walls about ten times.  It really is not a good choice of colour for any area that will receive a lot of light as for some reason the red pigment is very, very prone to fading.  Getting a nice, clean line is almost enough to pull your hair out as well.  So a room that should technically have taken two days has taken me six days and there is still another two good days of work in the kitchen putting me a bit behind schedule for my winter project.  Knowing how DIY projects go that two days will stretch out to four days.

Garden Gnome
©2006-2012