What does a Garden Gnome do when she is not gardening, in the kitchen or doing genealogy? Well the answer might just surprise you so read the entries to find out more. This blog focuses on everything we do to make our house a home. There will be a strong emphasis on home energy efficiency and do-it-yourself (DIY) projects. At the same time there will also be crafts, knitting and crocheting projects along with any other little tips we do to create that down to earth, I want to be here home. Please enjoy your visit :)


Showing posts with label decor. Show all posts

Thursday, January 8, 2015

Picking A Colour for the Greatroom

paint chips
Paint Chips

We are home now and the holidays are over so it is time to turn our attention to getting a bit of decorating done.  We had deep crown moulding installed in the entrance, greatroom and hallway back in November before we returned to our vacation home. The crown moulding still needs painting.  I'm rather partial to a pale grey for the walls with white trim.  I'm currently looking for just the right grey.

I brought paint chip samples home to see how they would look in the intended rooms.  These are Behr paint chips but our Home Hardware does colour match so can mix to Behr paint chips.  The one that I was immediately attracted to in the store (second from left) has a bit too much blue tone while the far right one has a green tone.  The second chip from the bottom of the far left sample is close to what I want but not quite. 

I'm planning on doing the painting prep work next week so that gives me the weekend to find a paint colour.  This will be a big project but the walls are in excellent conditions so there isn't a lot of repair work to do.  We will be replacing the doors in the hallway, the door trim and baseboard as well.  This should be a fun project!


Monday, November 3, 2014

Crown Moulding in Greatroom

Newer homes often have boxy rooms devoid of interesting details as seen in older homes.   These types of details include wainscotting, deep baseboards and trim.  They are easy, relatively low cost upgrades that can be selling features later.  Ever since moving into our home in 2011, we have been customizing to give the house more character.  As a result we have done a fair amount of custom finishing work.  Today, our friend was out to install deep crown moulding in the greatroom, hallway and entrance. 

crown molding in great room
Originally there was a plain border painted a slightly darker colour than the walls bordering the ceiling of the greatroom, hallway and entrance.  I really didn't like it but felt that simply painting this strip white would not give the areas that extra detail I was looking for.  Finally, I decided that a deep crown molding would give me the look I wanted.

Crown moulding is available in a wide range of finishes, depths and contours.  It can be plain, elaborate or combined with other trim for a completely custom look.  Our friend chose a primed white MDF deep enough to cover the painted strip on the ceiling.  The depth from ceiling to bottom of the crown moulding is six inches.

Crown moulding can be tedious to install simply due to the necessary miter joints.  Once the moulding is installed, the joints and nail holes are filled with Dap (a paintable filling compound).  At the end of the day, the greatroom and hallway had a brand new look.  The trim on door to the attic (top picture) was replaced with a thin white MDF trim.  Once the rest of the door is painted, it will blend in with the ceiling better.  I am very pleased with the results!  The crown moulding reinforces my plans to replace the slab doors, door trim and baseboards so this really is just the start of the make-over.  I'm thinking a pale dove grey for the walls, white trim and doors, and glass knobs on the new doors.  There is still a lot to do!


Monday, January 6, 2014

Custom Built Display Unit

The selling feature for this house when we bought it in 2010 aside of location was the complete absence of carpeting.  We had looked at several houses but this was the only one with no carpeting, something we have been wanting for a very long time!  We were rather pleased with the colours too.  What the house was really lacking was a bit of character.  All of the rooms were still very much painted boxes.  Mind you they were nice boxes, but boxes just the same with no updated trim or custom features to make them a bit unique.  So we decided to add custom built updates and trim.

The lower level opens into a large main space divided by floor (ceramic tile, laminate) and ceiling (textured, smooth) treatments but otherwise is one room.  We are using it as a games room so there are two custom built poker tables and a wood table that seat 22.  There is additional chairs to seat up to 30.  To the middle left of the picture out of camera range is a small room, initially a bedroom.  The hallway (starting edge of display unit middle left) leads to the large pantry (formerly a bedroom), lower bathroom and outdoors.  The door just barely visible (lower right corner) is the dry bar/laundry.

custom built display unit
One of our friends is a very accomplished woodworker.  He is doing all of our custom work for us like this beautiful display unit.  The floor to ceiling display unit was built to include room for our retro jukebox along with shelving for my husband's record collection and some of his sports collection.  The display unit spans the entire length of the wall from dry bar/laundry door to hallway entry. 

My husband loves his custom display unit.  It really is the feature wall in the games room!  As far as price goes, custom built is always more expensive than something store bought but it is unique and designed to meet a particular need so well worth the extra money spent.  Unfortunately, if we ever decide to sell the house, the display unit would have to stay with the house.  It would be a selling feature and does increase the value of our house.


Monday, July 22, 2013

Master Bedroom Blanket Update

One of the things I like so much about knitting and crocheting is it is quite easy to get that custom look for your decor.  Each project is unique!  It would have been so easy to just go out and buy a nice bedspread for our new king size bed but I wanted something special that only handmade would offer.  Given the size of planned blanket, I knew this was going to be a challenging project.  I chose a design by called the Wendy blanket then paid for the pattern.  What I paid for was actually the design as there really is no pattern other than a basic granny square.  I was very disappointed in what I did paid for since I could easily have duplicated the 'design' simply from pictures.  She did not include any pertinent details other than to start with a large granny square followed by alternating bands of small granny squares and rows.  At any rate, I developed my own style for this blanket.  Overall I will be pleased to share my results as to how I did certain steps in working the blanket, especially the joining and working corner joints, once the blanket is completed.

master bedroom blanket progress very close to covering the top of our king size bed
I've made a bit of progress on the master bedroom blanket.  The last time I updated was at the end of the eight rows following the second small granny square row.  At that time the blanket measured 57 inches square.  The blanket now measures 73 inches square just shy of covering the entire top of our king size bed.  Each small granny square row or band of eight rows adds about 4 inches.  Adding another band of small granny squares followed by a band of eight rows should give a measurement of 89 inches.  I need a total of 96 inches to include the depth of the mattress.  This means I can add a three to three and a half inch border to the blanket as a finishing touch.  I have been looking at various borders but haven't decided on anything yet. 

small granny squares in process of being made for fourth small granny squares row
I am currently working on the 60 small granny squares for the fourth small granny square band.  The joining row for these squares will be aran, the lightest colour in the blanket.

I normally work all the centres of the granny square first, followed by all the second rows and finally the third rows, putting them into stacks as I go.  In this case I would end up with stacks of squares in various stages of completion.  I changed that method for this set of granny squares, completing all three rows before starting the next square.  For this type of project, the first method is easiest if crocheting the squares on the go.  The method I am using is easier if the crocheting is not mobile but in all honesty either method works.  It is more of a personal preference.

I hope to have the blanket completed in the next couple of weeks.  It is slower going especially with all the distractions of summer but I am making a bit of progress each day.  I'm getting exciting as the blanket nears completion.  Even though it has only been a few months working on the blanket, it seems longer.  Stay tuned for the finished blanket results. 


Friday, May 3, 2013

The Master Bedroom Bedding Thus Far

In anticipation of the arrival of our new bedroom furniture, I did a bit of shopping for bedroom accessories. Well, in hindsight I should have made different choices but at least the lamps and yarn for the new crocheted bedspread in progress were spot on.  Unfortunately, a couple of the purchases did not work out as planned which means back to the drawing board.  In the meantime, the bedding is usable.

the lighthouse quilt
My husband is funny about quilts.  Years ago before we finished having kids, I splurged on a beautiful handmade quilt to replace my childhood handmade quilt that he so loved.  It had more than seen better days.  Thirty years later and the quilt I splurged on is as close to being a rag as it can get although I am considering salvaging the top to have it re-quilted if possible.  My husband bought the lighthouse quilt about five years ago.  It matched the theme of our previous house along with the navy blue bedding including dust ruffle. While the lighthouse quilt actually matches the room nicely with all the colours from my colour theme appearing, it does not match the curtains that have a fair amount of yellow tones in them along with more of a tropical theme than a nautical one.  However, my husband insists on having this quilt which is fine as it will be covered with a plain quilt then the crocheted bedspread.

temporary bedding layout
The taupe 1,200 thread count bedsheets fit perfectly, matching the planned colour scheme.  However, my husband does not like the feel of them.  He claims they are too soft!  He likes the red set, as shown on two of the pillows.  It is a harsher feeling set likely an 800 thread count.  So, I'm back to shopping for taupe sheets.  I knew the duvet (foot of bed) would not fit as it is queen size but put it there to see if we wanted anything there or not.  It's a nice look for winter but a lot will depend on how the crocheted bedspread looks when it is finished.

I'm just playing with pillow arrangements.  The two back (taupe) pillows are the new king size pillows.  The two middle (red) are queen size as is the blue striped one.  The three smaller cushions were a real bargain bought for the inside not the ivory removable covering.  I wanted pillow forms to cover in crochet to match the bedspread.  Pillow forms for that size are $7.99 each but I found the cushions at Jysk (a bed, bath, home store) for $2.99 so bought them to cover in crochet.  I'm still tinkering with the pillows.  At any rate, I need to buy two more king size pillows.  So, the room is still only partly finished.


Thursday, May 2, 2013

The New Master Bedroom Furniture!

Our new master bedroom is from Vaughan-Bassett's  Reflections Furniture Collection.  It consists of a king size sleigh storage bed, two nightstands and triple dresser (7 drawers) with mirror in a dark cherry finish.   The two bottom drawers of the triple dresser and the drawers in the sleigh bed have cedar bottoms.  The style is classic luxury with an air of regal splendor.  This furniture will really look quite lovely in the master bedroom!  A five drawer chest (41" W x 19" D x 57" H) is available but we decided to wait and see if we could fit in another piece if needed later.   

setting up the new bed frame in master bedroom
We chose a storage bed because it would give us storage to replace some of what we would be losing by eliminating the highboy.  The sleigh storage bed is set up in much the same way as a waterbed.  The frame is set up first and because the frame is both large and heavy, it is positioned where desired first.  Once the main side rails are attached to the headboard and foot board, a wood centre support T is placed on the floor beneath where the slats will be attached.  The slats that are attached to two material bands are pulled out from the foot of the bed to the head.  Each slat is then securely screwed into the side rails.  The mattress rests on the slats, eliminating the need for a separate box spring.

master bedroom furniture set up
One of the complaints we had heard about memory foam mattresses is they were hot.  That is the last thing either of us want when sleeping!  Yet the idea of a memory foam for comfort was rather appealing.  We chose a Valentino Therapedic International EcoGel® king size mattress.  This mattress offers an ideal balance of comfort and support.  The soy-based gel memory foam reduces pressure points while keeping you cool. 

The set-up of the furniture took about an hour and a half.  The delivery men moved the old highboy downstairs, moved the queen bed set and frame into the guest room and set it up, and did the complete set-up of the master bedroom furniture.  Once the set-up was complete, we had to dust the furniture then it was time to make the bed.  Of note, this bed is high.  The top of the mattress is 30½" - inches from the floor.  The furniture does fill the room nicely so we are glad we didn't buy the chest at the same time.  I don't think we really have room for it.  The picture really doesn't do the furniture justice as it is quite impressive!


Wednesday, May 1, 2013

The Final Master Bedroom Prep on Day of Furniture Arrival

We have dealt with a small Mom & Pop furniture and appliance store for decades.  We did not hesitate to buy our new bedroom furniture from them.  They are very, very good to deal with.  The only downside is on some items like our bedroom furniture is, they have to order it in which takes time.  While the time frame is usually two to three weeks, delays can happen and that was the case with our bedroom furniture.  We received the call on Wednesday (April 24, 2013) that they would be delivering our furniture that Friday.   It was time for the final prep of the room.

east wall mainly cleared except for bed
Most of the master bedroom had been cleaned out.  We moved our triple dresser to the guest room and the two chairs to the games room.  The highboy was cleaned out ready for the delivery men to move it downstairs for us. The delivery men are really good!  The move the old furniture, bring in the new furniture and set up both.  They take away old furniture and appliances if desired and they remove any packaging the new furniture came in.

That morning, I stripped the bed then just covered it with the duvet to keep any dust off the mattress until they arrived.  I removed everything from the make shift night stands then stacked the baskets in the corner.  The lettering on the east wall was rather easy to remove by simply peeling off.  I was surprised that it did not leave any marks at all, not bad for a quick bit of personality from the dollar store!

west wall cleared
The sewing machine and antique trunk remained in the room.  At this time, I turned my attention to the floor.  I did a good sweeping and oh my gosh, true to form the dust was bad (more on that in a later post) even though the floors are dusted daily.  After sweeping, I dry dusted the floor.  I was going to wash the entire floor but instead, washed just where the bed was going.  I knew the deliverymen would have their shoes on so decided that washing the floor after the install would be a better option.  After taking this picture, I decided to move the sewing machine in front of the closet doors just to give them extra room for bringing in the new furniture.  With that, there was nothing left to do in the room until the delivery men arrived.


Sunday, April 28, 2013

Progress on the Master Bedroom Crocheted Blanket

Work continues on the master bedroom crocheted blanket.  I'm tempted to call it a bedspread as that is what it really will be given the finished size.  This blanket is a lot of work but it is coming together nicely.  I won't have it finished before the furniture arrives.  The way it is going, I will likely be working on it for a couple more weeks or more but that's ok.  When the blanket is finished, it will really offset the classic beauty of our new furniture!

master bedroom crochet now measuring 57 inches square
This picture was taken on Day 20 (Friday, April 26, 2013) of working on the blanket just after finishing the third band of small granny squares.  The blanket now measures 57 - inches square, a little over half of the planned 98 - inches for the finished blanket.  This is sized to fit our new bed with extra deep mattress.  The picture was taken on top of the queen sized bed that is being moved into the guest room.

I was rather excited as I took this picture.  The furniture was scheduled to arrive just after 4 PM that day.  I had stripped the room of everything except the bed, highboy dresser, antique trunk, sewing machine, the two wicker baskets and unused satellite tv box.   The bed had been completely stripped down with just the duvet in place for the photo shoot.

Next up, the make-over - both ups and downs...


Thursday, April 18, 2013

Working on the Master Bedroom Accessories

Earlier this month I wrote about starting the master bedroom make-over.  The plans were to keep the sage green colour of the walls and work from that bringing in the rest of the colours for our home.  The colours are cool taupe, green, deep burgundy, white, black and grey with lots of wood tones to warm and tie the colours together.  We ordered new bedroom furniture that was expected to arrive three weeks from the purchase date but it hasn't yet.  The Mom & Pop furniture store we have dealt with for years told us yesterday that the furniture would be in tomorrow or Monday so they would call to arrange a time for delivery.  During this time, we did most of the prep work like move our triple dresser into the guest room as our kid who was going to take it and the high boy decided it was too big.  We worked on purging some of our clothes and I started shopping for accessories.

master bedroom quilt set, sheet set and yarn
I'm not the type to go out and buy all the accessories for a room at once.  Rather, I like to build on my ideas waiting to find just the right item to fulfill that idea.  The new king size bed frame is a storage sleigh bed.  I immediately decided that a homemade blanket would be ideal, bringing in a bit of old fashion country charm.  I bought 4 skeins of Red Heart Super Saver yarn - medium thyme, cornmeal, buff, aran - all colours found in the new master bedroom curtains.  I wanted a plain quilt for under the new blanket that would allow the blanket to become the focal point.  It was a fluke that I found a king size quilt set (quilt, two pillow shams) at a bargain price that would work perfectly.  A few days later I found a  six piece king size bed sheet set in taupe accented with an embroidery scroll design.  Finally, I found two clear raised coasters that I think are meant for pillar candles but will be used for our drink bottles on the night stands.

master bedroom king size pillows
About a week ago, we were at Sam's Club and my husband picked out a package of king size pillows for the new bed.  Serta is a good brand and the price was quite reasonable.  Pillows are one of those things that most people do not replace often enough.  I saw one recommendation that pillows should be replaced every 3 months but I think that could be extended if you put pillow protectors on the pillows.  I think we almost need to buy another set so we have one set for the shams and one set for sleeping.  We can still use some of our existing pillows as they are fairly new as well and not used for sleeping.  I'll take the pillows we were using for sleeping to the animal shelter as they are always looking for pillows, blankets and towels.

master bedroom nightstand lights
A few days ago I found bedside lamps.  They were mix and match in that the pieces were bought separately.  I chose a brush stainless steel finish for the lamp base which was a very easy way to introduce grey into the bedroom.  The A-line shape shades are a medium light taupe material with just a hint of sheen, accented with stitched scrolls imitating the scroll embroidery on the bedsheets.  I think they will look quite nice with the darker wood tone of the new furniture.

We aren't sure whether the sewing machine cabinet the lamps are temporarily sitting on will be staying in the master bedroom.  We may have to take out the antique trunk as well.  I'm hoping the trunk can stay as it would look quite nice with the new furniture.
 
master bedroom crochet blanket in progress
I actually saw a bedspread called a Wendy blanket after the designer.  I knew I just had to make it but only wanted to use four colours not the seventeen she had used.  I bought the pattern on Ravelry and talk about a disappointment!  The only part that could be considered a pattern was how to do the first four rows of a granny square, of which those instructions are widely available for free from numerous resources.  The rest was simply how she arranged the granny squares. There were no details for anything else other than number of small granny squares and number of plain granny rows between the squares.  I ended up doing several ripouts and some of them rather large ones.  The so called pattern was basically useless.  How she could justify charging someone for the instructions on how to work four rows of a granny square is beyond me!   So I am writing up a full pattern for the blanket as I work complete with the actual way I put my design together, including the method I used for that first granny row after the small granny squares.  The small granny squares are worked up to the last row then that row is created using the join as you go method to form the band of small granny squares.  

This is day 12 of working on the blanket and now that I am using my own methods, the work is progressing nicely as pictured.  The piece is on top of a queen size bed (60" x 80") to give a bit of perspective as to its size.  The piece is currently 46 inches square, a little over half of the size I want it to be to cover a king size bed 76" x 80".  I will be working the piece to at least 80" but perhaps a bit larger.  I'm currently working on the next band of small granny squares (a total of 44).  I found an online tool that helps with randomly generating the colour pattern.

My initial goal was to have the blanket completed by the time the furniture arrived.  Between the ripouts and other demands, progress has slowed somewhat.  The piece is getting increasingly cumbersome and heavy to work on. I know it won't be finished by the first of the week but it shouldn't take too long with any luck.  I'll post more on my blanket later.  I think the blanket will end up being a focal piece in the room.

Working a bit of navy blue and burgundy into the room is going to be a challenge.  I'm not sure how I will do it but I'm sure something will come to mind.  At least we are getting a bit closer to finishing the master bedroom makeover.  Once the furniture is set up, things will come together rather quickly!


Saturday, April 6, 2013

Continuing With the Guestroom Make-over

When we bought this bi-level house in 2011, we immediately knew we would not be using the five bedrooms as bedrooms.  The three upper level bedrooms were destined to be master bedroom, guest room and home office.  The two lower level bedrooms were to be a walk in pantry and a dart room/den off the main games room.  The pantry is to the right of the den, across from the lower bathroom off the hallway leading from the games room to the outer walk-out.  We plan on putting a fouton in that room to double as addition guest sleeping space if needed.

We actually liked the various taupes in the house even if they did mix warm with cool tones.  Most of the taupes will be repainted in similar colours but in cool tones, letting the strong wood tones warm the rooms for a balanced feeling.  My colour choices for this house are deep burgundy, taupe, olive green, black and white.  I have to work in navy blue as well since our couch set is navy blue leather but that can be done through accent pieces.  Green is not difficult to work in given my love of plants.  Within these main colours there is a wide range of colours to work with so I'm not having too much of a problem starting to coordinate the rooms.  The upper bathroom floor tile is hunter green with greyish and light green marbling. 

new paint and curtains in guest room
The guestroom is at the end of the upper hallway with a north facing window.  The small wall with the framed needlepoint (windmill) done by my mother-in-law is the end wall of the closet in the master bedroom.  This forms a small, fairly useless entryway into the room.  The main room is 11' x 11' which isn't too bad of a size.  While the rest of the house was fairly neutral in various shades of taupe in most of the rooms, the upper bathroom was a horrid peach including the ceiling and the guestroom had obviously been a little girl's room.  The window wall and door wall were shocking pink.  The small wall and entrance were an almost neon blue and the far west wall by the chair was a neon yellowish green.  Running along the top corner where the chair is were coordinating circle stickers.  The bar light bulb was covered with a huge paper globe (likely a dollar store find) that had been decorated with drizzles of the shocking pink paint.  This room took two full coats of primer followed by two coats of paint just to cover those colours!  I used Beautihome semi-gloss colour ND044 which is the cool greyish blue, more grey colour of the marbling in the upper level bathroom floor.

As you can see, an air mattress  on a metal frame has taken the place of an actual bed in the guestroom for the past 18 months.  We were taking it down after each use to give the grandkids more room to play.  This worked well because we don't have a lot of overnight guests, mainly a couple of our kids with the grandkids who are still fairly small.  The guestroom is used primarily for the grandkids to play in with a ready bed if they want a nap which doesn't happen very often!  The air mattress is deflated for storage now so we can move our queen size bed into the guest room.  The air mattress will still serve as extra sleeping if needed, likely set up temporarily in the games room

There was no window treatment other than a curtain rod left in the guestroom.  I improvised with a cloth shower curtain until we found the Elsinor ring top panels at the fabric shop going out of business.  They are outdoor panels that are fade and water resistant.  They have a flowery print in black outline with red outline leaf accents on a creamy white background so they have three of my colours and match nicely with the room.  Clearly I need to add mini blinds behind them as well to block a bit more light when needed.

guestroom entrance and closet
This wall is at the end of the upper hallway with our bedroom door to the left and the home office sharing the wall on the other side.  There is a nice size but not over large closet that currently needs purging.  The dresser holds kids crafts in the top drawer and some of my yarn stash in the other four drawers.  The yarn drawers are stuffed!  There are a few projects on the go on top of the dresser.  The floor lamp needs to be worked into our home somewhere.  It along with two table lamps were custom made for us by a very dear friend shortly after we bought our second house.  The wood is covered with a special coating that gives the pieces an intense shine and depth.

I put two shelf units in the guestroom to house some of my book collection along with toys and books  for the grandkids.  There is enough floor space for them to play with the Lego bin but we will lose a bit of floor space with the larger bed.  I have the yarn ready to start the crocheted blanket for the bed to bring in a homey feel.  We are planning on upgrading the wood trim for the entire upper level which will change the look including the guestroom and home office closets.  The master bedroom trim has already been upgraded but even that may change. 

Within the next couple of weeks the guestroom will be closer to completion.  There aren't a lot of accessories to buy but I do need to find a light fixture and shade for the floor lamp.  We haven't decided on the bed placement yet but I have a couple of ideas including using the bookshelves to create a headboard.  I will likely buy a new quilt and pillow sham set as well.  Off to do a bit of shopping...


Friday, April 5, 2013

Starting Our Master Bedroom Make-over

This year, my husband and I will celebrate our 36th wedding anniversary.  During that time we have made seventeen moves, raised a larger family and owned our last six houses as well as buying a vacation home.  Our bedroom has traditionally always been the last room in the house to have anything done to it.  We were more concerned about kids' bedrooms and creating comfortable family living space than we were about turning our bedroom into a show room.  As long as our bedroom was clean and tidy, we were happy.  Occasionally, I would splurge on a matching set of bedsheets but quite frankly even matching sheets were not a high priority.

We bought our first bedroom furniture in 1979.  It consisted of a queen size mattress, box springs, headboard, triple dresser, highboy and one night stand.  The queen size mattress and box spring never made the trip out west with us.  Instead we bought a king size waterbed.  I can't remember if we left the headboard out west or not but somewhere in all the moves it went missing.  When we moved back to Ontario, we bought a queen size waterbed that we had up until about 5 years ago.   The mattress sprung a leak just after we got into bed to get a couple of hours of sleep before heading out in the wee hours of the morning for Las Vegas.  Needless to say, we got no sleep! Both waterbeds had wood shelves that sat on the waterbed frame to be used as small bedside tables.  They were large enough for a water bottle and a couple of small items but not large enough to have a small lamp.

We just bought a new king size mattress, a Vaughan-Basset sleigh bed with under bed storage, matching triple dresser with mirror and two night stands from our favourite Mom & Pop local furniture shop.  We have dealt with them for years!  Looking back we have bought dining room table set, kitchen bar set, HE washer & dryer, mattress & box springs, gas range, chest freezer, two dishwashers, a side-by-side refrigerator and now our new bedroom furniture from them so that says something about our loyalty in dealing with local folk who really have become friends over the years.  Unlike larger box furniture stores that have a fair amount of warehouse space, this small shop tends to have rather limited warehouse space.  We decided on what we wanted from the floor display then they ordered it in for us with an expected delivery date of 3 weeks from our purchase date.  The arrival date is quickly approaching!  They deliver and set up the furniture free of charge which is rather nice.   

master bedroom as seen from doorway
Our new house (built in 1994, purchased by us in 2011) is a large, five bedroom bi-level in a delightful established estate subdivision.  Of the five bedrooms, the master bedroom on the upper level is the only one being used as a regular bedroom.  The north facing smaller bedroom is being used as a guest room and the smaller west facing bedroom is now our home office.  The two lower level bedrooms are being used as a dart room/den and a pantry, respectively. 

The master bedroom is 15' x 12'3", with the north facing window on the north short wall and the head of the bed on the west long wall.  Out of camera range beside the sewing machine cabinet (lower left) there is a large floor to ceiling double bi-fold door closet (7'6"W x 8'H x 29" D). Unfortunately, the closet is stuffed so we need to do a bit of purging!  The room is painted an olive green (actually two tone) that we like so will be leaving it that colour only putting a new coat of paint to freshen the room. We have a queen size mattress and box springs on a frame that will be moving into the guestroom.  The two IKEA wicker chairs are going south to our vacation home.  We don't know whether the trunk will stay in our bedroom or not depending on how the new furniture fits.  The floor like the rest of the upper level is laminate with the exception of the kitchen that is marble tile and the bathroom that is ceramic tile. 

We knew immediately we wanted to keep the green.  A couple of weeks ago, we stopped at a fabric store that is going out of business.  They had drapery panels on sale for up to 70% off.  My husband spotted the Saratoga leaf design drapery panels and just had to have them because they reminded him of Florida.  These grommet panels are actually outdoor drapery that is fade and water resistant as well as anti mildew.  They match the room perfectly except we have to move the rod down so the panels just clear the floor.  Well, he liked that pattern so much after he saw them up, we went back for four more panels to change out the living-room burgundy drapes and V-shape valances at our vacation home, but that is another story.
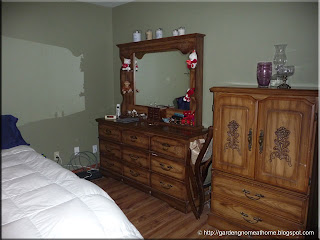
outdated master bedroom furnitureDespite the many moves, what is left of our bedroom furniture is in rather good all be it dated condition.  This was a very popular design when we bought it.  There were several variations around the same design, some plainer than others.  The little shelves on each side of the mirror that were so appealing when we bought the furniture are now viewed as dust collectors.  The top of the mirror is also a dust collector.  I normally had a couple of straw hats on top but I'm in the process of tearing the room apart.  All of the drawers have to be emptied as one of our kids is taking both pieces hopefully before our new furniture arrives.

master bedroom lighting
We did not install the halogen lighting fixture in the master bedroom.  It definitely is not a good design for any bedroom if you ask me.  The light is harsh and glaring creating odd shadows aside of not being very energy efficient.  We are replacing the lighting fixture but I'm not sure with what yet.  I have been looking since we bought the furniture but so far have not found something I like.  I am leaning towards a ceiling fan with light fixture similar to what we have in our vacation home.

I put the saying decal on the wall over the bed in lieu of a headboard shortly after we moved here knowing we were buying new furniture for the master bedroom.  This is a rather slick decal that is on a backing paper.  You position the backing paper and wording where you want it then slowly rub across each letter.  Once the letters have all been firmly rubbed, you slowly peel off the backing leaving the individual letters.  Unlike some decals, there is no clear sticker material around the letters so it looks quite nice.  The letters can be easily removed without marring the paint finish.  
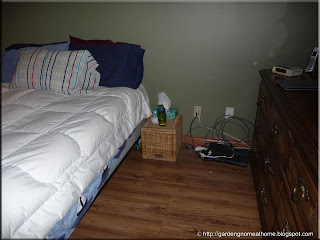
master bedroom makeshift night stands
After about our fourth year of marriage, until we bought our vacation home in 2010, we had always had a television in our bedroom.  We did not put a television in down there and don't intend to.  We had planned on putting a television in our master bedroom here, hence the satellite box on the floor.  However, even though our bedroom television is sitting in the dart room/den on the lower level not being used, and won't be used, we have no plans to put it back into the bedroom.  We are finding that we are enjoying a higher quality of sleep without the television.  If I can't sleep, I get up and make a cup of chamomile tea blend that has rosehips, valerian root, anise seed, fennel seed, caraway seed, peppermint, passion flower, lemon balm and calendula petal.  I bring it back to bed with me and sip on it while playing a hidden objects game on the iPad before drifting back to sleep.  I have found this routine works well before bedtimes so I usually sleep through the night.  At any rate, we will be removing the satellite box.

We are currently using two IKEA storage baskets turned upside down as makeshift night stands.  Originally we were going to do our bedroom first but we spent six weeks of the fall of 2011 in Florida, then almost a full 3 months spread over 3 trips in Florida in 2012.  Instead we worked on the upper level bathroom, did a lot of work in the kitchen and repainted the guest room before running out of steam in 2012.  I spent the first two months of 2013 quite sick so it was only mid-March before I started having much of an interest in the house decor aside of keeping things neat and tidy which honestly some days was all I could muster!  The weather is starting to turn so I'd like to get the master bedroom and guest room finished before we start our outside work of landscaping and decking.  There are still a few projects to do in the kitchen.

We aren't fancy people as far as wanting a showroom bedroom.  We have our colours and furniture decided so I'm working on ways to make our bedroom comfortable, inviting and co-ordinated.  In the top picture you can see a few accessories I have bought for the make-over.  I'll post more that later.  I'm planning on making crochet blanks for both the master bedroom and guestroom.  I am ready to start the guest room blanket but still need one more colour (I think) for the master bedroom blanket.  I am still shopping for bedside lamps.  The only place we have ever had bedside lamps is at our vacation home but we really enjoy them so I need to find some that match nicely for the master bedroom.  I finally took the cross-stitch wedding sampler I worked so long on to the frame it shop so that will go in the master bedroom.  I also have one of the original paintings that we collect for the master bedroom as well.  Let the make-overs begin!


Sunday, March 24, 2013

Replacing Our Kitchen Range Hood

We bought this house in September 2011.  Within the first two weeks installed a new natural gas range and replaced the dishwasher.  Then we left for our vacation home in Florida for three weeks, home long enough to do some unpacking and organizing as well as a bit of home canning then we were back to Florida for most of December.  When we returned home, I turned my attention to choosing colours for our new home and repainting a couple of rooms.  Although I had plans to repaint all the rooms before spring, that didn't happen but I did get three finished, the guest bedroom, upper level bathroom and kitchen.

The kitchen was painted a cool taupe when we bought the house.  A friend of ours is a cabinet maker and finisher so he is doing a lot of custom woodworking for us.  He make a shelf for over the sink just to the far left but visible in the last picture.  We custom matched the paint for the walls to our dinnerware thanks to our friends at Home Hardware.  Once the walls were finished, our friend built in the bulkhead and added trim around the ceiling.  We had panel curtains hung.  My husband installed a food waste disposal just in time for the busiest part of the canning year.  I home can year round but mid-May through mid-October is very busy.  The kitchen sat that way through the busy canning season and three trips to our vacation home.  I was sick most of January and February so got little done as far as painting and decorating.  That changed with March when I was once again on my feet ready to tackle a few new projects. 

old disgusting white range hood
The existing range hood was about as disgusting as you could get!  I took household ammonia to it and still could not get the thing clean.  Not only that, when the northerly winds blew there was enough draft coming in the range hood to move the panel curtains.  I removed the vent screen, covered it with tin foil then put it back into place just to keep the cold air out.  So, I went to Rona Building Centre for a replacement, identical to it except black for $49.99 that was in their flyer to find that it had been discontinued.  The search was on.

In fairness, I seldom use a range hood.  I had no range hood in our first two houses, a range hood in the third house, no range hood in the fourth but then installed the down draft system on the Jenn-Air range that was also moved to our fifth house.  I prefer the down draft system over a range hood but we bought a natural gas range for this house that doesn't have a down draft system.  Replacing the range hood, in my mind, was more a matter of aesthetics.

We were restricted as far as size both width from the cabinet width and height due to the way the ceramic tile had been installed.  We could not go to a range hood wider than 30 - inches or deeper than 6 - inches.  I saw a nice thin line model I really liked but then we would be left with a gap between the tile and the hood.  I finally decided on the Broan-NuTone HDN64 Series 30 - inch, 180 CFM 7.5 Sones range hood in black for $79.99.  Sones is the measurement of the sound level the unit produces.  At 7.5 Sones this model is considerably louder than some higher end models that produce only 0.9 Sones.  This model has two fan speeds and two settings for the light brightness controlled by rocker switches.  It does have a nice, basic design (black with platinum lettering) that I thought would match well with the kitchen range and blend nicely with the rest of the room. 

baffle on new range hood
The new range hood could be installed ducted to the outdoors or non-ducted.  It has a damper (included) to prevent cold air from entering when installed ducted.  If installed non-ducted, the hood requires an additional charcoal filter sold separately.

The damper was very easy to install on the top of the range hood.  My husband removed the knock-out on the top of the range hood then screwed the damper into position with the provided self tapping screws.  The baffle plate was slid into place behind the grille on the front of the range hood.  The slot where the baffle plate went is just visible to the right side at the top just behind the logo on the front of the range hood.

space where old range hood was removed
In order to install the new range hood, my husband turned the power off.  Then he removed the old range hood.  I washed the area well.  I then painted the smaller wall just to make sure there would be no wall showing that didn't match the main wall colour.  It took two coats but dried quite quickly.  I likely could have skipped this step but just wanted to be sure.   As you can see, rather than cut the tile as it should have been, the previous owners didn't.  That in itself would have presented a problem had we decided to use a range hood that wasn't as deep, not that it could not have been solved, just it would have been more work to install. 

old and new range hoods together
If you look closely you can see how dirty and stained the old range hood was.  More importantly the actual baffle was missing on the damper (top of old range hood to the left).  This explains why the cold air was pouring in when the wind blew.  Under normal use, there is no way the baffle would just go missing so it must have broke off when they removed the range hood to install the tile.  Why on earth they replaced the range hood without the baffle on the damper is a mystery but then why they would have reinstalled a range hood in such poor condition is beyond me.  It should have been replaced when they did the tiling.

Once the paint was dry to the touch, it was time to install the range hood.  My husband carefully placed the range hood in place and made the necessary connections.  Then he secured the unit temporarily to test the connections by turning on the power.  All was well so he turned off the power, finished securing the range hood and turned the power back on. 

new range hood installed
The new range hood really looks nice!  I used a Sylvania 8W LED bulb (450 lumens) instead of the GE 13W CFL (825 lumens).  Essentially, it was like replacing a 60W incandescent bulb with a 50W bulb.   We were already saving 47W by using a CFL rather than a 60W incandescent but now we will will be saving another 5W.  In this day and age of energy conservation, that is a good savings.  I am rather pleased with the light output as well.  The range hood light is mainly used as task and occasionally evening  lighting.

So, we are one step closer to finishing the kitchen.  When our friend installed the bulkhead enclosure, it was more of a taupe tone than golden oak.  He is going to redo the cabinets to match.  He is also going to cut the extra marble tile we found in the garage to fill the gap under the new dishwasher.  That leaves us with replacing the microwave oven, the sink and faucet.  With any luck our kitchen will be completely finished in the next month or so.


Tuesday, June 12, 2012

Levolor® PanelTrac™ Patio Door Treatment in the Kitchen

Patio doors are always a bit more difficult to choose some type of covering.  It is a big expanse of glass that can cause considerable thermal loss at night especially during the winter months and yet during the summer months the solar gain can be enough to make the room unbearably hot.  In both cases, patio doors can end up increasing your heating and cooling costs.  We had two sets of patio doors in our last house but chose not to cover them so we could enjoy the gorgeous view.  Privacy wasn't an issue and the property was very shaded in the summer so leaving them bare wasn't a problem.  We have patio doors at our vacation home with the standard vertical blinds.  This house has patio doors in the kitchen with the summer sun being problematic in the morning and one of our neighbour's windows looking directly into.  So far privacy has not been an issue.  I wanted something to lessen the solar gain during the summer while providing a bit of privacy when desired.  At the same time I didn't want the standard vertical blinds.

Levolor woven weaves totem pole panel
I decided to order custom treatments for the patio doors and the large living/dining room window.  Unfortunately, the living/dining room window treatment turned out to be a nightmare AND they brought out the wrong fabric panels for the patio doors.  Although the living/dining room window treatment remains unsettled, we finally got the patio doors finished in the panels we had ordered.  This is precisely why on any custom window treatment being installed by the company, you should never pay more than a deposit until they are installed and you are satisfied with the install. 

We chose Levolor® PanelTrac™custom made for our patio doors in woven weaves 23501 Totem Pole.  The colours match nicely with the kitchen and if you look close the colours of the rest of the house (taupe, moss green, navy blue) are in the weave as well.   Ours is a four panel, one way draw, light filtering covering.  Each panel attaches to the carrier on the head rail via Velcro strips making them easy to change and clean.  When opened with the auto wand, each panel stacks one behind the other.  Unlike the standard vertical blinds, these panels do not turn so cannot be adjust in that manner.  They simply slide back and forth.

view when PanelTrac is closed during the day
Levolor® offered a wide range of panels to choose from.  The solar panels don't completely block out the view but rather block the solar gain during the day and the heat loss at night.  The opacity is noted for each fabric so you can get panels offering no opacity to those with 95% opacity.  The higher the opacity the less you can see out or others see in. 

During the day, we can still see out somewhat but our neighbours can't see in.  This is perfect in the mornings when we are still in pajamas and sporting bed head.  They are working quite nicely to control the solar gain during the mornings.  By lunchtime, I can open them fully to take advantage of the natural light without the solar gain.

view when PanelTrac is closed at night
At night, the light filtering works in reverse so if there is a light on in the kitchen, the neighbours could see in.  However, we chose a heavy enough weave (95% opacity) they would likely only be able to see shadows, nothing clearly.  Without lights on, you can't see through them, perfect in the event of an attempted break-in and when we are on vacation.  We are used to this as the panels work very much like the SolarGuard window film we installed in one of our houses where solar gain was a huge problem during the summer months.

I really like the way the PanelTrac™ looks.  We may put a custom wood valance on it but haven't decided yet.  All around though, dealing with this particular local business has left a rather nasty taste in our mouths.  We won't deal with them again!  It took them almost three weeks to get the PanelTrac™ to what we ordered and the living/dining room (Eclipse shutters) still has the old sheers after they installed incorrectly without the necessary parts.  The shutters could not be opened and when I tried, one fell off and hit me.  I finally told them to take the shutters down and take them back.  They 'said' they would make it right but we've heard nothing from them since being home from vacation.  In case you are wondering, the PanelTrac™ cost us $680.26 plus $25 for installation.  There is a lifetime warranty against manufacturing defects and a 5 year on the panels themselves.

Garden Gnome
©2006-2012


Wednesday, March 7, 2012

Feather & Grass Decorative Planter

feather and grass decorative planter

I have been spending a fair amount of shopping time at Home Hardware lately buying paint, painting supplies and gardening supplies.  They have a section of decorative accent pieces.  I noticed an artificial pampus grass planter that I thought would look nice in our freshly made-over main bathroom [More on that to come this week].   However, it was $59.99 so I didn't buy it as that money would be better spent painting another room in my quest to have all the rooms painted in the house before the end of May.  Then I came up with a brilliant idea, one that was less expensive and one that could be changed out without waste whenever I desired.  Off to the dollar store...

I bought one 6 - inch clay pot ($1.50), seven feather & grass spears ($1 each) and a bag of sphagnum  moss ($1) for a total cost of $9.50.  I recycled some packaging styrofoam from the garage to hold the spears.  I disassembled two of the spears to use the leaf portion and make the planter look a bit more realistic.  Once the spears were arranged, I covered the styrofoam with the moss.  I got the look I wanted for $9.50 effectively saving myself $50.49!  The best thing is, I can easily take the planter apart and reuse everything in other projects with very little effort. 

Garden Gnome
©2006-2012


Wednesday, November 2, 2011

Decorative Wall Stickers

decorative wall stickers


It has been a few years that decorative wall stickers have been available.  These stickers are peel and stick but easy to remove.  Until now I had seen them mainly in children themes and while I have bought some for the grandchildren, I had not bought any for our home.  A couple of years ago the stickers were showing up in a black, more adult theme to add instant interest to a room.  These were larger designs like flowers, trees or geometric shapes.  I was in the dollar store the other day and noticed packages of removable vinyl lettering in different phrases so I bought a couple of packages.  All of the rooms need painting so for $2 I thought it would be a inexpensive way to see if I liked the effect or not.  Pictured is the one I put over the staircase bulkhead.  I put another one that says "Home is where our story begins" over our bed in place of a headboard as shown on the packages. 


I really like the effect!  It's not something I would go overboard using but as a bit of interest, the vinyl lettering is much easier to put up than stenciling.  I ended up buying five more packages, two to replace after painting and three different phrases just in case.  I learned a long time ago if you see something at the dollar stores you want or may want in the future to get it then as it may not be available after that stock is depleted.  The downside to the lettering is you are limited to the available phrases and colours.  There is a print shop that does the vinyl lettering for commercial signage that my husband has used many times.  It is on the same principle as the decorative lettering (applied the same way) I bought so I'll have them make up the lettering for my favourite quote for my home office once it is painted.  That way I can choose the font and colour I want. 


The vinyl lettering comes sandwiched between a heavy piece of coated backer paper on one side (sticky side) and a thinner coated paper to temporarily hold the letters for mounting.  To place the stickers on the wall, carefully peel back the thinner paper.  You may have to nudge the letters a bit to come off the backer paper while peeling so go slowly.  Position the sticker in the desired location on a clean wall.  Smooth out any air bubbles in the wall sticker.  Before removing the thin mounting paper, I used a flat edge over the lettering.  Carefully peel off the mounting paper and voila, instant interest!  The lettering can be peeled from the wall and stored on the backing sheet if desired but I'm not sure how well this will work which is why I bought extra packages in case I wanted to use that phrase again. 


Garden Gnome
©2006-2011

