What does a Garden Gnome do when she is not gardening, in the kitchen or doing genealogy? Well the answer might just surprise you so read the entries to find out more. This blog focuses on everything we do to make our house a home. There will be a strong emphasis on home energy efficiency and do-it-yourself (DIY) projects. At the same time there will also be crafts, knitting and crocheting projects along with any other little tips we do to create that down to earth, I want to be here home. Please enjoy your visit :)


Showing posts with label crochet. Show all posts

Saturday, December 27, 2014

Crochet Mouse Hats With Ear Flaps

I love giving homemade gifts at Christmas because they really are a gift from the heart.  While we were at our vacation home this fall, I searched for a pattern for our grandkids that would reinforce our desire to have them visit us in Florida, spending at least a day at Disney World.  I found just what I was looking for on Ravelry!

crochet mouse hats with ear flaps
I downloaded the Mr & Mrs Mouse Hat patterns designed by Elizabeth Roggasch published in The Little Bucket Bouquet.  The pattern is $5 which is quite inexpensive considering it is sized from newborn to adult.  This is a pattern that can easily be modified but I think it is cute the way it is, very much Disney-like if using those colours.

The pattern is very straight forward, easy to crochet.  There is a fair amount of finish work especially for the girl's hats but it isn't difficult just a bit time consuming.  I used RedHeart Super Saver black, petal pink, cherry red and soft white using a size 4.25 mm crochet hook.  I made one toddler size and three child size hats.  I was rather pleased with the results and the grandkids loved them!


Monday, July 22, 2013

Master Bedroom Blanket Update

One of the things I like so much about knitting and crocheting is it is quite easy to get that custom look for your decor.  Each project is unique!  It would have been so easy to just go out and buy a nice bedspread for our new king size bed but I wanted something special that only handmade would offer.  Given the size of planned blanket, I knew this was going to be a challenging project.  I chose a design by called the Wendy blanket then paid for the pattern.  What I paid for was actually the design as there really is no pattern other than a basic granny square.  I was very disappointed in what I did paid for since I could easily have duplicated the 'design' simply from pictures.  She did not include any pertinent details other than to start with a large granny square followed by alternating bands of small granny squares and rows.  At any rate, I developed my own style for this blanket.  Overall I will be pleased to share my results as to how I did certain steps in working the blanket, especially the joining and working corner joints, once the blanket is completed.

master bedroom blanket progress very close to covering the top of our king size bed
I've made a bit of progress on the master bedroom blanket.  The last time I updated was at the end of the eight rows following the second small granny square row.  At that time the blanket measured 57 inches square.  The blanket now measures 73 inches square just shy of covering the entire top of our king size bed.  Each small granny square row or band of eight rows adds about 4 inches.  Adding another band of small granny squares followed by a band of eight rows should give a measurement of 89 inches.  I need a total of 96 inches to include the depth of the mattress.  This means I can add a three to three and a half inch border to the blanket as a finishing touch.  I have been looking at various borders but haven't decided on anything yet. 

small granny squares in process of being made for fourth small granny squares row
I am currently working on the 60 small granny squares for the fourth small granny square band.  The joining row for these squares will be aran, the lightest colour in the blanket.

I normally work all the centres of the granny square first, followed by all the second rows and finally the third rows, putting them into stacks as I go.  In this case I would end up with stacks of squares in various stages of completion.  I changed that method for this set of granny squares, completing all three rows before starting the next square.  For this type of project, the first method is easiest if crocheting the squares on the go.  The method I am using is easier if the crocheting is not mobile but in all honesty either method works.  It is more of a personal preference.

I hope to have the blanket completed in the next couple of weeks.  It is slower going especially with all the distractions of summer but I am making a bit of progress each day.  I'm getting exciting as the blanket nears completion.  Even though it has only been a few months working on the blanket, it seems longer.  Stay tuned for the finished blanket results. 


Sunday, April 28, 2013

Progress on the Master Bedroom Crocheted Blanket

Work continues on the master bedroom crocheted blanket.  I'm tempted to call it a bedspread as that is what it really will be given the finished size.  This blanket is a lot of work but it is coming together nicely.  I won't have it finished before the furniture arrives.  The way it is going, I will likely be working on it for a couple more weeks or more but that's ok.  When the blanket is finished, it will really offset the classic beauty of our new furniture!

master bedroom crochet now measuring 57 inches square
This picture was taken on Day 20 (Friday, April 26, 2013) of working on the blanket just after finishing the third band of small granny squares.  The blanket now measures 57 - inches square, a little over half of the planned 98 - inches for the finished blanket.  This is sized to fit our new bed with extra deep mattress.  The picture was taken on top of the queen sized bed that is being moved into the guest room.

I was rather excited as I took this picture.  The furniture was scheduled to arrive just after 4 PM that day.  I had stripped the room of everything except the bed, highboy dresser, antique trunk, sewing machine, the two wicker baskets and unused satellite tv box.   The bed had been completely stripped down with just the duvet in place for the photo shoot.

Next up, the make-over - both ups and downs...


Thursday, April 18, 2013

Working on the Master Bedroom Accessories

Earlier this month I wrote about starting the master bedroom make-over.  The plans were to keep the sage green colour of the walls and work from that bringing in the rest of the colours for our home.  The colours are cool taupe, green, deep burgundy, white, black and grey with lots of wood tones to warm and tie the colours together.  We ordered new bedroom furniture that was expected to arrive three weeks from the purchase date but it hasn't yet.  The Mom & Pop furniture store we have dealt with for years told us yesterday that the furniture would be in tomorrow or Monday so they would call to arrange a time for delivery.  During this time, we did most of the prep work like move our triple dresser into the guest room as our kid who was going to take it and the high boy decided it was too big.  We worked on purging some of our clothes and I started shopping for accessories.

master bedroom quilt set, sheet set and yarn
I'm not the type to go out and buy all the accessories for a room at once.  Rather, I like to build on my ideas waiting to find just the right item to fulfill that idea.  The new king size bed frame is a storage sleigh bed.  I immediately decided that a homemade blanket would be ideal, bringing in a bit of old fashion country charm.  I bought 4 skeins of Red Heart Super Saver yarn - medium thyme, cornmeal, buff, aran - all colours found in the new master bedroom curtains.  I wanted a plain quilt for under the new blanket that would allow the blanket to become the focal point.  It was a fluke that I found a king size quilt set (quilt, two pillow shams) at a bargain price that would work perfectly.  A few days later I found a  six piece king size bed sheet set in taupe accented with an embroidery scroll design.  Finally, I found two clear raised coasters that I think are meant for pillar candles but will be used for our drink bottles on the night stands.

master bedroom king size pillows
About a week ago, we were at Sam's Club and my husband picked out a package of king size pillows for the new bed.  Serta is a good brand and the price was quite reasonable.  Pillows are one of those things that most people do not replace often enough.  I saw one recommendation that pillows should be replaced every 3 months but I think that could be extended if you put pillow protectors on the pillows.  I think we almost need to buy another set so we have one set for the shams and one set for sleeping.  We can still use some of our existing pillows as they are fairly new as well and not used for sleeping.  I'll take the pillows we were using for sleeping to the animal shelter as they are always looking for pillows, blankets and towels.
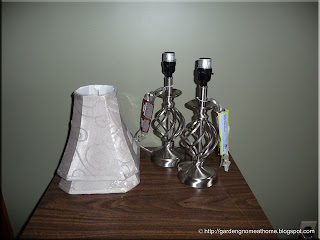
master bedroom nightstand lights
A few days ago I found bedside lamps.  They were mix and match in that the pieces were bought separately.  I chose a brush stainless steel finish for the lamp base which was a very easy way to introduce grey into the bedroom.  The A-line shape shades are a medium light taupe material with just a hint of sheen, accented with stitched scrolls imitating the scroll embroidery on the bedsheets.  I think they will look quite nice with the darker wood tone of the new furniture.

We aren't sure whether the sewing machine cabinet the lamps are temporarily sitting on will be staying in the master bedroom.  We may have to take out the antique trunk as well.  I'm hoping the trunk can stay as it would look quite nice with the new furniture.
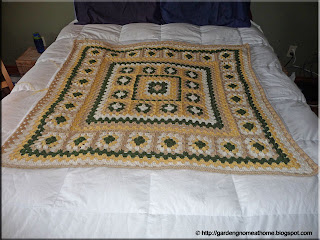
 
master bedroom crochet blanket in progress
I actually saw a bedspread called a Wendy blanket after the designer.  I knew I just had to make it but only wanted to use four colours not the seventeen she had used.  I bought the pattern on Ravelry and talk about a disappointment!  The only part that could be considered a pattern was how to do the first four rows of a granny square, of which those instructions are widely available for free from numerous resources.  The rest was simply how she arranged the granny squares. There were no details for anything else other than number of small granny squares and number of plain granny rows between the squares.  I ended up doing several ripouts and some of them rather large ones.  The so called pattern was basically useless.  How she could justify charging someone for the instructions on how to work four rows of a granny square is beyond me!   So I am writing up a full pattern for the blanket as I work complete with the actual way I put my design together, including the method I used for that first granny row after the small granny squares.  The small granny squares are worked up to the last row then that row is created using the join as you go method to form the band of small granny squares.  

This is day 12 of working on the blanket and now that I am using my own methods, the work is progressing nicely as pictured.  The piece is on top of a queen size bed (60" x 80") to give a bit of perspective as to its size.  The piece is currently 46 inches square, a little over half of the size I want it to be to cover a king size bed 76" x 80".  I will be working the piece to at least 80" but perhaps a bit larger.  I'm currently working on the next band of small granny squares (a total of 44).  I found an online tool that helps with randomly generating the colour pattern.

My initial goal was to have the blanket completed by the time the furniture arrived.  Between the ripouts and other demands, progress has slowed somewhat.  The piece is getting increasingly cumbersome and heavy to work on. I know it won't be finished by the first of the week but it shouldn't take too long with any luck.  I'll post more on my blanket later.  I think the blanket will end up being a focal piece in the room.

Working a bit of navy blue and burgundy into the room is going to be a challenge.  I'm not sure how I will do it but I'm sure something will come to mind.  At least we are getting a bit closer to finishing the master bedroom makeover.  Once the furniture is set up, things will come together rather quickly!


Saturday, February 2, 2013

Beanies for Bravery

We were in Florida at our vacation home when the word of the horrid events at Sandy Hook Elementary School unfolded.  Like many I was glued to the television hoping it was just a bad dream.  I've been in a knitting and crocheting funk ever since we moved here in September of 2011.  Aside of making a few dishcloths for here and our vacation home, starting a couple of projects, my knitting needles and crochet hooks have fallen silent.  Inspiration comes in strange forms sometimes.

beanies in progress
My daughter who only crochets emailed me asking if I would want to make a couple of beanies to be sent to the survivors of Sandy Hook Elementary School.  I told her I would.  Between Christmas and New Years, she brought me a skein a Red Heart Team Spirit yarn and the pattern designed by Michele Miller to be used for the beanies.  It is not to be used for commercial purposes but is free to use for non-commercial purposes.

Really, this is a simple round with increases evenly spaced to keep the project round then when you reach the desired diameter, discontinue the increases and continue until the desired length.  Basically, what you want to do is start the ring then increase evenly each succeeding row.  The first row after the ring is an increase stitch in every stitch, followed by work one stitch, increase,  in the next and work one stitch continuing around the round, then join, work two stitches and increase, work two stitches, continue around the round.  Each round you make increases the number of the first worked stitches by 1 and increases the number of stitches between increases by 1.  Once you understand how to increase to keep the project round, you could easily create your own pattern, custom tailored to what you are designing.

The beanie starts by making a magic ring.  The magic ring is a slick way to start a round project without leaving that little hole in the centre if using the traditional method of starting a round.  I am very experienced in crocheting but I did have problems starting the magic ring.  There are YouTube videos and it make take a couple of attempts but once you get it, you get it.

the finished beanies
I made two of the beanies as pictured.  Now I am a huge fan of variegated yarns but this is the first time I have used a self-striping yarn.  It does stripe nicely but I was not impressed with the texture.  The yarn was harsher and prone to splitting which I found a bit surprising as Red Heart is one of my favourite yarns to work with.

Together we sent 4 beanies in support of the children of Sandy Hook Elementary School.  I hope a little 'anything' helps give a bit of comfort if only in support.  I am truly saddened at those events so really What was nice is this project actually inspired me to do a bit more so the knitting needles and crochet hooks are in high gear.  What these children gave back to me even though they don't know it is a renewed spirit to get creating with knitting and crocheting.  From the bottom of my heart I wish them the best, the strength they need to get through this ordeal, the courage to face the future knowing the world is not that bad of a place...


Tuesday, March 6, 2012

Modified Easy Ombre Dishcloth

modified easy ombre dishcloth

I started replenishing my supply of handmade knitted and crochet washcloths and dishcloths prior to moving to our new home last September.  I also needed both for our vacation home.  These cloths are perfect for bathing and washing dishes while adding a custom touch to bathrooms and the kitchen.  I colour code my washcloths and dishcloths to match the room they will be used in so they don't get mixed up.  The easy ombre dishcloth with the taupes and turquoise tones is perfect for the main bathroom.   This modified granny square pattern is suitable for beginners but is poorly written as if worked as written will give a wave effect from too many stitches so the piece will not lay flat.   For example on the first row it reads  
1st rnd: Ch 3 (counts as dc). [3 dc. (Ch 2. 4 dc)] 3 times in ring. Ch 2. Join with sl st to top of ch 3.
If you do the stitches within the square brackets three times, you will have too many stitches.  This row should read:
1st rnd: Ch 3 (counts as dc). 3 dc. [(Ch 2. 4 dc)] 3 times in ring. Ch 2. Join with sl st to top of ch 3.
This will give you the correct pattern of 4 stitches per side with two stitches in between to form each corner.  The next row reads:
2nd rnd: Ch 3 (counts as dc). 1 dc in each of next 3 dc. (2 dc. Ch 2. 2 dc) in next ch-2 sp. *1 dc in each of next 4 dc. (2 dc. Ch 2. 2 dc) in next ch-2 sp. Rep from * twice more. Join with sl st to top of ch 3.
If you dc in the next 3 dc it will cause you to have too many stitches.  It should read:
2nd rnd: Ch 3 (counts as dc). 1 dc in each of next 2 dc. (2 dc. Ch 2. 2 dc) in next ch-2 sp. *1 dc in each of next 3 dc. (2 dc. Ch 2. 2 dc) in next ch-2 sp. Rep from * twice more. Join with sl st to top of ch 3. 

Here is the corrected pattern as I made it:

Materials:
  • Yarn: Bernat Handicrafter Cotton
  • Crochet hook: Size 4 mm (U.S. G or 6) crochet hook or size needed to obtain gauge.
Size: Approx 10 ins [25.5 cm] square.
Gauge: 13 dc and 6½ rows = 4 ins [10 cm].

Instructions:

Ch 5. Join with sl st to form a ring.
1st rnd: Ch 3 (counts as dc). 3 dc. [(Ch 2. 4 dc)] 3 times in ring. Ch 2. Join with sl st to top of ch 3.
2nd rnd: Ch 3 (counts as dc). 1 dc in each of next 2 dc. (2 dc. Ch 2. 2 dc) in next ch-2 sp. *1 dc in each of next 3 dc. (2 dc. Ch 2. 2 dc) in next ch-2 sp. Rep from * twice more. Join with sl st to top of ch 3.  [My note: This will give 7 dc per side.]
3rd to 8th rnds: Ch 3 (counts as dc). *1 dc in each dc to next ch-2 sp. (2 dc. Ch 2. 2 dc) in next ch-2 sp. Rep from * 3 times more. 1 dc in each dc to end of rnd. Join with sl st to top of ch 3.  [My note: Each row will increase by 4 dc per side, so the 3rd row will have 11 dc per side, the 4th row will have 15 dc per side and so on.]
9th rnd: Ch 1. 1 sc in each dc around, having 3 sc in corner ch-2 sps. Join with sl st to first sc. Fasten off.

Garden Gnome
©2006-2012


Saturday, April 17, 2010

Plastic Bag Crochet

Earth Day 2010 is fast approaching so I thought a recycling post would be rather fitting.  Plastic shopping bags are not environmentally friendly.  In the past several years many have been turning to re-usable cloth shopping bags or baskets.  Some municipalities such as the Greater Toronto Area in an attempt to reduce the number of shopping bags used have passed bylaws that stores must charge the customer 5¢ for each plastic shopping bags.  This concept is not a new one as some grocery stores have been charging for plastic grocery bags for quite some time. 

Enterprising crafters have turned to recycling plastic shopping bags into useful items.  The plastic bags can be cut into strips.  The strips are then joined together to form a long chain of yarn.  Crotchet is a popular way to turn the plastic yarn.  Here is a good video showing the joining technique and a few items you can make. 


Garden Gnome
©2006-2010


Wednesday, February 7, 2007

Granny Square Afghan


Granny Square Afghan

Knitted and crocheted afghans are a family favourite so I make quite a few. A granny square afghan is worked one square at a time then the squares are sewn together and an edging added to form the finihed piece. It is an ideal project for those learning to crochet as it involves simple stitches. The variations in how granny squares are made are as varied and unique as the people who make them.

Here's how I made a basic shell style granny square. More detailed instructions by Martha Stewart along with diagrams can be found here. I make the initial stitch then chain (ch) six stitches. Leaving the last stitch on the hook, I put the hook into the first stitch of the chain, catch the yarn with the hook and draw through both stitches. This is called a slip (sl) stitch. Then I chain 3, double crochet (dc) twice chain 3, [double crochet three, chain three] I repeat [] three more times ending with a chain 3. I slip (sl) stitch into the top of the chain forming the first shell. There are now four shells and four holes that will become the corners. I slip the next two stitches then chain 3, double crochet (dc) twice, chain 3 in the first hole, double crochet (dc), into the same hole. There are now two shells in the first hole. I chain (ch) 3 then double chrochet (dc) 3, chain (ch) 3, double crochet (dc) 3 into the second hole, chain (ch) and repeat for last two holes, chain 3 and slip into the first stitch of the first shell. The piece is now a square. I continue making rounds by working two shells in each corner, one shell in each of the holes in the sides of the square.

Once you have tried making a granny square it will become clear as to how this works and diagrams make it a lot easier to visualize. There are a lot of good references online for making the basic granny square. One tip I would offer is to use cotton yarn when learning. Make the square about 9" then edge with a row of single crochet (sc) and you now have a wash or dish cloth.

When I was looking for a couple of sites for making basic granny squares, I came across a site that said traditionally granny squares are made in bright colours then trimmed in black. Well, when I made this afghan, I had never heard of that. Usually when I start a piece I have a particular idea or yarn in mind. The idea I had for this afghan was to create a piece somewhat mimicking an Amish pieced quilt. However, I couldn't resist working in the variegated yarns as the practical purpose was using up left-over yarns in my stash. Anyone who knits or chrochets knows how quickly that stash can grow!

The finished piece is a heavy afghan perfect for snuggling in on cold winter evenings. It measures 55" x 78". There are seventy squares consisting of 4 rounds of shells edged in double crochet (dc) worked in worsted 4 ply yarn. The squares were place right side down and joined through only the back loop forming a textured ridge on the right side of the afghan. I then edged the afghan with a row of black, row of muted blue and final row of black worked in double crochet (dc).

While the beauty of the basic granny square can be used in so many ways, I just had to try this more advanced version. This is an afghan (?) project I have in progress at the moment. I have a question mark because I am considering on making it big enough to use as a bedspred for or bed. The piece is being worked in Bernat worsted 4 ply. The heart is worked first and is raised from the square. The square is then started by attaching at 8 points on the back of the heart. The square is then worked as normal and edged in double crochet (dc). I will likely piece together through the back loop of the double crochet as I like that look for added texture and definition.

Garden Gnome
© 2007

