Yesterday, I wrote about the brains of our home automation system, the SmartThings Hub 2. I currently have 30 connected devices connected to the hub with more waiting to be connected. I purposely left Nest thermostat and Sonos speakers independent of the hub although both can be used with SmartThings. Nest requires a SmartApp but Sonos works directly through SmartThings. I do have the Sonos speakers on smart outlets though. At some point, I will be connecting our Sonos speakers directly to the hub though. I have also kept all of our home automation independent of our home security system. Home automation should not be used as a security system although it is a good compliment to existing independent systems. The following are some of our connected devices. Of course, we have multiples of most of these devices.

Connected bulbs (ZigBee) are by far the easiest and least expensive of our connected devices. The beauty of the connected bulbs are simply connect and start using.
They replace standard A19 base CFL or incandescent bulbs. They are not
suitable for enclosed fixtures or use outdoors. Connected bulbs are dimmable as well.
Pictured are Cree bulbs (fan, bottom right), Wemo (middle right) and GE Link (upper right). These bulbs cost between $20 and $30 when I bought them. Each brand has pros and cons. The Cree bulbs have a grate venting that some do not care for but I have found these bulbs have the cleanest, whiter light with problem free performance. The Wemo bulbs made by Belkin can be used via their own hub and app or through the SmartThings Hub. These bulbs have a nice clean appearance and are just a little warmer colour than the Cree bulbs. They tend to lose pairing occasionally which although minor is an annoyance. The GE Link has a clear covering and has the warmest light of the three brands. It is problematic not only for initial pairing but also losing pairing. My preference is the Cree bulbs so I have several in use.

Plug-in controlled outlets are extremely convenient and flexible but they are big, often covering part of the other outlet. Aesthetically, these are best for use in locations where they can be hidden like behind furniture. These outlets are for indoor, dry locations only and are rated for maximum W which determines the use. The plug-in controlled outlets can be used for lamps and small appliances (if rated for such use.
I have a Schlage (Z-wave, 600 W incandescent maximum, top), two Aeon Labs (Z-wave, 1875 W maximum, middle) and SmartThings (ZigBee, 480 W incandescent maximum, bottom). These plugs all have an indicator light but the Schlage is the only one that can be controlled in the app to lit when on, lit when off or not lit. This is a plus if you want to keep light pollution in the house low. The Schlage is has a controlled dimmable outlet on the left side of the plug and a regular outlet on the right side. Although this controlled outlet is likely best for lamps where dimming may be desired, I'm using it for a Sonos speaker for the time being. The SmartThings outlet gives energy usage (W). The Aeon Lab plug-in outlets are suitable for small appliances like coffeemakers. They also give the energy usage (W, kWh) of the appliance being used so rules can be set up based on that in addition to time or occupancy.

Connected switches are expensive at $40 to $70 depending on the switch.
Some are on/off while others are dimmable with dimmable switches being
more expensive. Three-way switches are more expensive as well.
Connected switches simply replace regular paddle switches so it is not
an obvious change. The downside is they only come in white or almond.
One brand offers both light and dark almond but no black or brown. Connected switches are used to control non-connected light fixtures such as enclosed fixtures, ceiling lights, bathroom lights.
I have a few wired connected switches all GE (Z-wave). The switch on the right in the duplex outlet is a single pole controlling the bathroom light. The middle switch in the triple outlet is a 3-way switch that also has an accessory switch (not shown). The GE switches require a neutral wire so may not be suitable in older homes. Each connected switch has a small blue indicator light that can be set to on when lit, off when lit or off in the app.
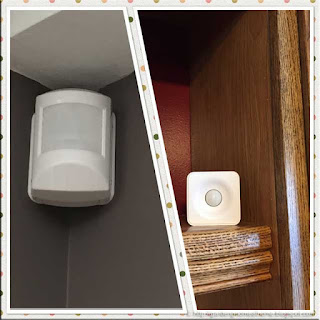
You can actually get a fair amount of home automation based simply on bulbs, outlets and switches by using schedules and rules. However, your home automation comes to life via motion sensors. Motion sensors can be paired with other controlled devices, turning them on or off depending on motion. I have two styles. The Ecolink (Z-wave, left) motion sensor is corner mount. This limits where the sensor can be placed and hiding it is rather difficult. The PEQ by Centralite (ZigBee, right) is a smaller motion sensor that can be set on a shelf or mounted on a bracket. The PEQ motion sensors also measure temperature so the sensor can be configured to control other connected devices by motion and/or temperature. It is also one of the more flexible sensors in terms of placement. I have one sitting on a cabinet covered almost entirely by a vining plant that can barely be seen yet it registers motion just fine. There are no extrnal indicator lights on either brand of motion sensor. Rather the front cover is removed for pairing where a connection button is pressed and an indicator lights during the process. Both brands have a battery indicator in the app and notification when low. The motion sensors take one CR123A 3V battery.

A fundamental device in home automation is the open/closed sensor. This device is mounted on a door or window. The contact is either broken (open) or together as pictured (closed). Rules can easily be created based on this. For example, if the sensor is open 'notify me if rain is coming' or 'notify me if I leave" or 'turn off AC" or "turn on light". More importantly, an open/closed sensor can be used on any item that would cause the contact to open or close such as refrigerators, freezers and mailboxes. There are a lot of creative uses for open/closed sensors!
There is no external indicator light. Pairing is achieved in the same manner as the motion sensors. There is a battery level indicator in the app as well as notification for low battery. The open/closed sensor uses one CR2 3V battery.
Presence sensors are very useful for home automation systems. The arrival sensor by SmartThings (ZigBee, bottom) can be used as a person or pet tag. It can be configured to trigger a set of actions when the sensor arrives or leaves the geofence. It has an audible beep to so is the perfect addition to your set of keys. It will make finding them a lot easier! The arrival sensor uses a CR2032 3V battery. There is a battery level indicator in the app and notification when the battery is low.
Beacons are just starting to be used in home automation but they are already in wide use commercially. Beacons can track you through malls and stores, tracking your shopping style. If you don't want this to happen, be sure Bluetooth is turned off on your phone when shopping.
I have three Radius beacons (Bluetooth). While the SmartThings Hub 2 does have Bluetooth it is not enabled currently. In order to use the Radius beacons, two additional apps BeaconThings and SmartRules are required. The beacons are small about the size of a quarter in diameter and three quarters stacked thick, easy to place out of sight and yet still work. The beacon can be stationary registering presence when cell phone/tablet comes into proximity of the beacon or the cell phone/tablet can be stationary registering presence when the beacon comes within proximity of the cell phone/tablet.


