What does a Garden Gnome do when she is not gardening, in the kitchen or doing genealogy? Well the answer might just surprise you so read the entries to find out more. This blog focuses on everything we do to make our house a home. There will be a strong emphasis on home energy efficiency and do-it-yourself (DIY) projects. At the same time there will also be crafts, knitting and crocheting projects along with any other little tips we do to create that down to earth, I want to be here home. Please enjoy your visit :)
Scrapbooking and family history just go hand in hand. Back in 2005 I started experimenting with digital scrapbooking as a way to extend my scrapbooking experience as well as document our life through both pictures and journaling. A contributing factor was not being able to find the right sticker or background mixed with wanting something unique. If you have been following this blog you will know that I love Photoshop® as my main graphic editing software but the following 2 page layout was created with Microsoft Word® for Mac. The layout is a combination of digital and paper scrapbooking using elements of each. It is part of 6 pages highlighting our culinary favourites from 2005.
 Page 1
The first thing I did was determine the main colour theme as being an almost sky blue. What doesn't show well in either picture is the actual background. On this two page layout the background and title is printed on brilliant white cardstock. The background for this two page layout is multiple lines of canning in a light sky blue. I used the same colour to make the title a script font and highlighted that to use Word Art. Once I had the desired effect, I printed out two sheets, one with the title and one without.
Next I selected the photos I wanted to use and size then printed off all of my pictures on matte photo paper using iPhoto. At thirteen pictures I knew the layout would be rather graphic intensive so kept the images small. Once I had the two sheets of pictures printed I had to cut them out using my Fiskars® large flatbed rotary cutter. This really is a must have for anyone doing paper scrapbooking! Next I used scalloped decorative scissors to round the edges of the photos for the first page. I really like the look of rounded corners and I know there are punches for that but part of scrapbooking is using what you have on hand sometimes.
Journalling is very important in scrapbooking because it ads that personal touch. I wrote the recipe in a dark blue font in Word and printed it off on plain medium blue card stock. Then I cut it into a rectangle and positioned it using 2 sided tape on an angle to give movement to the page. Using movement is a big part of scrapbooking but basically it just means adding interest. With the journalling in place I snipped off the over hanging portions with the rotary cutter. The pictures were then positioned around the journalling and secured with 2 sided tape.
 Page 2
The pictures on this page were left with sharp corners. The journalling used the same font and font colour to write a bit more personal touch to canning then printed on white card stock. I used a fancy corner punch to make a design in the upper corner the used a piece of scrap paper to form a stencil to colour in a mirror image of the punch in the lower corner with a gel pen. To give the journalling a bit more of an impact and tie it in with page 1 I used the same blue card stock cut into a square then used it as a partial matting.
Next I arranged the pictures then secured them to the page using 2 sided tape. Next I wanted something a little extra so chose a couple of stickers from my vast supply of stickers. These were stickers from Creative Memories®. Now, I do have a love/hate relationship with stickers. First you are really restricted to available stickers and second you can never just find the right sticker. At the same time, you end up with a lot of stickers you will never use. But there's a work-around by using a Xyron Create a Sticker gadgets of which I have the smaller X and the larger 500. Just about anything can be turned into a sticker using either.
Microsoft Word® also has a feature where you can import photos. You can resize and position alignment them as well as some basic photo adjustments. Simply import your image into the Word document then go to Edit > Edit Picture. I was surprised at some of the effects so this is a nice feature of Word without having to invest a lot of dollars.
Scrapbooking remains to be a mixture of both paper and digital imaging for me although I am moving ever more to strictly digital. Digital scrapbooking expands your creativity. Basically any image can be used, adjusted or tweaked so you really are limited only by your imagination. You can add shadows for depth, rotate images for movement and the best part everything is done on the computer without any wastage. When you are finally finished you can print out the end result on brilliant white card stock. So a scrapbooking layout that would have taken several sheets of paper, cutting, trimming, stickers and other embellishments is now reduced to one sheet produced on the computer. In scrapbooking terms you are saving a lot of money! With experience you can get some very beautiful and very realistic results. At the same time digital keep your layouts flat so you don't have to worry about other layouts being damaged by raised elements on another. However, you will be missing some of the texture and textile feel of fully paper scrapped layouts. Combining the two techniques gives you the best of both worlds!
Garden Gnome
©2006-2009

 Old World Map
June 28, 2009
There are so many free graphics and images available online that can be used for digital scrapbooking and web design. At some point especially with digital scrapbooking you will want to make your own unique images. I use Photoshop® CS as my main graphic editing software. There are many online sites dedicated to providing free Photoshop® tutorials. There are also many forums and groups for discussing Photoshop® and getting help with the various features of the program. Even with a program as powerful as Photoshop® by itself there are various add-ons, plugins, free brushes, free actions and etc that can be used to enhance the program. You can even make your own brushes as I did for my © brush. So within the program there is still more room for personal creativity. I try to work through one or two Photoshop® tutorials each week.
Pictured is my first attempt at the Old World Map
tutorial from psd tuts+. This would be a cute digital scrapbooking image that can be used as an element or background or even a frame. This tutorial uses several techniques to create a fictional old world map. It was a rather easy tutorial to follow but there were a few important details left out of a couple of the steps that would make it difficult for a beginner to complete. Once I had worked through the tutorial I decided to tweak just a little. There were several layers to creating the image which is something I really like. What is nice about layers is you can easily go back and change one element of your image if you save it as a .psd file. The image is created by adding additional layers each with a technique. For example in this tutorial the landmass was created as a layer then a background layer was added and dragged below the landmass. Each time something new was added I used a new layer. To get the final ridging effect all the layers were merged then a texture filter was used. I added a page curl using AV Bros. Page Curl Pro 2.2. This is an additional filter I purchased for Photoshop® that makes customizable bends and curls on the image. That left a transparent background so I added another layer filled with white so the image would blend properly on this blog.
I like the resulting image but have a few ideas how to make it better and that's what tutorials really are all about. I'm not really happy with how the stripes turned out so would use the gradient tool instead. I definitely would keep the compass on a separate layer, turn off that layer, merge the other layers then add the texture and turn the compass layer back on. I think the map would look a bit more authentic with perhaps a burnt or ragged edging as well. There are a few suggestions in the comment section of the tutorial so I will be playing a bit more and post what I come up with!
Garden Gnome
©2006-2009

A lovely way to spend a cold, blustery afternoon or evening is to snuggle up in a warm afghan with a good book. Over the years I have made several afghans in both knit and crochet. I posted earlier about a granny square afghan I made to resemble an Amish quilt (more here). As far as preferring knit over crochet or visa versa, I really don't have a preference even though the family favourite afghan requested is the crochet zig zag. Crocheted afghans work up quicker than knit ones but unlike crochet, for the most part I don't have to watch my work as I knit. Very pretty yet practical afghans can easily be made using only a few basic stitches. Pictured is the Feather and Fan afghan I made using Bernat® Soft Bouclé knit on circular knitting needles size 8.00 mm. Circular needles are better for large pieces like afghans than straight needles for the extra width.
The Feather and Fan stitch is formed by increasing using the basic yarn forward (yfwd) and the decrease is made by knitting two stitches together (k2tog). The other stitch used is the purl stitch. The result is a lacy pattern. There are many variations to the Feather and Fan stitch based on multiples of 18 plus 2 which forms a single stitch edging on row 3. An edging can be added by changing the 2 stitches to desired number (eg. 8) and knitting the first and last 8 or desired number stitches of the purl row. If adding a wider border knit 8 rows at the beginning and end of the afghan. The afghan I made does not have a border or either end.
Feather and Fan Stitch
Cast on any amount (divisible by 18) plus any amount for border. I used 200 stitches, tension 14½ st and 16 rows to 4 in. (10 cm) measured over pattern. Border stitches are knit on both sides all rows.
Row 1: Knit to end of row
Row 2: Purl to end of row
Row 3: K1, *[K2tog] 3 times, [yfwd, K1] 6 times, [K2tog] 3 times, K1, repeat from * to last stitch, K1
Row 4: Knit to end of row
Repeat these 4 rows for pattern until piece measures approximately 56 in (142 cm) from beginning or until desired length ending with Row 4. Cast off.
Garden Gnome
©2006-2009
If you have been following this blog you will know we installed a high efficiency Bosch SHE44C02UC (more here) dishwasher shortly after moving here. You will also know that energy conservation and energy efficiency is a huge concern to us. I vary between using dissolvable dishwasher tabs (not the individual wrapped kind) and am currently in the process of switching over to using phosphate free Green Earth tabs for use during the hotter, humid months. During the dryer winter months I use a non-phosphate powdered dishwasher detergent. In terms of detergent, the cost is ranging from 9¢ to 29¢ per load. Electricity costs 13¢ per load and that includes the cost of the flow through water heater in the dishwasher. The water is pre-heated by natural gas comes in at about 6¢ per load and water less than 5¢. Total cost to operate the dishwasher per load come out to 33¢ to 53¢ without adding in the cost of the rinse agent. The manufacturer is very specific that a separate rinse agent must be used even if the detergent has a rinse agent included. The reason for this is the dishwasher dries by convection rather than using a heating element. A separate rinse agent ensures proper drying.
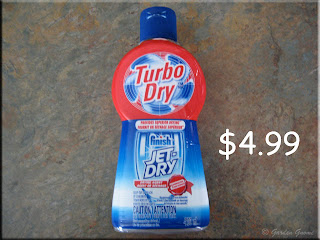 Brand Name Rinse Agent
I started off using a brand name rinse agent (JetDry®) at 7¢ per load then switched to their new TurboDry® formula. A 200 ml bottle cost me $4.99 for 64 loads or 8¢ per load. This brought my total costs to run the dishwasher per load up to 41¢ to 61¢. In the big picture the total cost for the brand name rinse agent worked out to be $16.64 so saving on rinse agent was not going to be a big cost savings but it would still be a savings. Part of being frugal is to never pay more for a product if you can find a less expensive product that gives you the same results.
The biggest problem I had with buying brand name rinse agents aside of the cost was availability. The regular JetDry® was usually available but the TurboDry® was not. Another problem I had was rinse agent is not something I could find on sale.
 Store Brand Rinse Agents
On day I was in NoFrills® and rinse agent was on my grocery list. There wasn't a bottle of JetDry® to be found so I tossed a bottle of their no name® brand into the cart. It was $2.99 for 250 ml. I immediately thought I'm getting 50 ml more for $2 less so as long as it worked the same as JetDry® I knew I would be switching. This would reduce my cost to 4¢ per load, not bad! I filled the rinse agent reservoir then waited to see the results. There was no noticeable difference between JetDry® and the no name brand®! It worked just as the same and it was a made in Canada product.
A few weeks later I discovered rinse agent at our local dollar store. It was 250 ml for $1, made in Canada and phosphate free! So I bought a bottle to try. This brought my rinse agent cost down to 1.3¢ per load so a savings of 6.7¢ per load. The key thing that I liked was the product was phosphate free. Eliminating any phosphates in the products we use is also important. Once again I did a few test runs over the period of one full loading of the rinse agent reservoir. This product performed just as good as the brand name without the phosphates so I went back to do a stock up. There is no expiry date on the rinse agent and unlike powdered detergent it does not lose its effectiveness.
When shopping at a dollar store think of it as a liquidation store. If you find a product that you like that works to your expectations, stock up then. Their stock is determined based on availability and don't forget some of this availability is due to buying up stock from other stores that went under. Once they are sold out a different product will replace that product. So do keep that in mind.
Garden Gnome
©2006-2009


 Page 1
 Page 2

 Brand Name Rinse Agent
 Store Brand Rinse Agents


