What does a Garden Gnome do when she is not gardening, in the kitchen or doing genealogy? Well the answer might just surprise you so read the entries to find out more. This blog focuses on everything we do to make our house a home. There will be a strong emphasis on home energy efficiency and do-it-yourself (DIY) projects. At the same time there will also be crafts, knitting and crocheting projects along with any other little tips we do to create that down to earth, I want to be here home. Please enjoy your visit :)


Wednesday, December 25, 2013

Merry Christmas

Merry Christmas 2013
Merry Christmas to each and everyone! 

I'm sorry I haven't posted in awhile but will be back to normal for the new year.  We spent October at our vacation home, then back home for almost three weeks, returning to our vacation home for five weeks.  We made the 1207 mile journey home for Christmas arriving Monday night, leaving us only Christmas Eve to finalize our holiday shopping, restock on groceries and deck the halls for our family gathering on Boxing Day (December 26).  The kids and grandkids will stay for a couple of days then when they leave it is prep time for another large gathering on the 28th.  'Tis indeed a very busy and hectic time for us, but we are very blessed!

May the peace, joy and magic of the holiday season be with you and yours today!  It is not what is found under the tree, but in the warm smiles and loving words of the people around us.  Merry Christmas!


Monday, July 22, 2013

Master Bedroom Blanket Update

One of the things I like so much about knitting and crocheting is it is quite easy to get that custom look for your decor.  Each project is unique!  It would have been so easy to just go out and buy a nice bedspread for our new king size bed but I wanted something special that only handmade would offer.  Given the size of planned blanket, I knew this was going to be a challenging project.  I chose a design by called the Wendy blanket then paid for the pattern.  What I paid for was actually the design as there really is no pattern other than a basic granny square.  I was very disappointed in what I did paid for since I could easily have duplicated the 'design' simply from pictures.  She did not include any pertinent details other than to start with a large granny square followed by alternating bands of small granny squares and rows.  At any rate, I developed my own style for this blanket.  Overall I will be pleased to share my results as to how I did certain steps in working the blanket, especially the joining and working corner joints, once the blanket is completed.

master bedroom blanket progress very close to covering the top of our king size bed
I've made a bit of progress on the master bedroom blanket.  The last time I updated was at the end of the eight rows following the second small granny square row.  At that time the blanket measured 57 inches square.  The blanket now measures 73 inches square just shy of covering the entire top of our king size bed.  Each small granny square row or band of eight rows adds about 4 inches.  Adding another band of small granny squares followed by a band of eight rows should give a measurement of 89 inches.  I need a total of 96 inches to include the depth of the mattress.  This means I can add a three to three and a half inch border to the blanket as a finishing touch.  I have been looking at various borders but haven't decided on anything yet. 

small granny squares in process of being made for fourth small granny squares row
I am currently working on the 60 small granny squares for the fourth small granny square band.  The joining row for these squares will be aran, the lightest colour in the blanket.

I normally work all the centres of the granny square first, followed by all the second rows and finally the third rows, putting them into stacks as I go.  In this case I would end up with stacks of squares in various stages of completion.  I changed that method for this set of granny squares, completing all three rows before starting the next square.  For this type of project, the first method is easiest if crocheting the squares on the go.  The method I am using is easier if the crocheting is not mobile but in all honesty either method works.  It is more of a personal preference.

I hope to have the blanket completed in the next couple of weeks.  It is slower going especially with all the distractions of summer but I am making a bit of progress each day.  I'm getting exciting as the blanket nears completion.  Even though it has only been a few months working on the blanket, it seems longer.  Stay tuned for the finished blanket results. 


Sunday, May 19, 2013

Curbing Our Dust Problem

Dust can be an issue in any home.  Some houses tend to be dustier than others due to location, age and interior features.  An old house with lath plaster walls will be dustier than a newer home with plastered walls as will a house with a lot of textiles or pets.  Increased household activity can cause dust to become airborne while indoor air currents can cause the dust to form dust bunnies, the bane of many homemakers.  Our home was built in 1994.  The walls are drywall and one selling feature for us was the absence of carpeting.  I quickly discovered that a home with all hard flooring did not mean less dust.  If anything, the dust is more apparent because it has nowhere to hide.

dust
After moving in, I realized the floors needed daily attention to keep them dust free.  There is a farmer's field behind us which is only a problem when the farmer is tilling or harvesting so I simply keep the windows shut then.  I came up with several solutions to control dust in our home including the use of both wet and dry mops.  I use the Bissell steam mop for floors as well.

About three weeks ago, I noticed the dust of the floors getting worse which really didn't make a lot of sense.  It was still cold enough that I hadn't had the windows opened and it had been over a week since we had had a larger get together.  Still, where I had been able to keep the floors looking nice by dusting each morning, the dust balls were quickly growing into the size of dust tumbleweeds.  I resorted to sweeping the upper level floors morning and night but within a half hour of sweeping, they looked like they hadn't been touched.  I was getting frustrated so mentioned to my husband that we might have to install an air cleaner on the furnace.  I set about researching for furnace air cleaners when I cam across a site that listed several ways to reduce dust in the house.  The author indicated that in most cases a furnace air cleaner was not worth spending the money on.  One of his suggestions was using a higher filtering furnace filter.  We already use the 3M allergen control filters so I went down to the furnace to check the filter.

dirty furnace filter
Oh my gosh!  I discovered the furnace filter was beyond being dirty.  It was clogged as you can see from the picture.  Clearly we had somehow forgotten to change out the furnace filter.  Actually, forgetting this important task is rather easy since it is not something you see on a regular basis and it is even easier when you spend time between two houses.  I know we changed a furnace filter back in December but it must have been at our vacation home.  At any rate, I did find the problem.

I turned off the furnace then went to the hardware store for a replacement.  With the new filter in place, I turned the furnace back on and set about removing as much dust as possible from the floors and furniture. I swept all the floors to remove the larger dust bunnies then vacuumed and finally used the wet mop.  Then I went through the house and damp dusted the furniture.  Once the dusting was finished, I turned the furnace back on.  The following morning, the floors were considerably better.  There were no large dust bunnies, just a light coating of dust.  I am using the wet mop with a vinegar and water solution each morning just to keep the dust knocked down even though it doesn't really need it.  At least the floors are back to looking normal rather than living in a dust bowl!


Friday, May 3, 2013

The Master Bedroom Bedding Thus Far

In anticipation of the arrival of our new bedroom furniture, I did a bit of shopping for bedroom accessories. Well, in hindsight I should have made different choices but at least the lamps and yarn for the new crocheted bedspread in progress were spot on.  Unfortunately, a couple of the purchases did not work out as planned which means back to the drawing board.  In the meantime, the bedding is usable.

the lighthouse quilt
My husband is funny about quilts.  Years ago before we finished having kids, I splurged on a beautiful handmade quilt to replace my childhood handmade quilt that he so loved.  It had more than seen better days.  Thirty years later and the quilt I splurged on is as close to being a rag as it can get although I am considering salvaging the top to have it re-quilted if possible.  My husband bought the lighthouse quilt about five years ago.  It matched the theme of our previous house along with the navy blue bedding including dust ruffle. While the lighthouse quilt actually matches the room nicely with all the colours from my colour theme appearing, it does not match the curtains that have a fair amount of yellow tones in them along with more of a tropical theme than a nautical one.  However, my husband insists on having this quilt which is fine as it will be covered with a plain quilt then the crocheted bedspread.

temporary bedding layout
The taupe 1,200 thread count bedsheets fit perfectly, matching the planned colour scheme.  However, my husband does not like the feel of them.  He claims they are too soft!  He likes the red set, as shown on two of the pillows.  It is a harsher feeling set likely an 800 thread count.  So, I'm back to shopping for taupe sheets.  I knew the duvet (foot of bed) would not fit as it is queen size but put it there to see if we wanted anything there or not.  It's a nice look for winter but a lot will depend on how the crocheted bedspread looks when it is finished.

I'm just playing with pillow arrangements.  The two back (taupe) pillows are the new king size pillows.  The two middle (red) are queen size as is the blue striped one.  The three smaller cushions were a real bargain bought for the inside not the ivory removable covering.  I wanted pillow forms to cover in crochet to match the bedspread.  Pillow forms for that size are $7.99 each but I found the cushions at Jysk (a bed, bath, home store) for $2.99 so bought them to cover in crochet.  I'm still tinkering with the pillows.  At any rate, I need to buy two more king size pillows.  So, the room is still only partly finished.


Thursday, May 2, 2013

The New Master Bedroom Furniture!

Our new master bedroom is from Vaughan-Bassett's  Reflections Furniture Collection.  It consists of a king size sleigh storage bed, two nightstands and triple dresser (7 drawers) with mirror in a dark cherry finish.   The two bottom drawers of the triple dresser and the drawers in the sleigh bed have cedar bottoms.  The style is classic luxury with an air of regal splendor.  This furniture will really look quite lovely in the master bedroom!  A five drawer chest (41" W x 19" D x 57" H) is available but we decided to wait and see if we could fit in another piece if needed later.   

setting up the new bed frame in master bedroom
We chose a storage bed because it would give us storage to replace some of what we would be losing by eliminating the highboy.  The sleigh storage bed is set up in much the same way as a waterbed.  The frame is set up first and because the frame is both large and heavy, it is positioned where desired first.  Once the main side rails are attached to the headboard and foot board, a wood centre support T is placed on the floor beneath where the slats will be attached.  The slats that are attached to two material bands are pulled out from the foot of the bed to the head.  Each slat is then securely screwed into the side rails.  The mattress rests on the slats, eliminating the need for a separate box spring.

master bedroom furniture set up
One of the complaints we had heard about memory foam mattresses is they were hot.  That is the last thing either of us want when sleeping!  Yet the idea of a memory foam for comfort was rather appealing.  We chose a Valentino Therapedic International EcoGel® king size mattress.  This mattress offers an ideal balance of comfort and support.  The soy-based gel memory foam reduces pressure points while keeping you cool. 

The set-up of the furniture took about an hour and a half.  The delivery men moved the old highboy downstairs, moved the queen bed set and frame into the guest room and set it up, and did the complete set-up of the master bedroom furniture.  Once the set-up was complete, we had to dust the furniture then it was time to make the bed.  Of note, this bed is high.  The top of the mattress is 30½" - inches from the floor.  The furniture does fill the room nicely so we are glad we didn't buy the chest at the same time.  I don't think we really have room for it.  The picture really doesn't do the furniture justice as it is quite impressive!


Wednesday, May 1, 2013

The Final Master Bedroom Prep on Day of Furniture Arrival

We have dealt with a small Mom & Pop furniture and appliance store for decades.  We did not hesitate to buy our new bedroom furniture from them.  They are very, very good to deal with.  The only downside is on some items like our bedroom furniture is, they have to order it in which takes time.  While the time frame is usually two to three weeks, delays can happen and that was the case with our bedroom furniture.  We received the call on Wednesday (April 24, 2013) that they would be delivering our furniture that Friday.   It was time for the final prep of the room.

east wall mainly cleared except for bed
Most of the master bedroom had been cleaned out.  We moved our triple dresser to the guest room and the two chairs to the games room.  The highboy was cleaned out ready for the delivery men to move it downstairs for us. The delivery men are really good!  The move the old furniture, bring in the new furniture and set up both.  They take away old furniture and appliances if desired and they remove any packaging the new furniture came in.

That morning, I stripped the bed then just covered it with the duvet to keep any dust off the mattress until they arrived.  I removed everything from the make shift night stands then stacked the baskets in the corner.  The lettering on the east wall was rather easy to remove by simply peeling off.  I was surprised that it did not leave any marks at all, not bad for a quick bit of personality from the dollar store!

west wall cleared
The sewing machine and antique trunk remained in the room.  At this time, I turned my attention to the floor.  I did a good sweeping and oh my gosh, true to form the dust was bad (more on that in a later post) even though the floors are dusted daily.  After sweeping, I dry dusted the floor.  I was going to wash the entire floor but instead, washed just where the bed was going.  I knew the deliverymen would have their shoes on so decided that washing the floor after the install would be a better option.  After taking this picture, I decided to move the sewing machine in front of the closet doors just to give them extra room for bringing in the new furniture.  With that, there was nothing left to do in the room until the delivery men arrived.


Sunday, April 28, 2013

Progress on the Master Bedroom Crocheted Blanket

Work continues on the master bedroom crocheted blanket.  I'm tempted to call it a bedspread as that is what it really will be given the finished size.  This blanket is a lot of work but it is coming together nicely.  I won't have it finished before the furniture arrives.  The way it is going, I will likely be working on it for a couple more weeks or more but that's ok.  When the blanket is finished, it will really offset the classic beauty of our new furniture!

master bedroom crochet now measuring 57 inches square
This picture was taken on Day 20 (Friday, April 26, 2013) of working on the blanket just after finishing the third band of small granny squares.  The blanket now measures 57 - inches square, a little over half of the planned 98 - inches for the finished blanket.  This is sized to fit our new bed with extra deep mattress.  The picture was taken on top of the queen sized bed that is being moved into the guest room.

I was rather excited as I took this picture.  The furniture was scheduled to arrive just after 4 PM that day.  I had stripped the room of everything except the bed, highboy dresser, antique trunk, sewing machine, the two wicker baskets and unused satellite tv box.   The bed had been completely stripped down with just the duvet in place for the photo shoot.

Next up, the make-over - both ups and downs...


Thursday, April 18, 2013

Working on the Master Bedroom Accessories

Earlier this month I wrote about starting the master bedroom make-over.  The plans were to keep the sage green colour of the walls and work from that bringing in the rest of the colours for our home.  The colours are cool taupe, green, deep burgundy, white, black and grey with lots of wood tones to warm and tie the colours together.  We ordered new bedroom furniture that was expected to arrive three weeks from the purchase date but it hasn't yet.  The Mom & Pop furniture store we have dealt with for years told us yesterday that the furniture would be in tomorrow or Monday so they would call to arrange a time for delivery.  During this time, we did most of the prep work like move our triple dresser into the guest room as our kid who was going to take it and the high boy decided it was too big.  We worked on purging some of our clothes and I started shopping for accessories.

master bedroom quilt set, sheet set and yarn
I'm not the type to go out and buy all the accessories for a room at once.  Rather, I like to build on my ideas waiting to find just the right item to fulfill that idea.  The new king size bed frame is a storage sleigh bed.  I immediately decided that a homemade blanket would be ideal, bringing in a bit of old fashion country charm.  I bought 4 skeins of Red Heart Super Saver yarn - medium thyme, cornmeal, buff, aran - all colours found in the new master bedroom curtains.  I wanted a plain quilt for under the new blanket that would allow the blanket to become the focal point.  It was a fluke that I found a king size quilt set (quilt, two pillow shams) at a bargain price that would work perfectly.  A few days later I found a  six piece king size bed sheet set in taupe accented with an embroidery scroll design.  Finally, I found two clear raised coasters that I think are meant for pillar candles but will be used for our drink bottles on the night stands.

master bedroom king size pillows
About a week ago, we were at Sam's Club and my husband picked out a package of king size pillows for the new bed.  Serta is a good brand and the price was quite reasonable.  Pillows are one of those things that most people do not replace often enough.  I saw one recommendation that pillows should be replaced every 3 months but I think that could be extended if you put pillow protectors on the pillows.  I think we almost need to buy another set so we have one set for the shams and one set for sleeping.  We can still use some of our existing pillows as they are fairly new as well and not used for sleeping.  I'll take the pillows we were using for sleeping to the animal shelter as they are always looking for pillows, blankets and towels.

master bedroom nightstand lights
A few days ago I found bedside lamps.  They were mix and match in that the pieces were bought separately.  I chose a brush stainless steel finish for the lamp base which was a very easy way to introduce grey into the bedroom.  The A-line shape shades are a medium light taupe material with just a hint of sheen, accented with stitched scrolls imitating the scroll embroidery on the bedsheets.  I think they will look quite nice with the darker wood tone of the new furniture.

We aren't sure whether the sewing machine cabinet the lamps are temporarily sitting on will be staying in the master bedroom.  We may have to take out the antique trunk as well.  I'm hoping the trunk can stay as it would look quite nice with the new furniture.
 
master bedroom crochet blanket in progress
I actually saw a bedspread called a Wendy blanket after the designer.  I knew I just had to make it but only wanted to use four colours not the seventeen she had used.  I bought the pattern on Ravelry and talk about a disappointment!  The only part that could be considered a pattern was how to do the first four rows of a granny square, of which those instructions are widely available for free from numerous resources.  The rest was simply how she arranged the granny squares. There were no details for anything else other than number of small granny squares and number of plain granny rows between the squares.  I ended up doing several ripouts and some of them rather large ones.  The so called pattern was basically useless.  How she could justify charging someone for the instructions on how to work four rows of a granny square is beyond me!   So I am writing up a full pattern for the blanket as I work complete with the actual way I put my design together, including the method I used for that first granny row after the small granny squares.  The small granny squares are worked up to the last row then that row is created using the join as you go method to form the band of small granny squares.  

This is day 12 of working on the blanket and now that I am using my own methods, the work is progressing nicely as pictured.  The piece is on top of a queen size bed (60" x 80") to give a bit of perspective as to its size.  The piece is currently 46 inches square, a little over half of the size I want it to be to cover a king size bed 76" x 80".  I will be working the piece to at least 80" but perhaps a bit larger.  I'm currently working on the next band of small granny squares (a total of 44).  I found an online tool that helps with randomly generating the colour pattern.

My initial goal was to have the blanket completed by the time the furniture arrived.  Between the ripouts and other demands, progress has slowed somewhat.  The piece is getting increasingly cumbersome and heavy to work on. I know it won't be finished by the first of the week but it shouldn't take too long with any luck.  I'll post more on my blanket later.  I think the blanket will end up being a focal piece in the room.

Working a bit of navy blue and burgundy into the room is going to be a challenge.  I'm not sure how I will do it but I'm sure something will come to mind.  At least we are getting a bit closer to finishing the master bedroom makeover.  Once the furniture is set up, things will come together rather quickly!


Saturday, April 6, 2013

Continuing With the Guestroom Make-over

When we bought this bi-level house in 2011, we immediately knew we would not be using the five bedrooms as bedrooms.  The three upper level bedrooms were destined to be master bedroom, guest room and home office.  The two lower level bedrooms were to be a walk in pantry and a dart room/den off the main games room.  The pantry is to the right of the den, across from the lower bathroom off the hallway leading from the games room to the outer walk-out.  We plan on putting a fouton in that room to double as addition guest sleeping space if needed.

We actually liked the various taupes in the house even if they did mix warm with cool tones.  Most of the taupes will be repainted in similar colours but in cool tones, letting the strong wood tones warm the rooms for a balanced feeling.  My colour choices for this house are deep burgundy, taupe, olive green, black and white.  I have to work in navy blue as well since our couch set is navy blue leather but that can be done through accent pieces.  Green is not difficult to work in given my love of plants.  Within these main colours there is a wide range of colours to work with so I'm not having too much of a problem starting to coordinate the rooms.  The upper bathroom floor tile is hunter green with greyish and light green marbling. 

new paint and curtains in guest room
The guestroom is at the end of the upper hallway with a north facing window.  The small wall with the framed needlepoint (windmill) done by my mother-in-law is the end wall of the closet in the master bedroom.  This forms a small, fairly useless entryway into the room.  The main room is 11' x 11' which isn't too bad of a size.  While the rest of the house was fairly neutral in various shades of taupe in most of the rooms, the upper bathroom was a horrid peach including the ceiling and the guestroom had obviously been a little girl's room.  The window wall and door wall were shocking pink.  The small wall and entrance were an almost neon blue and the far west wall by the chair was a neon yellowish green.  Running along the top corner where the chair is were coordinating circle stickers.  The bar light bulb was covered with a huge paper globe (likely a dollar store find) that had been decorated with drizzles of the shocking pink paint.  This room took two full coats of primer followed by two coats of paint just to cover those colours!  I used Beautihome semi-gloss colour ND044 which is the cool greyish blue, more grey colour of the marbling in the upper level bathroom floor.

As you can see, an air mattress  on a metal frame has taken the place of an actual bed in the guestroom for the past 18 months.  We were taking it down after each use to give the grandkids more room to play.  This worked well because we don't have a lot of overnight guests, mainly a couple of our kids with the grandkids who are still fairly small.  The guestroom is used primarily for the grandkids to play in with a ready bed if they want a nap which doesn't happen very often!  The air mattress is deflated for storage now so we can move our queen size bed into the guest room.  The air mattress will still serve as extra sleeping if needed, likely set up temporarily in the games room

There was no window treatment other than a curtain rod left in the guestroom.  I improvised with a cloth shower curtain until we found the Elsinor ring top panels at the fabric shop going out of business.  They are outdoor panels that are fade and water resistant.  They have a flowery print in black outline with red outline leaf accents on a creamy white background so they have three of my colours and match nicely with the room.  Clearly I need to add mini blinds behind them as well to block a bit more light when needed.

guestroom entrance and closet
This wall is at the end of the upper hallway with our bedroom door to the left and the home office sharing the wall on the other side.  There is a nice size but not over large closet that currently needs purging.  The dresser holds kids crafts in the top drawer and some of my yarn stash in the other four drawers.  The yarn drawers are stuffed!  There are a few projects on the go on top of the dresser.  The floor lamp needs to be worked into our home somewhere.  It along with two table lamps were custom made for us by a very dear friend shortly after we bought our second house.  The wood is covered with a special coating that gives the pieces an intense shine and depth.

I put two shelf units in the guestroom to house some of my book collection along with toys and books  for the grandkids.  There is enough floor space for them to play with the Lego bin but we will lose a bit of floor space with the larger bed.  I have the yarn ready to start the crocheted blanket for the bed to bring in a homey feel.  We are planning on upgrading the wood trim for the entire upper level which will change the look including the guestroom and home office closets.  The master bedroom trim has already been upgraded but even that may change. 

Within the next couple of weeks the guestroom will be closer to completion.  There aren't a lot of accessories to buy but I do need to find a light fixture and shade for the floor lamp.  We haven't decided on the bed placement yet but I have a couple of ideas including using the bookshelves to create a headboard.  I will likely buy a new quilt and pillow sham set as well.  Off to do a bit of shopping...


Friday, April 5, 2013

Starting Our Master Bedroom Make-over

This year, my husband and I will celebrate our 36th wedding anniversary.  During that time we have made seventeen moves, raised a larger family and owned our last six houses as well as buying a vacation home.  Our bedroom has traditionally always been the last room in the house to have anything done to it.  We were more concerned about kids' bedrooms and creating comfortable family living space than we were about turning our bedroom into a show room.  As long as our bedroom was clean and tidy, we were happy.  Occasionally, I would splurge on a matching set of bedsheets but quite frankly even matching sheets were not a high priority.

We bought our first bedroom furniture in 1979.  It consisted of a queen size mattress, box springs, headboard, triple dresser, highboy and one night stand.  The queen size mattress and box spring never made the trip out west with us.  Instead we bought a king size waterbed.  I can't remember if we left the headboard out west or not but somewhere in all the moves it went missing.  When we moved back to Ontario, we bought a queen size waterbed that we had up until about 5 years ago.   The mattress sprung a leak just after we got into bed to get a couple of hours of sleep before heading out in the wee hours of the morning for Las Vegas.  Needless to say, we got no sleep! Both waterbeds had wood shelves that sat on the waterbed frame to be used as small bedside tables.  They were large enough for a water bottle and a couple of small items but not large enough to have a small lamp.

We just bought a new king size mattress, a Vaughan-Basset sleigh bed with under bed storage, matching triple dresser with mirror and two night stands from our favourite Mom & Pop local furniture shop.  We have dealt with them for years!  Looking back we have bought dining room table set, kitchen bar set, HE washer & dryer, mattress & box springs, gas range, chest freezer, two dishwashers, a side-by-side refrigerator and now our new bedroom furniture from them so that says something about our loyalty in dealing with local folk who really have become friends over the years.  Unlike larger box furniture stores that have a fair amount of warehouse space, this small shop tends to have rather limited warehouse space.  We decided on what we wanted from the floor display then they ordered it in for us with an expected delivery date of 3 weeks from our purchase date.  The arrival date is quickly approaching!  They deliver and set up the furniture free of charge which is rather nice.   

master bedroom as seen from doorway
Our new house (built in 1994, purchased by us in 2011) is a large, five bedroom bi-level in a delightful established estate subdivision.  Of the five bedrooms, the master bedroom on the upper level is the only one being used as a regular bedroom.  The north facing smaller bedroom is being used as a guest room and the smaller west facing bedroom is now our home office.  The two lower level bedrooms are being used as a dart room/den and a pantry, respectively. 

The master bedroom is 15' x 12'3", with the north facing window on the north short wall and the head of the bed on the west long wall.  Out of camera range beside the sewing machine cabinet (lower left) there is a large floor to ceiling double bi-fold door closet (7'6"W x 8'H x 29" D). Unfortunately, the closet is stuffed so we need to do a bit of purging!  The room is painted an olive green (actually two tone) that we like so will be leaving it that colour only putting a new coat of paint to freshen the room. We have a queen size mattress and box springs on a frame that will be moving into the guestroom.  The two IKEA wicker chairs are going south to our vacation home.  We don't know whether the trunk will stay in our bedroom or not depending on how the new furniture fits.  The floor like the rest of the upper level is laminate with the exception of the kitchen that is marble tile and the bathroom that is ceramic tile. 

We knew immediately we wanted to keep the green.  A couple of weeks ago, we stopped at a fabric store that is going out of business.  They had drapery panels on sale for up to 70% off.  My husband spotted the Saratoga leaf design drapery panels and just had to have them because they reminded him of Florida.  These grommet panels are actually outdoor drapery that is fade and water resistant as well as anti mildew.  They match the room perfectly except we have to move the rod down so the panels just clear the floor.  Well, he liked that pattern so much after he saw them up, we went back for four more panels to change out the living-room burgundy drapes and V-shape valances at our vacation home, but that is another story.

outdated master bedroom furniture
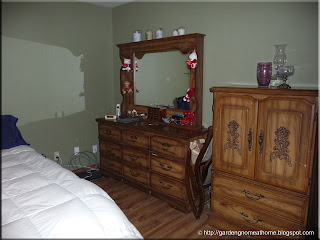
Despite the many moves, what is left of our bedroom furniture is in rather good all be it dated condition.  This was a very popular design when we bought it.  There were several variations around the same design, some plainer than others.  The little shelves on each side of the mirror that were so appealing when we bought the furniture are now viewed as dust collectors.  The top of the mirror is also a dust collector.  I normally had a couple of straw hats on top but I'm in the process of tearing the room apart.  All of the drawers have to be emptied as one of our kids is taking both pieces hopefully before our new furniture arrives.

master bedroom lighting
We did not install the halogen lighting fixture in the master bedroom.  It definitely is not a good design for any bedroom if you ask me.  The light is harsh and glaring creating odd shadows aside of not being very energy efficient.  We are replacing the lighting fixture but I'm not sure with what yet.  I have been looking since we bought the furniture but so far have not found something I like.  I am leaning towards a ceiling fan with light fixture similar to what we have in our vacation home.

I put the saying decal on the wall over the bed in lieu of a headboard shortly after we moved here knowing we were buying new furniture for the master bedroom.  This is a rather slick decal that is on a backing paper.  You position the backing paper and wording where you want it then slowly rub across each letter.  Once the letters have all been firmly rubbed, you slowly peel off the backing leaving the individual letters.  Unlike some decals, there is no clear sticker material around the letters so it looks quite nice.  The letters can be easily removed without marring the paint finish.  

master bedroom makeshift night stands
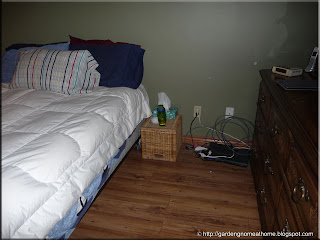
After about our fourth year of marriage, until we bought our vacation home in 2010, we had always had a television in our bedroom.  We did not put a television in down there and don't intend to.  We had planned on putting a television in our master bedroom here, hence the satellite box on the floor.  However, even though our bedroom television is sitting in the dart room/den on the lower level not being used, and won't be used, we have no plans to put it back into the bedroom.  We are finding that we are enjoying a higher quality of sleep without the television.  If I can't sleep, I get up and make a cup of chamomile tea blend that has rosehips, valerian root, anise seed, fennel seed, caraway seed, peppermint, passion flower, lemon balm and calendula petal.  I bring it back to bed with me and sip on it while playing a hidden objects game on the iPad before drifting back to sleep.  I have found this routine works well before bedtimes so I usually sleep through the night.  At any rate, we will be removing the satellite box.

We are currently using two IKEA storage baskets turned upside down as makeshift night stands.  Originally we were going to do our bedroom first but we spent six weeks of the fall of 2011 in Florida, then almost a full 3 months spread over 3 trips in Florida in 2012.  Instead we worked on the upper level bathroom, did a lot of work in the kitchen and repainted the guest room before running out of steam in 2012.  I spent the first two months of 2013 quite sick so it was only mid-March before I started having much of an interest in the house decor aside of keeping things neat and tidy which honestly some days was all I could muster!  The weather is starting to turn so I'd like to get the master bedroom and guest room finished before we start our outside work of landscaping and decking.  There are still a few projects to do in the kitchen.

We aren't fancy people as far as wanting a showroom bedroom.  We have our colours and furniture decided so I'm working on ways to make our bedroom comfortable, inviting and co-ordinated.  In the top picture you can see a few accessories I have bought for the make-over.  I'll post more that later.  I'm planning on making crochet blanks for both the master bedroom and guestroom.  I am ready to start the guest room blanket but still need one more colour (I think) for the master bedroom blanket.  I am still shopping for bedside lamps.  The only place we have ever had bedside lamps is at our vacation home but we really enjoy them so I need to find some that match nicely for the master bedroom.  I finally took the cross-stitch wedding sampler I worked so long on to the frame it shop so that will go in the master bedroom.  I also have one of the original paintings that we collect for the master bedroom as well.  Let the make-overs begin!


Tuesday, March 26, 2013

Homemade Orange Cleaner

Earlier in the month, I bought a Bella High Power juice extractor.  Most fruits and vegetables being juiced do not need to be peeled but citrus fruit does.  That leaves the peels to either candy or dehydrate, or discard.  I did a bit of searching for something else to do with the peels and came across making homemade orange cleaner.  Anytime I can replace a store bought, toxic cleaner with a non-toxic, homemade cleaner I will so I decided to make a batch the next time I juiced oranges.

ingredients for orange cleaner
I recently made a orange pineapple juice (in mason jar) which left me with the peels from 7 navel oranges and the top of the pineapple.  I saved the seeds and pineapple top to grow.  I've had good luck with lemon seeds growing and now have three little lemon trees about 6 - inches tall. Pineapple tops will also root to grow into a lovely houseplant so I saved that as well. I set the orange peels aside to make the orange cleaner.  

Materials needed for orange cleaner: large mason jar or similar with lid, white vinegar; later you will need a large measuring cup, fine mesh strainer, funnel and spray bottle.

orange cleaner set up
Setting up the orange cleaner is very easy.  Simply put the orange peels into the jar then cover with the white vinegar.  I used a 1.5 L mason jar and a reusable storage lid. I also used all natural vinegar because I was out of the cheap white vinegar but next time will use the cheap one.  Label the jar with the date then set aside and let sit for at least two weeks.  That's it.  The sitting time is the time consuming part so you will want to start another batch before running out of the orange cleaner you are using.  

The orange peels in vinegar looked rather pretty so I was anxious to test the results.  Once the sitting time was finished, it was time to move to the next step of making my non-toxic orange cleaner.

orange cleaner ready to strain
I make a lot of homemade cleaners and have found the spray bottles from the dollar store work well for liquid cleaners I want to use as a spray.  As you can see, after sitting for two weeks, the orange peel had absorbed some of the vinegar.  This really wasn't a problem.  I was more concerned about the amount of cleaner I would get as well as how well the orange cleaner cleaned.  

I strained the orange cleaner into the measuring cup.  At that point the orange peels themselves were of no further use so were put down the food disposal.  I ended up with 24 oz (750 ml) of homemade orange cleaning solution.

orange cleaner ready to use
Vinegar itself is a good household cleaner that kills germs, cuts grease and leaves a sparkly finish.  Orange peel contains oils that give the characteristic orange scent.  I tested the homemade orange cleaner on the counter.  It cleaned well with no residue yet had a pleasant smell.  I was quite impressed!

As is, the cleaner does a nice job cleaning.  If a sudsing orange cleaner was needed, a couple of drops of liquid dish detergent could be added but for most cleaning purposes this really isn't necessary.  The total cost of the 24 oz of homemade orange cleaning solution using the natural vinegar which is more expensive worked out to 56¢.  If using the cheaper, store brand white vinegar the price is reduced to 37¢ at our current prices. 

I am very pleased with the results.  It is nice to be able to add one more homemade, non-toxic cleaner to cleaning supplies.  The nice thing is, this cleaner is made from orange peels that many simply discard to begin with.  It is low cost and effective, making it an eco-friendly cleaning product.  Do give it a try the next time you have a few orange peels.  You will be pleasantly surprised!


Monday, March 25, 2013

LED Lighting

LED Christmas and nightlights quickly took over more energy inefficient versions and they cost pennies to operate.  Solar LED lights have become very popular because not only do you get the effect you want they only cost the price of the light itself with no further operating costs.  Over the past several years we have seen a move away from energy inefficient incandescent light bulbs CFLs and now LEDs for daily household use.  A 60W incandescent light bulb can be replaced with a 13W CFL bulb effectively saving 47W of power or an 11W LED bulb saving 49W of power.  Unlike CFLs, there is no mercury in LED bulbs and their lifespan is considerably longer (more than double) than CFL bulbs so they really are environmentally friendly.  Currently, the main deterrent to switching to LED bulbs is price at $19 to $24 for incandescent style bulbs and $26 for the prong type to replace halogen bulbs.

Sylvania Utra High Performance Series LED bulb
I bought a Sylvania Ultra High Performance Series LED light bulb to use in our new range hood.  This 8W bulb is the equivalent to an 11W CFL bulb or a 40W incandescent bulb.  It is dimmable, compatible with dimmers.   The bulb lasts 25,000 hours or 23 years based on 3 hours operation per day.  At a cost of 11¢ per kWh the bulb will cost 96¢ per year based on 3 hours operation per day.  If the bulb were left on 24 hours per day, it would last 1,041 days or 2.9 years at a total cost of $22.27 (96¢ x 8 x 2.9) or $7.68 per year making it a frugal if you have a location where a light needs to be on 24 hours a day, 7 days a week.  Under most household applications, an average of 3 hours per day is a reasonable estimate.  I paid $24.99 for the bulb so if the bulb lasts 23 years, it cost just over $1 per year plus the hydro use so in reality about $2 per year.

The new LED bulbs have a few features I really like.  The bulb contains no mercury which is a real plus over CFL bulbs.  Another plus is the base which does not have a transformer so it will fit any standard light fixture just as an incandescent bulb would.  The nice thing is there is no warm up period like there is with a CFL when first turned on.  There is no notation that LED bulbs are best in locations where they won't be turned on and off all the time as there is with CFL.  LED bulbs contain no toxic substances, they can be disposed in normal household waste but since they last so long, even that is of little concern. 

I can't wait for the price to come down on the LED bulbs!  I remember when the CFL first came out.  The transformer base was big and bulky so the bulbs could only be used in certain fixtures, mainly lamps or to replace a bare ceiling bulb.  I think I paid somewhere around $20 for the first CFL.  Now, we can buy an 8 pk of 13W CFL for $9 at Sam's Club.  As the LED bulbs become more popular, the price will go down.  There are less expensive ones already on eBay so I may order a couple of different styles just to try them. 

The LED lights have a lot of potential.  They can be used indoors or outdoors, in damp locations and at temperatures ranging between -20°C and 40°C (-4°F and 104°F).  The energy savings switching from CFL  to LED is not the huge difference it is when switching from incandescent to LED but it is still an energy savings.  Every watt saved reduces our energy usage as well as our hydro bill so the LED lights do look very promising.


Sunday, March 24, 2013

Replacing Our Kitchen Range Hood

We bought this house in September 2011.  Within the first two weeks installed a new natural gas range and replaced the dishwasher.  Then we left for our vacation home in Florida for three weeks, home long enough to do some unpacking and organizing as well as a bit of home canning then we were back to Florida for most of December.  When we returned home, I turned my attention to choosing colours for our new home and repainting a couple of rooms.  Although I had plans to repaint all the rooms before spring, that didn't happen but I did get three finished, the guest bedroom, upper level bathroom and kitchen.

The kitchen was painted a cool taupe when we bought the house.  A friend of ours is a cabinet maker and finisher so he is doing a lot of custom woodworking for us.  He make a shelf for over the sink just to the far left but visible in the last picture.  We custom matched the paint for the walls to our dinnerware thanks to our friends at Home Hardware.  Once the walls were finished, our friend built in the bulkhead and added trim around the ceiling.  We had panel curtains hung.  My husband installed a food waste disposal just in time for the busiest part of the canning year.  I home can year round but mid-May through mid-October is very busy.  The kitchen sat that way through the busy canning season and three trips to our vacation home.  I was sick most of January and February so got little done as far as painting and decorating.  That changed with March when I was once again on my feet ready to tackle a few new projects. 

old disgusting white range hood
The existing range hood was about as disgusting as you could get!  I took household ammonia to it and still could not get the thing clean.  Not only that, when the northerly winds blew there was enough draft coming in the range hood to move the panel curtains.  I removed the vent screen, covered it with tin foil then put it back into place just to keep the cold air out.  So, I went to Rona Building Centre for a replacement, identical to it except black for $49.99 that was in their flyer to find that it had been discontinued.  The search was on.

In fairness, I seldom use a range hood.  I had no range hood in our first two houses, a range hood in the third house, no range hood in the fourth but then installed the down draft system on the Jenn-Air range that was also moved to our fifth house.  I prefer the down draft system over a range hood but we bought a natural gas range for this house that doesn't have a down draft system.  Replacing the range hood, in my mind, was more a matter of aesthetics.

We were restricted as far as size both width from the cabinet width and height due to the way the ceramic tile had been installed.  We could not go to a range hood wider than 30 - inches or deeper than 6 - inches.  I saw a nice thin line model I really liked but then we would be left with a gap between the tile and the hood.  I finally decided on the Broan-NuTone HDN64 Series 30 - inch, 180 CFM 7.5 Sones range hood in black for $79.99.  Sones is the measurement of the sound level the unit produces.  At 7.5 Sones this model is considerably louder than some higher end models that produce only 0.9 Sones.  This model has two fan speeds and two settings for the light brightness controlled by rocker switches.  It does have a nice, basic design (black with platinum lettering) that I thought would match well with the kitchen range and blend nicely with the rest of the room. 

baffle on new range hood
The new range hood could be installed ducted to the outdoors or non-ducted.  It has a damper (included) to prevent cold air from entering when installed ducted.  If installed non-ducted, the hood requires an additional charcoal filter sold separately.

The damper was very easy to install on the top of the range hood.  My husband removed the knock-out on the top of the range hood then screwed the damper into position with the provided self tapping screws.  The baffle plate was slid into place behind the grille on the front of the range hood.  The slot where the baffle plate went is just visible to the right side at the top just behind the logo on the front of the range hood.

space where old range hood was removed
In order to install the new range hood, my husband turned the power off.  Then he removed the old range hood.  I washed the area well.  I then painted the smaller wall just to make sure there would be no wall showing that didn't match the main wall colour.  It took two coats but dried quite quickly.  I likely could have skipped this step but just wanted to be sure.   As you can see, rather than cut the tile as it should have been, the previous owners didn't.  That in itself would have presented a problem had we decided to use a range hood that wasn't as deep, not that it could not have been solved, just it would have been more work to install. 

old and new range hoods together
If you look closely you can see how dirty and stained the old range hood was.  More importantly the actual baffle was missing on the damper (top of old range hood to the left).  This explains why the cold air was pouring in when the wind blew.  Under normal use, there is no way the baffle would just go missing so it must have broke off when they removed the range hood to install the tile.  Why on earth they replaced the range hood without the baffle on the damper is a mystery but then why they would have reinstalled a range hood in such poor condition is beyond me.  It should have been replaced when they did the tiling.

Once the paint was dry to the touch, it was time to install the range hood.  My husband carefully placed the range hood in place and made the necessary connections.  Then he secured the unit temporarily to test the connections by turning on the power.  All was well so he turned off the power, finished securing the range hood and turned the power back on. 

new range hood installed
The new range hood really looks nice!  I used a Sylvania 8W LED bulb (450 lumens) instead of the GE 13W CFL (825 lumens).  Essentially, it was like replacing a 60W incandescent bulb with a 50W bulb.   We were already saving 47W by using a CFL rather than a 60W incandescent but now we will will be saving another 5W.  In this day and age of energy conservation, that is a good savings.  I am rather pleased with the light output as well.  The range hood light is mainly used as task and occasionally evening  lighting.

So, we are one step closer to finishing the kitchen.  When our friend installed the bulkhead enclosure, it was more of a taupe tone than golden oak.  He is going to redo the cabinets to match.  He is also going to cut the extra marble tile we found in the garage to fill the gap under the new dishwasher.  That leaves us with replacing the microwave oven, the sink and faucet.  With any luck our kitchen will be completely finished in the next month or so.


Monday, March 18, 2013

Our House is a Mess!

I would love to say our house is always neat, tidy and ready for unexpected company at any given moment.  The reality is, it isn't.  That's because I am a chronic multi-tasker with many, many projects on the go (knitting, crocheting, home decorating, home food preservation).  I'm a high volume canner which by definition creates a multitude of messes.  We are also working on the house so there are a lot of DIY projects that create a bit of chaos and mess. 

This past couple of weeks, my husband hung new drapes in two rooms and replaced the range hood, both of which I will go into further detail.  Then, I finally had enough of how our dining room table was looking so decided it was a good time to refinish it (more details to come).  While that project is moving along nicely, I'm getting little done in the way of housework and gearing towards my annual spring cleaning.  So today, I took action and got out my trusty timer to go back onto my 15 minute routine.  I'm focusing mainly on the morning hours (9 AM to noon) to do this, freeing up the afternoons for blogging, knitting/crocheting and cooking.  I'm up a lot earlier than that but unless under a crunch usually don't do much housework other than laundry before 9 AM.

The 15 minute routine is my modification of the 15 minute declutter from my Flylady days.  Her idea was to set the timer and do whatever you could in your zone in 15 minutes.  The month was divided into zones so for the first week of the month you only focused on zone 1 which I think was the entrance.  That never worked for me but mind you she was/is giving advice to individuals with severe clutter problems bordering on hoarder issues.  So while the zone thing never worked for me, the modified 15 minute routine did as did the 27 Fling Boogie.  For that, you grab a garbage bag then as fast as you can toss 27 pieces of trash into the bag, then toss the bag.  Once it is in the bag it can't come out.  I modified that a bit as well to meet my needs. 

I take the timer to any room and it doesn't matter which one, set it and do as much as I can in 15 minutes.  When the timer goes off, I have a 15 minute timed break which is much needed due to health.  Then I repeat the process.  So far today, I've hit the utility room, pantry, kitchen, master bedroom and living room.  I can't believe what a difference just 15 minutes can make in any room.  It is not a perfect system and the house will take two or three days to get back to normal but it is a system that is working well for me.  I'm looking forward to getting order restored in our house!


Monday, March 11, 2013

Dealing With Mice

I read where if you see a mouse at night, set a trap but if you see a mouse during the day you have an infestation so likely need an exterminator.  Now we have owned six houses not counting our vacation home.  Our last three homes have had in common a very proximity to farmland.  What this really means is when the crops come off the mice come in.  It was common to see mice and voles in the garden and around the yards at our last two houses yet here I haven't seen a mouse other than what we trapped.  Vole live with proximity to river banks.  They seldom get into houses as they don't climb like mice but they can be problematic in the garden.  It is common to see voles scurry across yards or patios to get to the river bank.  In general, you won't see a mouse in the house, only evidence of a mouse in the house.

Our experience was we set a few traps and only catch a mouse or two then no further signs of mice activity more, then it was safe to seal the house well.  Chances are your problem is solved although you still need to keep a watchful eye.  This house was a bit different even though it is a newer house but had sat semi-empty for over six months.  The field came off and the mice came in.  We trapped four mice within one week!  Then I noticed the tell tale tracks of mice on the deck after a snowfall so did not hesitate to call in the exterminator.  He set up six bait stations, 5 indoors and 1 where we saw the mouse run.  Once the bait stations stayed clear of activity for a couple of months he told us to seal the hole the mice were getting into the house.  We haven't had a problem since nor have we seen any signs of activity in or around the house. 

You don't need to see a mouse to know you have problems.  All you need to see is the tell tale signs of a mouse.  If you see droppings, take action immediately.  This is not something you want to ignore.  Set traps and/or bait an exterminator.  Once you are sure there are no mice in the house, seal any problem areas where they are getting in.  Keep the traps and /or baiting going for at least 3 months after sealing the house.  If you see any signs of activity, outside, increase the traps and/or bait stations.  If you see any signs of activity in the house, set more traps then monitor the situation.


Tuesday, February 26, 2013

The Cell Phone Verses Landline Delimna

There is the question as to whether to give up a landline (aka phone service) in favour of cell phones only.  Some of our kids have totally eliminated their landlines and a couple after using only cell phones for a couple of years went back to adding a basic landline.  We have Bell for our landline, Roger's for my husband's cell phone and I put my cell phone of a pay as you go plan through Telus because I seldom use it. 

Here's the problem in Ontario.  We have Bell so pay $54.85 for a very stripped down service that includes caller ID and 500 minutes of long distance for North America.  They were none to pleased when we cut over $30 worth of extras about three years ago after buying a home telephone system offering call waiting, call blocking and all those nice features on board so all we need is call display.  The only feature on our landline that can be reduced is long distance but that won't save us much.  I pay $100 per year for my cell phone pay as you go plan with the only problem being it is only good in the US but I can unlock the phone, buy a sim card and plan in the US which would be good at our vacation home.  I very seldom travel in the US by myself so really don't need a cell phone there.  My husband pays $86 per month for his cell phone which has a data plan.

We looked at getting a new cell phone for me and eliminating our home landline.  A new cell iPhone was $199 special and adding a family plan was $50 plus $16 for caller ID and shared data ($66 total).  We would be up to $152 per month BUT if my husband changes his current cell phone plan that is no longer available he would also have to pay $16 for caller ID which brings the total to $168 per month.  We are currently paying a total of $151.43 for both cell phones and landline so giving up the landline would actually cost us more money for less.  Plus, we have internet and television with Bell so get a bundle discount of $21 per month that we would lose if we eliminated the landline.  After doing the math, we quickly realized giving up our landline in favour of cell phone only would not save us any money but rather cost us more while getting less.  Now technically, we could without changing out my phone, adding US coverage with no data but it would still cost us more monthly. 

I personally would rather go to cell phones only.  It really is a lot more convenient and quite frankly the younger generation has embraced cell phones, choosing to eliminate landlines.  There are a lot of benefits going to cell phones only as you have instant communication pretty much everywhere.   So far, the problem of telemarketers is very low as you aren't listed in a directory so the calls for the most part that you get are for you. 

The downside is cell phone numbers like landline numbers are recycled which means you can have a high volume of calls from debt collectors from the previous owner of that number but the cost of those calls can cost you in addition to your actual cell phone plan.  We dealt with this problem with both our landline phone number and my cell phone number since moving here in September of 2011.  They can be very nasty as well as threatening and if you are on a pay as you go plan can really eat up your minutes AND they will not remove the number from their database even if you request it contrary to the rules set out by the CRTC.  The problem is, you cannot block these calls on a cell phone the way you can with a landline.  The best advice I have after having this cell phone number for 18 months is to not answer the call, find out who they are via a service like Who Calls Me then report them to the CRTC. 


Wednesday, February 20, 2013

Upside Down or Right Side Up

When it comes to homemaking and organization, everyone has their own ways of doing things.  What makes sense or works for some does not make sense or work for others.  There are even debates over which way the roll of toilet paper should be placed on the roller.  What I never really considered an issue was whether to put glasses, mugs and other drinking vessels upside down or right side up in the cupboards.  I used to think it was just a personal preference.

Our first three purchased homes were relatively problem free as far as home invaders.  The worst we dealt with was ants (rarely), house flies, fruit flies and in our third house, earwigs.  Even then, all of these pests were very minor outbreaks that were quickly controlled.  They were not ongoing.  Glassware and mugs were placed right side up in the cupboards.  Then we bought our fourth house that backed onto farmland.  When the crops came off, the mice came in.  Our fifth house was a beautiful house in a beautiful location but it had issues.  It was across the main road with a small road in between from farmland on water front property.  The house was surrounded by English ivy, a rodent mecca.  The mice would scurry across the patio, get into the outdoor grill and loved visiting us indoors.  Not only were mice a problem, the house was a magnet for centipedes (4 or more a week!), millipedes, pill bugs and carpenter ants.  We bought this house in 2011.  There is farmland directly behind it so even though it is a newer house, mice found their way indoors.  After catching four mice, we called in the professionals who quickly took care of the problem.

As part of our pest control, glassware and mugs have been placed upside down in the cupboards ever since our fourth house.  It's a way to ensure that rodents or other pests don't get into them, and it keeps any dust out.  Well, this does make perfect sense.  However, shortly after we discovered mice in this house I was getting platters from the shelf unit in the pantry, I was not pleased to discover the tell tale signs of mice on the top platter.  So, even if the glassware and mugs are turned upside down in the cupboards, other dinnerware or pots and pans in the cupboard can still be contaminated by rodents, other household pests or dust.

Essentially, upside down or right side up ends up being a personal choice.  While it will give peace of mind that nothing contaminated your clean glassware or mugs, it does nothing to eliminate the possible contamination of other items in your cupboard that come into contact with food.  Up or down, 'tis up to you :)


Sunday, February 10, 2013

Energy Conservation Incentive Programs

Yesterday, I wrote about our so far nasty experience with our municipal hydro provider setting up the PeakSaver program.  The premise is, the municipal hydro provider wants you to give up a bit of control over your hydro usage if needed and in return they give you an incentive for signing up.  So far, the municipal hydro provider is winning and we are left with a pile of electronic junk thanks to BlueLine.  Seriously, with out experience using the BlueLine Monitor and the BlueLine WiFi Bridge, I wouldn't wish either on my worst enemy!  Talk about crap and I do mean crap!  Now, at the moment I am not naming our municipal hydro provider (although they claim to be all about integrity but so far I've seen none of that) but I will and I have every intention of going through my MP (already contacted) and the BBB as well as reporting BlueLine to the BBB.  Seriously, pissing off consumers is not the way to go about getting them interesting in energy conservation.

Energy conservation programs rightly executed are awesome as it was done through Ontario Hydro.  Everyone was a winner.  We got a new programmable thermostat and they got a customer who didn't mind them cycling our hydro during the summer if needed.  So incentive programs do work. We knew what the incentive was through Ontario Hydro but not through our municipal hydro.  That was our mistake or my mistake because I am the primary with respect to energy conservation especially grants and that type of thing.  I should have came right out at asked the municipality hydro provider what the incentive was and then did the research before saying we wanted it.  This serves as a reminder BEFORE you sign up to any energy conservation program, do your research first.  It will save you a lot of headaches in the end.


Saturday, February 9, 2013

The New PeakSaver Goodies - A MAJOR FAIL!

When we moved into our fifth purchased home in 2007 our goal as with all of the houses we have owned was to make it as energy efficient as possible.  At that time we were dealing with Ontario Hydro, who supplies municipal hydro companies and is by far a lot nicer to deal with than the municipal ones.  We signed up for their PeakSaver program which gave us a $25 rebate off our hydro bill and a new Honeywell Programmable Thermostat.  We bought our sixth (actually seventh if you count our vacation home) in 2011 so I immediately called the municipal hydro company to sign up for the PeakSaver program.  What this program does is allow the hydro company to remotely adjust your thermostat by 3 degrees during the heavy air conditioning usage during the summer months if there are brown out conditions.  Honestly, I think they only did it three times in the four years we owned that house.

peaksaver gifts
My husband was very excited that he was going to get a new thermostat.  NO!  What they gave us as an incentive was a BlueLine WiFi Bridge, a PowerCost Monitor and a Coby tablet so we can monitor and control our hydro use online.  Now the real problem is, the technician installed the remote on the AC unit and the sensor on the meter but then just handed me the boxes and the rest has turned into a bloody nightmare!

The WiFi Bridge if working properly would allow us to remotely control our furnace and AC from the cloud (online program accessible anywhere).  Since we are away a lot, this would be a nice cost saving and energy conservation feature BUT after several failed attempts at installing it, several reboots, disabling my firewall and two and a half days on the phone with BlueLine customer support I have nothing but a piece of junk!  The BlueLine PowerCost Monitor is rather nice as you can see the power usage and cost as you are using it BUT it doesn't work properly.  The numbers are off as it right now it is telling me it is 60°F outside when in fact it is 29°F and the dang thing keeps going into sleep mode.  It would be a very nice visual if it worked properly.  I have to tell you I am really not impressed with BlueLine products.  It has been two weeks trying to get this figured out and settled so Monday morning I will be calling my hydro company and ask them to remove the PeakSaver and give them back all their pieces of crap.

You know this really does tick me off.  They want you to conserve energy and set up programs to help you conserve energy then give you a crappy incentive that doesn't even work!  It would be bad enough if one of the pieces of equipment they gave us didn't work, but none of them do.  Oh wait a minute, the Colby table works but it isn't anything I couldn't do on my iPad to begin with.  At least the thermostat they gave us as an incentive last time worked!  In terms of customer loyalty and energy conservation this particular program through the municipality hydro company is a huge FAIL!!!!!!!!!!!!!


Saturday, February 2, 2013

Beanies for Bravery

We were in Florida at our vacation home when the word of the horrid events at Sandy Hook Elementary School unfolded.  Like many I was glued to the television hoping it was just a bad dream.  I've been in a knitting and crocheting funk ever since we moved here in September of 2011.  Aside of making a few dishcloths for here and our vacation home, starting a couple of projects, my knitting needles and crochet hooks have fallen silent.  Inspiration comes in strange forms sometimes.

beanies in progress
My daughter who only crochets emailed me asking if I would want to make a couple of beanies to be sent to the survivors of Sandy Hook Elementary School.  I told her I would.  Between Christmas and New Years, she brought me a skein a Red Heart Team Spirit yarn and the pattern designed by Michele Miller to be used for the beanies.  It is not to be used for commercial purposes but is free to use for non-commercial purposes.

Really, this is a simple round with increases evenly spaced to keep the project round then when you reach the desired diameter, discontinue the increases and continue until the desired length.  Basically, what you want to do is start the ring then increase evenly each succeeding row.  The first row after the ring is an increase stitch in every stitch, followed by work one stitch, increase,  in the next and work one stitch continuing around the round, then join, work two stitches and increase, work two stitches, continue around the round.  Each round you make increases the number of the first worked stitches by 1 and increases the number of stitches between increases by 1.  Once you understand how to increase to keep the project round, you could easily create your own pattern, custom tailored to what you are designing.

The beanie starts by making a magic ring.  The magic ring is a slick way to start a round project without leaving that little hole in the centre if using the traditional method of starting a round.  I am very experienced in crocheting but I did have problems starting the magic ring.  There are YouTube videos and it make take a couple of attempts but once you get it, you get it.

the finished beanies
I made two of the beanies as pictured.  Now I am a huge fan of variegated yarns but this is the first time I have used a self-striping yarn.  It does stripe nicely but I was not impressed with the texture.  The yarn was harsher and prone to splitting which I found a bit surprising as Red Heart is one of my favourite yarns to work with.

Together we sent 4 beanies in support of the children of Sandy Hook Elementary School.  I hope a little 'anything' helps give a bit of comfort if only in support.  I am truly saddened at those events so really What was nice is this project actually inspired me to do a bit more so the knitting needles and crochet hooks are in high gear.  What these children gave back to me even though they don't know it is a renewed spirit to get creating with knitting and crocheting.  From the bottom of my heart I wish them the best, the strength they need to get through this ordeal, the courage to face the future knowing the world is not that bad of a place...


Saturday, January 26, 2013

Knock Down the Dust Mite Population with Cold Air

Many folk suffer from dust mite allergies more specifically from dust mite droppings. Dust mites are microscopic insects that live in our home feeding off of dead skin. The problem is dead skin accumulates in dust as a normal part of our daily activity because we are always shedding skin. In homes with carpeting and upholstered furniture or in rooms with a lot of textiles (eg. stuffed animals), the dust mite population can explode into large numbers causing those allergic to dust mites to have an increase in allergy symptoms ranging from minor (eg. sniffles, runny eyes) to life threatening (eg. severe asthma attack). My allergists and respiratory therapist have drilled it into me over and over that the best control is to reduce the dust mite habitat by removing all carpeting and upholstered furniture. We've been working towards that goal and in September 2011, we finally bought a house with no carpeting. All floors are hard so the dust mite population here is quite low. Not everyone can rip out their carpeting or buy a house with no carpeting. If you live in a cold climate as we do, you can use the reduced humidity and cold air treatment to knock down the dust mite population in your home. If you have a humidifier, do not set the humidity level higher than 25%. This will still help keep your mucosal membranes from becoming too dry. The cold air treatment ideally needs 24 to 48 hours so is best done during the winter when you can be away for one or two nights. The ideal magic temperature you want to get your house to is 50°F, no lower as you don't want pipes freezing. Turn the furnace off and replace the filter about 3 hours before leaving the house. Gather all textiles (eg. stuffed animals, pillows, afghans) and place in plastic garbage bags. Put them in the freezer or if you have an unheated garage or shed in there while you are gone. Strip the beds leaving them bare. Thoroughly vacuum all floors both hard and carpeted. Empty the vacuum bag or cup, clean if necessary and replace as you will need to use the vacuum cleaner as soon as you arrive home. Now, leave the house with furnace off for at least 24 hours. The inside air temperature will dip and continue to dip, killing off dust mites. The closer the temperature gets to 50°F the more effective the kill off is. At the same time, the dust mites in your textiles in the plastic bags are being killed off. When you return home, it will be chilly but houses don't take long to warm up. Turn the furnace on. Carefully open the garbage bags with your textiles and place the textiles in the dryer on air fluff for at least 15 minutes. This will remove dust mite carcasses and feces. Next, vacuum thoroughly all floor surfaces to also remove dust mite carcasses and feces. The dust mite population has been basically knocked down to an ultra low level so will take a couple of months or more to get to the level to cause allergic symptoms providing you do regular vacuuming. While you are doing dust mite control, this is a good time to put allergy covers on all pillows and mattresses. The cover forms a barrier between you and the dust mite droppings. Use the cold treatment on pillows then cover. Vacuum mattresses well then place a zippered allergy cover on the mattress. If your house has a lot of carpeting (eg. all rooms except bathrooms and kitchen), this treatment can be used monthly or three times during the cold weather depending on your lifestyle. When we are at our vacation home in Florida during December, our house is left at 50°F for the entire duration of three to five weeks. This was particularly helpful for dust mite control in our last home where there was a lot of carpeting and while it is more of an eco-friendly solution here to avoid using a lot of energy to heat our house when we aren't here, it still kills off the dust mites. Oh, and while the treatment sounds like a lot of work, it really isn't! It usually takes me about a half hour on each end of the treatment. The results are definitely worth it in increased comfort, reduced allergy symptoms and reduced medications.