What does a Garden Gnome do when she is not gardening, in the kitchen or doing genealogy? Well the answer might just surprise you so read the entries to find out more. This blog focuses on everything we do to make our house a home. There will be a strong emphasis on home energy efficiency and do-it-yourself (DIY) projects. At the same time there will also be crafts, knitting and crocheting projects along with any other little tips we do to create that down to earth, I want to be here home. Please enjoy your visit :)


Showing posts with label eco-friendly. Show all posts

Tuesday, March 26, 2013

Homemade Orange Cleaner

Earlier in the month, I bought a Bella High Power juice extractor.  Most fruits and vegetables being juiced do not need to be peeled but citrus fruit does.  That leaves the peels to either candy or dehydrate, or discard.  I did a bit of searching for something else to do with the peels and came across making homemade orange cleaner.  Anytime I can replace a store bought, toxic cleaner with a non-toxic, homemade cleaner I will so I decided to make a batch the next time I juiced oranges.

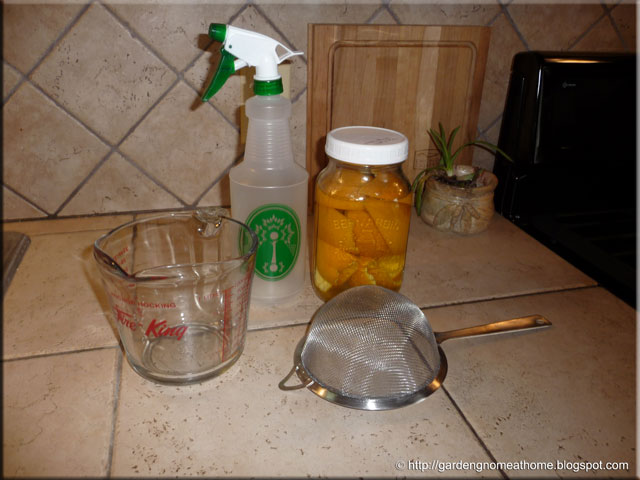
ingredients for orange cleaner
I recently made a orange pineapple juice (in mason jar) which left me with the peels from 7 navel oranges and the top of the pineapple.  I saved the seeds and pineapple top to grow.  I've had good luck with lemon seeds growing and now have three little lemon trees about 6 - inches tall. Pineapple tops will also root to grow into a lovely houseplant so I saved that as well. I set the orange peels aside to make the orange cleaner.  

Materials needed for orange cleaner: large mason jar or similar with lid, white vinegar; later you will need a large measuring cup, fine mesh strainer, funnel and spray bottle.

orange cleaner set up
Setting up the orange cleaner is very easy.  Simply put the orange peels into the jar then cover with the white vinegar.  I used a 1.5 L mason jar and a reusable storage lid. I also used all natural vinegar because I was out of the cheap white vinegar but next time will use the cheap one.  Label the jar with the date then set aside and let sit for at least two weeks.  That's it.  The sitting time is the time consuming part so you will want to start another batch before running out of the orange cleaner you are using.  

The orange peels in vinegar looked rather pretty so I was anxious to test the results.  Once the sitting time was finished, it was time to move to the next step of making my non-toxic orange cleaner.
orange cleaner ready to strain
I make a lot of homemade cleaners and have found the spray bottles from the dollar store work well for liquid cleaners I want to use as a spray.  As you can see, after sitting for two weeks, the orange peel had absorbed some of the vinegar.  This really wasn't a problem.  I was more concerned about the amount of cleaner I would get as well as how well the orange cleaner cleaned.  

I strained the orange cleaner into the measuring cup.  At that point the orange peels themselves were of no further use so were put down the food disposal.  I ended up with 24 oz (750 ml) of homemade orange cleaning solution.

orange cleaner ready to use
Vinegar itself is a good household cleaner that kills germs, cuts grease and leaves a sparkly finish.  Orange peel contains oils that give the characteristic orange scent.  I tested the homemade orange cleaner on the counter.  It cleaned well with no residue yet had a pleasant smell.  I was quite impressed!

As is, the cleaner does a nice job cleaning.  If a sudsing orange cleaner was needed, a couple of drops of liquid dish detergent could be added but for most cleaning purposes this really isn't necessary.  The total cost of the 24 oz of homemade orange cleaning solution using the natural vinegar which is more expensive worked out to 56¢.  If using the cheaper, store brand white vinegar the price is reduced to 37¢ at our current prices. 

I am very pleased with the results.  It is nice to be able to add one more homemade, non-toxic cleaner to cleaning supplies.  The nice thing is, this cleaner is made from orange peels that many simply discard to begin with.  It is low cost and effective, making it an eco-friendly cleaning product.  Do give it a try the next time you have a few orange peels.  You will be pleasantly surprised!


Monday, March 25, 2013

LED Lighting

LED Christmas and nightlights quickly took over more energy inefficient versions and they cost pennies to operate.  Solar LED lights have become very popular because not only do you get the effect you want they only cost the price of the light itself with no further operating costs.  Over the past several years we have seen a move away from energy inefficient incandescent light bulbs CFLs and now LEDs for daily household use.  A 60W incandescent light bulb can be replaced with a 13W CFL bulb effectively saving 47W of power or an 11W LED bulb saving 49W of power.  Unlike CFLs, there is no mercury in LED bulbs and their lifespan is considerably longer (more than double) than CFL bulbs so they really are environmentally friendly.  Currently, the main deterrent to switching to LED bulbs is price at $19 to $24 for incandescent style bulbs and $26 for the prong type to replace halogen bulbs.

Sylvania Utra High Performance Series LED bulb
I bought a Sylvania Ultra High Performance Series LED light bulb to use in our new range hood.  This 8W bulb is the equivalent to an 11W CFL bulb or a 40W incandescent bulb.  It is dimmable, compatible with dimmers.   The bulb lasts 25,000 hours or 23 years based on 3 hours operation per day.  At a cost of 11¢ per kWh the bulb will cost 96¢ per year based on 3 hours operation per day.  If the bulb were left on 24 hours per day, it would last 1,041 days or 2.9 years at a total cost of $22.27 (96¢ x 8 x 2.9) or $7.68 per year making it a frugal if you have a location where a light needs to be on 24 hours a day, 7 days a week.  Under most household applications, an average of 3 hours per day is a reasonable estimate.  I paid $24.99 for the bulb so if the bulb lasts 23 years, it cost just over $1 per year plus the hydro use so in reality about $2 per year.

The new LED bulbs have a few features I really like.  The bulb contains no mercury which is a real plus over CFL bulbs.  Another plus is the base which does not have a transformer so it will fit any standard light fixture just as an incandescent bulb would.  The nice thing is there is no warm up period like there is with a CFL when first turned on.  There is no notation that LED bulbs are best in locations where they won't be turned on and off all the time as there is with CFL.  LED bulbs contain no toxic substances, they can be disposed in normal household waste but since they last so long, even that is of little concern. 

I can't wait for the price to come down on the LED bulbs!  I remember when the CFL first came out.  The transformer base was big and bulky so the bulbs could only be used in certain fixtures, mainly lamps or to replace a bare ceiling bulb.  I think I paid somewhere around $20 for the first CFL.  Now, we can buy an 8 pk of 13W CFL for $9 at Sam's Club.  As the LED bulbs become more popular, the price will go down.  There are less expensive ones already on eBay so I may order a couple of different styles just to try them. 

The LED lights have a lot of potential.  They can be used indoors or outdoors, in damp locations and at temperatures ranging between -20°C and 40°C (-4°F and 104°F).  The energy savings switching from CFL  to LED is not the huge difference it is when switching from incandescent to LED but it is still an energy savings.  Every watt saved reduces our energy usage as well as our hydro bill so the LED lights do look very promising.


Wednesday, November 28, 2012

Smelly Garbage

We have been on a waste reduction goal for a few months now.  I am very pleased to announce that it is working.  On average, we have a bit less than a kitchen catcher garbage bag of curb side waste that will end up in the landfill.  We are working on reducing that further.  Part of the reduction in household waste is due to the installation of an Insinkerator food waste disposal last August but the rest is due to an increased awareness with respect to packaging that can't be recycled.

Kitchen waste tends to be smelly and while the food waste disposal takes care of most of this problem, it does not take care of all of it.  Smelly garbage is problematic on a few levels.  We spend extended periods of time away from our main home.  If we miss garbage day before leaving, that garbage can sit for a month or so attracting rodents while stinking up the garage.  Our last home was rural so stinky garbage attracted racoons, skunks, squirrels and birds.  Let me tell you, crows and grackles are horrid for ripping apart garbage bags if they get any hint of a smell.  This home is urban bordering on farmland so again, stinky garbage attracts the pests especially the birds and occasionally dogs.

We have virtually eliminated smelly garbage.  Now, we can leave for a month at a time knowing our garbage is not going to smell or attract critters.  It was actually easier than I thought it would be.    Here's a few things we have done to curb the smell garbage issue:

  • food waste disposal - The food waste disposal takes care of most of the food waste the compost can't handle due to volume.  I do a lot of home canning so the compost cannot always handle a large influx of produce waste that can become rather smelly during the warmer months.
  • bones and fat - Bones and fat can quickly become smelly during the warm months.  Larger bones and fat are not put down the food waste disposal.  Rather, large bones are given to a friend with a dog that really enjoys them.  Fat is scooped into a zipper style storage bag then discarded when full with the exception of bacon grease that is collected and used for cooking.  I also mix some of the fat with bird seed to feed the birds during the winter months.
  • zipper style storage bags - I have a lot of this style bag used mainly for on the boat and traveling with a few used for food storage.  I don't throw them out and they can't go into the recycle bin.  If I have kitchen waste (eg. meat wrappers, fat, bones) that I know will smell that can't go into the compost bin or food waste disposal, it goes into a used zipper style storage bag.  Now, odours can escape from these types of bags so I keep the bag in the freezer until garbage day.  If I miss a garbage day, the bag simply sits in the freezer until the next garbage day.  At best, I may have about a half a quart bag of waste that could smell each week so saving it until the bag is full isn't a huge problem.  


Monday, November 19, 2012

Moving Towards Natural Hair Care

Even before I had health problems and well before I was educated, I was adamant about avoiding white sugar, excess salt and food additives.  I really don't know why, just I knew this was ingredients to avoid in our foods.  Those ideals moved into household cleansers not only as a way of being frugal but also as becoming eco-friendly.  We began making our own 100% all natural, vegetable based bar soap for bathing back in 1995.  Within a year, my husband's psoriasis was completely gone and the patches have never returned.  The last stronghold was my beloved Pantene products.


I have waist length hair, worn straight.  It is prone to frizzing in high humidity.   I was told by one hair salon not to use Pantene products as they leave a build-up in your hair but since I don't colour or perm my hair, I wasn't concerned.  The main problem with a lot of hair products is they contain sodium chloride (drying, stripping), sulfates (strips hair of keratin making it prone to frizzing), sodium lauryl suflate (stripping, carcinogenic), alcohol (drying, stripping, increases frizzing), silicon (synthetic) and scents (synthetic, allergenic).  In short, the majority of hair product are not good for you so I decided to take a bit more natural approach.  

I tried the No-Poo method which is washing with a baking soda solution followed by an apple cider vinegar rinse.  This is the ultimate natural approach for hair care if it works for you.  It takes about three weeks for your hair to adjust but after that it is reported to work rather well.  The No-Poo method does work well but my hair really needed something else.  As hair ages, it loses the protein, keratin.  The loss of keratin results in more frizz so it make sense to replace the keratin rather than use a synthetic like silicone to control frizz.  I switched to the Organix line of hair products that are sodium and sulfate free so they aren't stripping my hair of keratin nor are they drying it.  Before blow drying and styling, I use Moroccan argan oil.  This is almost a miracle natural hair treatment that protects the hair from heat styling treatments, UV damage and frizzing while mending split ends as well as giving the hair a gorgeous shine AND it doesn't leave the hair oil feeling.  I use this a couple of times a day just sprayed on my brush then brushed through my hair.  I also use extra virgin olive oil just after styling my hair.  I don't use a lot, just a little rubbed between the palms of my hands then over my hair.  Olive oil is rich in vitamin E, an antioxidant that evens slows the greying of hair while darkening natural hair slightly as it controls frizz.  


Tuesday, August 21, 2012

Insinkerator® Badger® 5 (Model 5-86) Food Waste Disposal

I recently wrote about our new gaburator aka food waste disposal.    It is an Insinkerator® Badger® 5 (Model 5-86) half HP unit that was bought on sale and installed as a DIY project.  We have had food waste disposal units in two of our owned homes as well as our vacation home.  A food waste disposal is a wonderful asset when doing a lot of cooking and home canning especially in an urban setting.  Don't get me wrong as a food disposal unit is not meant to see how much food you can put down it, it is meant as a tool to help you manage kitchen waste. 

food waste disposal installed
It took about two hours for my husband to install the food waste disposal.  He had to run wiring for the switch, cut into the existing plumbing then reconnect the sinks and dishwasher.  It was fairly straight forward with no real problems other than having to go to the hardware store for a part he needed.

As you can see, the food waste disposal does take up a bit of room in the cabinet under the sink but really it isn't too bad.  There is still plenty of room for storage.  I don't keep a lot under the sink to begin with.

The garbage bin is part of a recycling series of bins available at Home Hardware.  The flip lids are colour coded as to the type of recycle material to put in.  We only had room for the one bin which is fine as our larger recycle bins are in the attached garage just off the landing.  The food waste disposal in combination with the compost bin, black box and blue box has reduced our actual waste that goes to the curb to mainly packaging that can't be recycled and bones.  The larger bones go to our friend's dog so at least they don't go into the waste.

I processed 10 dozen ears of corn shortly after the food waste disposal was installed so it wasn't a good week to judge our waste reduction.  Still we didn't have a full pail of garbage at the curb which was down from our normal but in fairness we are still unpacking and decluttering so there is a bit more waste than normal.  Last week I did a bushel of peaches and started tomatoes.  I put out less than a full kitchen bag of actual waste to the curb for this morning's waste collection.  I still want to reduce further.  More on that to come...

Garden Gnome
©2006-2012


Sunday, July 29, 2012

Household Activities That Increase Household Waste

Reducing our household waste is one of our goals this year.  Household waste is anything that cannot be re-used, recycled, donated or disposed of otherwise.  In short, household waste ends up in the landfill.  Landfills are not an eco-friendly way of dealing with household waste.  Some items can take decades to break down while certain plastics never break down in landfills.  The reality is landfills are becoming over filled so at some point everyone is going to have no choice but to reduce their household waste.   It may sound simplistic but one of the easiest ways to reduce household waste is to avoid buying those products that create household waste like blister packaging, plastic packaging, over packaged items,  and to eliminate buying anything packaged that you possibly can.  However, I have noticed there are certain household activities that can significantly increase household waste.  Here is how we keep these activities in check with respect to producing household waste:

  • home canning - Home canning is likely one of the most frugal and eco-friendly things you can do with very little waste being produced.  Jars are reused as are rings and some styles of lids (Tattler, glass inserts).  The metal snap lids can be put into the recycle bin or used in crafting projects.  A high influx of produce during the busy canning season can produce waste like corn husks, corn cobs, fruit pits, peelings, and containers while year round canning produces waste like bones, fat and minimal produce waste.  Corn husks can go to the burn pile as they don't compost well.  Dried corn cobs and dried fruit pits are given to a friend who burns them in his wood stove for heating his home.  I dehydrate some produce peelings to make vegetable powders and put the rest in the compost bin.  If there is more than can be dehydrated or composted they go into the food waste disposal.  I have several plastic hampers and fruit baskets so always take my own when going to a produce stand or orchard.  All bones, fat and meat trimmings are used to make stocks.  I freeze them until I have enough then make and can stock.  Fat from defatting the stock goes into the food waste disposal as does small bones.  Large bones are given to a friend who has a huge German shepherd that likes bones.
  • large get togethers - This includes family events like holiday celebrations and family celebrations as well as entertaining, of which do a fair amount.  We actively encourage recycling by having appropriate bins easily accessible.  We discourage wrapping paper for any celebration opting instead to use reusable cloth gift bags or unique, non-disposable wrapping.  I bought bulk pack restaurant grade stainless steal cutlery at Sam's Club so I have more than enough for 30 place settings to eliminate using disposable cutlery.  I have five sets of dinnerware giving me more than enough for 30 place settings to eliminate disposable plates and bowls.  If the event is over 40, we get plates and cutlery from one of our friends who owns a restaurant/catering service.  Everything including serving ware is geared towards being reusable or at worst case can go into the recycle bin.  I love cooking from scratch which keeps kitchen waste to a minimum to begin with.  Quite often folks bring homemade dishes and goodies to these events usually in containers they can take home.  There is always way too much food!  Food waste can be a problem at larger events so we started a tradition where everyone takes home a meal for the following day.  This actually started with a pig roast we held for our 30th Anniversary with about 75 in attendance.  We realized there was too much food left over some that couldn't be froze or kept for much more than a couple of days.  It has become a huge hit with our family and friends AND we are glad the food will get used rather than wasted.
  • small get togethers - We host monthly games night ten months of the year and we have spur of the moment get togethers like pool parties, games night and just having a few people over several times a month.  I very much discourage folks from bringing pre-packaged snacks like potato chips buy offering healthier, homemade alternatives without the packaging. 
  • personal care - This is one area where it is difficult to reduce waste other than simply not use certain products, especially those sold in tubes that can't be recycled.  That includes sunscreens, toothpastes, medicinal salves, herbal remedies, creams and lotions.  If I can find an alternative in a jar, I buy that instead.  For the most part, we have simply reduced what we buy of products sold in tubes.  A lot of cosmetic containers like lipsticks, eyeliner, powders, nail polish and that type of thing cannot be recycled either.  I've opted for the natural look using aloe vera, sunblock and occasionally a mineral powder.  That has eliminated a lot of cosmetic containers.   Toothbrushes are still sold in eco-unfriendly packaging so unfortunately that does end up in our household waste.
  • cleaning - The containers of most cleaners sold in plastic bottles can be recycled but some cleaner containers like the pressboard in powdered scouring containers cannot.  Aerosol containers can't be recycled.  We opted to use natural cleaners (eg. vinegar, household ammonia, baking soda, soap) and nix using commercial cleaners other than Simple Green, a non-toxic biodegradable concentrate.
Garden Gnome
©2006-2012


Saturday, July 28, 2012

Ten Water Conservation Tips

We are surrounded by many beautiful lakes, rivers and supporting waterways in beautiful Ontario, Canada.  Yet freshwater is getting scarcer.  Our last two homes were semi-rural and rural on waterfront properties.  A lot of our summer activities involve water what with swimming and boating.  Water conservation has always a concern for us.  Our water and wastewater (sewage) charges come on the same bill as our hydro.  The breakdown for water usage is: water service charge, water usage, wastewater service charge and wastewater charge.  The cost of wastewater (sewage) is determined by the amount of water used.  Now our water costs us 95¢ per cubic metre with an additional 81¢ per cubic metre for wastewater pluse to two service charges ($14.50. $18 respectively).  So even if we use no water we would still have to pay our provider a minimum of $32.50. 

  1. cooking -  We seldom boil vegetables.  Steaming vegetables uses a lot less water than boiling them and results in more nutritious vegetables. 
  2. water off - When hand washing dishes, fill the second sink about half full with hot clear water to rinse dishes.  Don't let the water run when brushing teeth. 
  3. showers -  We have energy efficient flow restrictors on the showers which means we get nice pressure for showering with less water being used.
  4. conservative pool usage - Pools can waste a lot of water and they are costly between water usage, hydro and chemical but at the same time, a pool provides low cost entertainment.  We use Heatsavr™ (a liquid solar blanket) in the pool to reduce evapouration and help keep the water temperature.  A solar blanket can be just as effective.  We only backwash when absolutely necessary.  We watch the radar so as to not add water if rain is imminent.  
  5. toilets - The recommendation is to add a brick in the tank of older toilets.  We have low flush models in both bathrooms.  We also have a kit (not installed yet) to further reduce the amount of water per flush.
  6. dishwasher - The dishwasher is an energy efficient model that is only run when completely full.  Never run a partial load in the dishwasher as that wastes both hydro and water.
  7. washer - Our washer is an HE large capacity model, something I highly recommend if you are replacing yours.  It is run only at full capacity and always on cold unless running a white load.
  8. gardens - We have gardens around the perimeter of the yard, the perimeter of the house and three raised vegetable beds as well as many container plants.  I conserve water in the garden by using a rain barrel and self-watering planters rather than use municipal water.  We don't have a sprinkler system and we don't water our lawn.  
  9. vehicles - We live in beautiful Ontario, Canada where salt is used as a de-icer on roads during the winter months.  Salt causes vehicles to rust prematurely costing money in repairs and replacement vehicles.  Our local car washes use recycled water so we use those in the winter.  In the nicer weather we power wash the vehicles once a month in the driveway.  A powerwasher is more effective at removing dirt and grim from the vehicles using a lot less water.  
  10. floors - We have hard flooring throughout the entire house, no carpeting at all.  The mop and bucket method for cleaning floors wastes a lot of water.  I use a steam mop which uses about 2 c of water per refill.  It does a nicer job of cleaning the floors without chemicals while conserving water.

Garden Gnome
©2006-2012


Friday, July 27, 2012

Ten Ways to Reduce Household Waste

Our municipality just issued new recycling bins that are almost double the volume of our old recycling bins.  Each household receiving curbside recycling collection is entitled to one black box (stream 1, fibre products) and one blue box (stream 2 - food, beverage and liquid containers).  Essentially we can recycle paper beverage cartons (eg. milk cartons, tetra pack, paper cups), household paper, newspaper, catalogues, books, telephone books, paper egg cartons, boxboard and cardboard boxes in our black box.  We can recycle glass bottles and jars, aluminum and steel cans, aluminum foil containers, foil, plastic bottles, plastic tubs and jugs in our blue box.  Some containers cannot be placed in either box (eg. foil pouches, aluminum foil lined containers, frozen food packaging, wax paper boxboard, unmarked plastics and stryrofoam containers.  These are the containers to avoid buying foods in, in the first place.  There are rumours that the municipality may start charging for waste collection even though it is funded through property taxes.  What does this mean to the households with curbside waste and recycling collection?  The emphasis must be on reducing waste even if it can be recycled and waste that can't be recycled.  Focus on reducing kitchen waste and packaging.  Here are a few ways for reducing household waste.

  • books/magazines/newspapers - Simply don't bring them into your house.  Invest in an ebook reader to eliminate hardcopy books or borrow from the library.  Read newspapers online.
  • food containers - Eliminate as many food containers (eg. tin cans, glass bottles, glass jars, plastic tubs) as possible.  Opt to cook from scratch using fresh ingredients.  Stock your pantry with home canned foods (jars can be reused for years) and home dried foods stored in reusable containers.  Stock you freezers with bulk meat purchases and home frozen foods.  Avoid buying any frozen food in waxed boxboard (eg. fish sticks, ice cream) as that can't be recycled.  Buy a couple of reusable hot drink travel mugs and water bottles that will effectively eliminate these types of disposable and take-out containers.  Avoid take-out and fast food.
  • food waste -  Ideally you can get food waste down to a few bones each month after they have been used to make meat stocks, fruit pits and corn cobs.  Food waste other than dairy, meats and fatty foods can go into the compost BUT before you do that consider vegetable and fruit peelings can be dried then powdered as wonderful flavour enhancers for cooking.  Corn cobs can be dried then used in the fireplace.  They do burn hot though so don't overload it.  Save meat and poultry bones in the freezer until you have enough to make stock.  The stock can be home canned or frozen.  Install a garburator (food waste disposal) to take care of kitchen waste that cannot go into the compost.  Serve smaller portions to reduce scraps on plates and left overs.
  • packaging - Avoid any individually wrapped items and those with excessive packaging.  Cooking from scratch will eliminate a significant amount of packaging.  Avoid any packaging that cannot be recycled (eg. blister packs).  Avoid packaging period if at all possible (eg. buy bulk apples rather than apples packaged in bags).  Buy used
  • cleaners - Go natural for cleaning by using soap and water, baking soda, vinegar, household ammonia and rubbing alcohol.  Not only will you eliminate a lot of cleaning containers, you will free up a bit of cupboard space.
  • reuse -  If you make eco-friendly choices when shopping, a vast amount of packaging can be reused or repurposed.  Keep whatever you can out of your waste and recycle containers.  If you can reuse it, do so. 
  • disposables -  Avoid using anything disposable as that creates waste.  Most disposable items cannot be recycled and few can be reused.
  • yard waste - Yard waste is a hard one to reduce but it can be done.  Compost whatever you can.  Replace high maintenance plants that need a lot of trimming with low maintenance ones.  Use a mulching lawnmower to put nutrients back into your lawn without having to put bags of grass clippings to the curb. 
  • set a goal - Our goal for 2012 is to reduce our actual waste (eg. waste that goes to the landfill)  to one kitchen sized garbage bag for a month.  That helps to keep us conscious whenever we are buying anything.

Garden Gnome
©2006-2012


Wednesday, November 30, 2011

Sources of Air Leaks in a House

The cost of energy is consistently rising so energy efficiency is ever more important.  Air leaks in your home can cost you hundreds of dollars a year in energy costs and yet they are one of the easiest to remedy with low cost materials and DIY projects.  For example, a 4  x 300 ml package of 25 year durability interior/exterior acrylic caulk costs $8.97 at Home Hardware.  Simply using one of the tubes to seal cracks could save you the cost of the caulk in less than a month during the heating season.  Just imagine the savings if you used all four tubes!  Chances are good that you may not have to use all four tubes of caulk depending on how well sealed your house is already.  For example, I likely used four tubes of caulk in our third house but closer to twenty tubes in our last house, and I estimate this house will need less than four.  The difference being the age and design of the houses as well as whether the previous owner did any sealing. 

Cracks and crevices are not the only source of air leakage in a house.  Improperly weather stripped door and windows can cause a significant amount of air leakage.  Faulty seals on refrigerators or freezers can cause air to leak out of either which causes the appliance to use more energy which translates into paying more on your hydro bill.  Electrical outlets, switches, and ceiling/wall fixtures can all be sources where cold air can leak into the house.  Our hydro panel was located on an outside wall in main living area.  On a windy day, enough wind came in to move the mirror hung over it!  Fireplaces can literally suck heat air from the room, ultimately costing you more in heating costs.  Gaps around wires, cables and pipes entering the house can be a significant source of air leakage.  A gas pipe had been installed in our fourth house but had not been sealed properly allowing a gap big enough that rodents could get in!  Bell installed our satellite tv here and I specifically asked the technician if he had caulked around the cable.  He said he had but he obviously didn't as I found out the first windy day where the wind was hitting that side of the house.  Exhaust fans and clothes dryers both can let in a significant amount of cold air.  One solution to this problem is to replace regular vent covers with the Braun Eco-Vent.  This specialized insulated vent cover has a ball closure that opens to allow exhaust air out but seals when not in use to prevent cold air from entering the vent.  Your HVAC ductwork may have seams and joints that aren't sealed causing the loss of hot or cold air when in use.  Seal any you can with aluminum foil duct tape.

It is possible to use temporary air leakage blockers such as door snakes, removable caulk, heavy quilts or blankets, towels, shrink plastic, and cardboard secured with removable tape.  These are ideal when you discover a bad air leak that can't be immediately repaired.  For example, today it is extremely windy with driving torential rain.  I discovered the range hood that desperately needs replacing is pouring in very cold, damp air.  I taped a piece of carboard to the filter just to stop the cold air from coming it.  It is only a very temporary measure that quickly solves the problem until the wind dies down and obviously one that can't remain if using the stove.  What this means though is the flapper on the range hood that prevents cold air from entering the house is broke.  Since we are replacing the range hood the problem will be solved anyway.  If using a temporary blocker, do not create a fire hazard or block exit routes from your home in the event of an emergency. 

Before embarking on sealing your house, be aware that a house can be sealed too tightly creating problems with indoor air quality and the proper operation of combustible appliances (eg. gas fireplaces, gas furnace, gas water heater, gas ranges).  Be sure all combustible appliances are venting properly before and after sealing.  Under normal daily activities, there should be enough fresh air entering a house via outside door during entry and exit.  A tightly sealed house may require an air exchanger.  Our new house has a Lifebreath HRV (model 150Max) that is set on a 40/20 cycle.  For twenty minutes each hour the HRV brings in fresh air from outside while exhausting stale air.  Also be aware that in tightly sealed homes it is even more important to avoid using toxic household cleaners and anything containing VOCs (eg. some paints, household cleaners).  It is important to use controlled air exhaust (eg. range hoods, bathroom exhaust fans, HRV,) methods to reduce indoor air pollution, ensure sufficient fresh air entering the house and to ensure combustible appliances have ufficient oxygen for proper operation.  It is a good idea to have an air pressure test done on your home before and after sealing as well as have any combustible appliances checked for proper venting before and after sealing.

Garden Gnome
©2006-2011


Tuesday, November 15, 2011

Wet and Dry Floor Mops

In many ways hard flooring is a bit more work than carpeting but only because dust and dirts becomes hidden in carpet whereas there is no place for it to hide on hard flooring.  Properly maintained hard flooring results in a healthier home.  There are dust mites and other allergens than there would be with carpeting and even fewer if you make a point to dust down the floors daily.

wet and dry floor mops
I had a plain Swiffer wand that I used for many years for both damp and dry dusting.  I had more than seen better days so I replaced it with a Vileda FibroContact wet or dry mop (right).  This mop uses a unique cotton and microfibre blend for cleaning walls, ceilings and all hard flooring.  The removable pad is machine washable so that will greatly eliminate the need for buying the Swiffer cloths.  Extra pads are available.

I also had a Swiffer WetJet at one time but did not care for it as both batteries and special propriety cleaning solutions were required.  I replaced the WetJet with a Bissell steam mop.  The steam mop does a wonderful job cleaning and while I can use in on ceramic tile, marble and laminate flooring, I decided to buy a Rubbermaid Reveal microfibre spray mop (left) for lighter cleaning.  The microfibre pad is machine washable and extra pads are available.  I can use a simple water and vinegar solution on all of my floors except the marble tile in the kitchen.

Both of these mops are eco-friendly tools to help me keep my floors looking gorgeous and clean without using strong chemicals, disposable cloths, batteries or electricity.  Running the dry dust mop over the floors at least once daily keeps them about as dust free I can get.  Honestly, within 10 minutes of dusting the floors, I can see a bit of fresh dust.  It is a never ending battle that would be quite costly if running the vacuum cleaner every day!  From one end of the house and back including the entrance and lower level of a large bi-level home, it takes me about 10 minutes to dust the floors.  


Monday, January 31, 2011

My New Green with Envy Pant Coat

I have never been one to be up with the latest fashions.  Instead I tend to choose classic style clothing that can be worn for several years.  One of the reasons for this is I simply hate shopping and that includes shopping for clothes.   Our primary residence is in Ontario, Canada so needless to say warm winter coats are a must.  I have a gorgeous long coat (pink silk lined, grey wool melton cloth) for dressier type events during the winter.  It has served me well for over 10 years and still looks good!  Since it is only used a few times throughout the winter this coat will last me several more years.  I have my university leather jacket as my main short winter coat.  It has a heavy liner that can be zipped in for extra warmth.  It's old and nostalgic but very much me.  I did not have an in between length even though there have been several times a dressy mid-length would have been quite welcomed.  The other day I finally decided on a whim and because the coat I saw was at an excellent price ($29.99), to splurge on a new mid-length dressier pant coat. 

my new Green with Envy coat
I chose a Green with Envy Enlightened Outerwear coat.  The picture doesn't really do it justice as the coat is quite nice.  The coat is double breasted with a stand collar and a lot of extra detail, very much shorter trench coat style in my favourite steel grey.  I love steel grey as a colour for blazers and dress coats because I wear a lot of black.  The grey compliments the black nicely and grey tends to not go out of style.  I also liked the coat because it was wool melton cloth.  Melton cloth is a heavy weight, tightly woven fabric usually wool.  The traditional colours are navy blue, hunter green, steel grey and sand.  It is an extremely durable fabric that will keep it's good looks for several years!  Melton cloth is a very practical and frugal choice of material for coats.  I can remember my very first melton cloth coat, a navy blue pant coat with hood, that my Mom bought me when I was about 8 years old.  I've been hooked on melton cloth ever since.

Green with Envy tag
Green with Envy is a line of outerwear launched by Amerex Group in 2008 originally sold in Macy's but is now making its way to Sam's Club.  The premise is you can have nicely designed clothes that are good for the environment as well.  The wool fabric is made from recycled wool using garment dyes that are better for the environment.  The tags are printed with soy ink on 100% recycled paper.  Amerex Group is socially responsible as well by donating 1% of Green with Envt's yearly earnings to 1% For The Planet.  Once you are finished wearing your coat you can send it back to them to be donated to those less fortunate or to be recycled into new coats. 

While the thought of returning the coat for donating or recycling is nice, it really is not an eco-friendly solution as shipping involves fuel that adds to your carbon footprint.  A better solution is to donate the coat at the local level.  There are a wide range of charities that accept donations of coats with one of the most notable in our area being Coats for Kids.  I'm on the petite side so any of my unused clothing would easily fit a smaller teenager. 

Garden Gnome
©2006-2011


Sunday, January 2, 2011

Utility Bills

We have slowly but steadily move most of our utility bills over to online rather than paper bills.  This made a lot of sense for us on a few levels.  First going to online ebills is eco-friendly, reducing the amount of paper we as individual households consume.  Second we generally have internet access where ever we are so the bill comes right into our inbox where we can pay it immediately with a click or two.  This is really convenient!  Third, we love to travel and quite often on a whim so we don't have to worry about having anyone pick up our mail from our mailbox (rural) or having our mail held.  I should note that for use to have our mail held during our last vacation home visit it cost $60.  This is no longer a service that Canada Post offers for free!  So using ebills ends up saving us money for shorter vacations where all we are expecting are utility bills.  We really don't get much in the way of mail anyway as more and more businesses move away from paper billing.  Most times we get junk mail, flyers and the weekly newspaper.  I've been told that in town if you don't have a mailbox the mail carrier can't deliver to your home which might be one way to deal with that pesky weekly paper!

Garden Gnome
©2006-2011


Monday, December 20, 2010

Core Charge on Batteries

Batteries have rechargeable life span so any rechargeable battery from AAA to 12 V will at some point need to be replaced.  All batteries whether rechargeable or not should be disposed of in a manner that they do not contaminate land fills.  In most cases batteries are disposed as a hazardous waste via special hazardous waste disposal sites or through the repair shop or store where you bought the batteries.  To ensure you dispose of the old batteries properly there is a provincial  (Canada) or state (United States) fee charged on the purchase of the new 6 V, 8 V or 12 V batteries that is refunded when the old battery is brought back.  There may or may not be an additional battery disposal fee.   If the battery is replaced at an auto repair shop or similar type repair shop for other battery powered equipment (eg. golf carts) the fee is waived although any battery disposal fee is still charged if applicable. 

It was rather nice that we were able to return the old golf cart batteries to get our $9 back per battery.  That ended up being a refund of $45 and we did not have the hassle of finding another eco-friendly way of disposing them.  We didn't get the $9 refund for the battery that blew as it was too damaged to transport safely.  It ended up going into the hazardous waste collection in our vacation home community.

Garden Gnome
©2006-2010


Sunday, July 25, 2010

Plastic in the Freezer

Continuing on my theme of plastics in the kitchen, I wanted to share how I deal with plastics in the freezer.  By far the most used packaging in my freezers (2 chest, 1 refrigerator side) is butcher's wrap.  For safety reasons I prefer not to use glass in my freezers other than the door shelves of the freezer portion of the side-by-side.  At the same time most plasticware and specifically the less expensive plasticware does not prevent freezer burn which leads to food spoilage.  For this reason I very seldom use snap lid types of plastic containers in the freezer.  Occasionally I will use a screw type plastic container in the freezer but only for very short term storage.  I also occasionally use plastic shape forming molds for things like homemade frozen treats.  The majority of plastic use in the freezers is comprised of plastic vacuum sealer bags with a very small minority of zipper style plastic freezer bags.  Zipper style freezer bags are good for a few select foods but in general I prefer vacuum sealer bags.  Vacuum sealer bags are heavy duty bags with a channel that when used with a vacuum sealer removes air surrounding the food from the bag then heat seals the bag.  Foods sealed this way have an extended freezer life and freezer burn is virtually eliminated. 

Garden Gnome
©2006-2010


Saturday, July 24, 2010

The Plastic Rules

Everyone has a different way of dealing with plastics in their kitchen.  We have been striving to greatly reduce plastics coming into our kitchen.  Like many I have come to the conclusion that trying to eliminate plastics in the kitchen is virtually impossible. I have the following rules regarding plastic that finds its way into my kitchen:

  • if the product comes packaged more than one ways, jars will always win over plastic
  • plastic does not go in the dishwasher
  • plastic does not go in the microwave ovne
  • plastic is always hand washed without exposing to hard environment
  • any disposable plastic is recycled if at all possible

Garden Gnome
©2006-2010


Friday, July 23, 2010

Continuing on the Theme of Reducing Plastics in the Kitchen

Continuing on the them of reducing plastics in the kitchen it really is interesting to do an inventory of anything plastic in the kitchen.  The problem with plastic is it is everywhere from large and small appliance components to utensils, serving dishes, handles, dish soaps and even kitchen decor.  It is everywhere!  Realizing this makes it easier to deal with plastics that come into the kitchen.  In some instances you can eliminate or reduce certain plastics in your kitchen.  In other cases plastics are desirable due to the safety aspect of plastic not breaking like glass.  In many cases though you have no choice because the plastic is part of the appliance or that is how it is packaged (eg. dishsoap, some dairy products).  So the plastic does come into the house.  The way to deal with this is reduce what you buy and recycle what plastics you can.

I am most concerned about plastics that come into direct contact with foods.  That includes utensils, food storage containers, dishware, serving bowls and that type of thing.  When it comes to these types of things plastic does have its place.  In fact plastic can be better than metal or glass for some of these application.  Here is my hit list for avoidable plastics in the kitchen.  :

  • disposable anything - This includes: cups, cutlery, disposable plates/bowls, plastic wrap, food containers, spice/seasoning bottles, and water/juice/soda bottles.
  • individually wrapped anything -  This includes things like condiment packages, snack foods, drinks, frozen treats and that type of thing.
  • excessively wrapped anything - I prefer buying the least amount of plastic packaging possible.  Excess plastic packaging adds to the cost of the product and often ends up in the landfill because it can't go in the recycle bin.
  • non-recyclable plastics - If I can't put the plastic into the recycle bin I try very hard not to bring it into the house. 
It can be difficult to eliminate these plastics entirely so the goal is to reduce and use the least amount possible.  It is a continual battle and sometimes it becomes a compromise.  If you pick up a deli roasted chicken that is cheaper than raw and eliminates cooking on a hot, humid summer day but the chicken comes in a plastic container it may be that the chicken is the more eco-friendly choice.  Quite often take-out or delivered food includes things like disposable cutlery so I usually tell them I don't want it but on the rare occasion we go through a drive through restaurant any extra plastic cutlery or individually packaged cutlery are saved.  In this case I feel it is better to use/recycle these items rather than just tossing. 

Garden Gnome
©2006-2010


Thursday, July 22, 2010

Unavoidable Plastic Food Packaging in the Kitchen

In an effort to reduce the amount of plastic used in the kitchen I have eliminated or reduced certain types of food storage containers.  This is a conscious decision one in which we can choose whether or not to use plastic.  The problem with plastic is that it is virtually impossible to avoid in the grocery store.  As manufactures strive to cut their cost of production and transporting the product they are turning to plastic.  The reasons for this include:

  • plastic is cheaper than glass or cans
  • plastic is more durable than glass, removes risk of breakage
  • plastic is lighter weight than glass or cans
Plastic is continuously coming into our homes whether or not we like it usually though the foods we buy.  Reducing what comes in via this method is possible and some plastic food packaging can be recycled.  Some of the sources of plastic in food packaging is quite obvious while in other cases it is not quite so obvious.  The important thing to note is that in the following cases the plastic is in direct contact with the food:
  • plastic wrap - Fresh meats, poultry, cured meats, lunch meats and cheeses are usually wrapped in some type of plastic packaging.  Compounding the problem is fresh meats often come on styrofoam trays wrapped in thin plastic wrap.   Ideally the plastic packaging has been vacuum sealed to keep the product fresh longer but that is not always the case.  Plastic wrap can be avoided in fresh meats and poultry by buying directly from the farmer or from a butcher shop.  It is possible to buy cheeses at a cheese factory that have not been wrapped in plastic but even there a large number of cheeses are wrapped in plastic.  Cured meats can be made at home or bought at a butcher shop to avoid plastic wrap.  Lunch meats can be eliminated entirely by slicing leftover roast, turkey breast, ham or meatloaf to use instead.  Another problem is buying at stores like Sam's Club quite often a food item is in a plastic container then 2 or more of these containers plastic wrapped together or things like canned tuna are shrink plastic wrapped together.  True you get the savings but you also get the plastic.
  • plastic clam shell containers -  Berries, some fruits, bean sprouts and some vegetables are often packaged in plastic clam shell containers.  Avoiding these horrid containers is easy by buying from the loose produce section, shopping the U-picks or farm markets and sprouting your own beans.
  • plastic tubs - Yogurt, sour cream, soft cream cheese, cottage cheese, ricotta cheese, feta cheese, dips, deli foods (salads, etc.)  and ice cream all come packaged in plastic tubs.  Yogurt, sour cream and ricotta cheese are easily made at home and homemade is less expensive.  The only way to avoid the other products is to not use them.  For most people that is not an option.  Dried foods (eg. nuts, snacks, Parmesan cheese) in the bulk section of the grocery store are often packaged in plastic tubs.  However many of these products are also available in other containers like plastic pouches or cardboard containers so that is always an option.  If you shop at a bulk food store, foods like peanut butter, honey and pie filling are spooned into plastic tubs.  Here the only option is to not buy them but rather make your own pie filling and peanut butter.  Buy honey from a beekeeper where you can bring your own glass container.
  • plastic food bags - Thin plastic bags are available for produce in the grocery stores.  It is advisable to use these to prevent cross contamination of other food products and to prevent further contamination from surfaces like the conveyor belt at the check-out.  Many bakery (eg. breads, rolls, etc.) products are packaged in plastic bags.  These can be avoided by making your own bakery products.  If you shop in bulk food stores for dry foods like herbs, spices, flours and etc the only choice is to use their plastic bags to get your food home.  You can't use your own containers as they presents a health and safety as well as liability issue for the store.
  • plastic bottles - Most condiments come packaged in the popular plastic squeeze bottles.  However some are also available in glass jars so that is an option.   Another option is to make your own condiments at home.  Relish, ketchup and mustards are very easy to make at home and they are less expensive.   Juices and water also come in plastic bottles.  Buy a reusable water bottle and fill at home to eliminate buying pricey water in plastic bottles.  Eliminate the plastic bottle for juices by buying frozen juices and making them at home.  Frozen juices tend to be cheaper as well.
  • plastic pouches - Spices, dried herbs, nuts, baking supplies like chocolate chips all come packaged in plastic pouches.  Buy from a bulk food store instead where you will still use thin plastic bags but those bags can be recycled whereas the pouches can't.  Some fast food restaurants and sidewalk carts have condiments packaged in individual serving sized plastic pouches.  Avoid these entirely.
  • cans -  Many are under the mistaken impression that getting foods packaged in aluminum cans solves the plastic issue.  It doesn't and in many ways foods packaged in aluminum cans are worse because of the potential health risks.  Every food and beverage can used in North America has a plastic lining to prevent interaction with the food.  This is a FDA mandatory requirement.  The coating may be white so it is visible or it may be clear giving the impression there is no lining but it is there.  The problem with this plastic coating is it does cont Bis-phenol A (BPA) which means the food contains BPA due to the nature of the canning industry.  Heat and acidic conditions causes BPA to leach from the plastic.  Both of these conditions occur during the canning process.  Avoid buying any food or beverage packaged in a can and that includes carbonated beverages and beer.
  • glass jars - The BPA issue cannot be avoided by buying in glass jars or home canning as all metal lids also have the plastic coating containing BPA.  However, buying in glass or home canning greatly reduces food exposure to BPA.  It is very important when home canning to not invert the jar allowing the hot food to come into contact with the lid.  Once the food is cooled for both commercially jarred or home canned food the risk of BPA leaching into the food is gone.
Garden Gnome
©2006-2010


Sunday, July 18, 2010

The Dishwasher Fallacy

I recently reported on a newly purchased piece of Nami coated bakeware that really looks promising.  It was a spur of the moment purchase so I did not do any research on this silicone based coated software. When I did the only complaint I found was the bakeware was not dishwasher safe.  I honestly don't understand this kind of complaint.  The bakeware is designed to be non-stick so by default should take minimal washing to clean-up.  It doesn't need to be washed in the dishwasher!  In fact in my test runs with this particular bakeware it doesn't even need soaking but rather just a simple wash that would take less than 2 minutes.  I have all kinds of non-stick bakeware, non-coated bakeware, pot and pans, baking utensils and a wide range of entertainment and kitchen ware that never sees the inside of a dishwasher.  My prep knives are always hand washed as well.  So the only complaint agaists a piece of non-stict bakeware is it isn't dishwasher safe?

Let's think about this.  I've had a dishwasher since the kids were quite small and now they are adults with kids of their own.  I still have a dishwasher.  Over the years I have heard of people using their dishwasher for washing ball caps and even cooking food.  I recently posted how  jar labels can gunk up your dishwasher and yet everyone has this misplaced fallacy that everything must be dishwasher safe.  I'm sorry but I don't buy that.  Certain kitchen items are simply meant to be hand washed.  It takes very little effort to load the dishwasher then wash up the remaining items that should not go into the dishwasher.  Don't fall into the dishwasher fallacy that everything thas to be dishwasher safe.  It doesn't and despite that the item can function quite nicely in the kitchen. 

Garden Gnome
©2006-2010


Thursday, July 15, 2010

Reusable and Cloth Shopping Bag Danger

Many eco-friendly shoppers have turned to using reusable and cloth shopping bags.  Apparently it has come to light that these bags can present a cross contamination and bacterial build-up danger.  The reason is the bags can get moisture via damp produce and condensation from refrigerator products.   Factor in the fact many keep the bags in their vehicle so they may also be exposed to high humidity conditions when the vehicle is not in use depending on your location.  All grocery products whether wrapped or not have been exposed to several levels of human contact.  In addition to that canned and boxed foods may have been exposed to rodents during their time in warehouse storage.  The problem with all of this it the bacterial level on various food items can cause bacterial buildup in the bags.  As each bag is reused there is the potential to contaminate other foods carried home in the bags.  To prevent these potential problems:

  • Use those very thin produce bags for your produce in the produce section.  They can be washed and reused several times unless they develop a hole.  They can also be put into the recycle bin at home or at your grocery store if they offer bag recycling.  Alternately use a dedicated cloth bag or two for unbagged produce only and wash after each use.
  • Wash cloth bags after using them for groceries.  They can go through the washer in the cold setting and hung to dry.
  • Spray the insides of polyethene bags with rubbing alcohol after each use.  The rubbing alcohol will kill off any germs left behind and evapourate quickly so as to not leave the bag wet.
  • Leave your clean shopping bags near the main exit door or by your keys rather than in your vehicle.

Garden Gnome
©2006-2010


Friday, July 2, 2010

Nami Coated Glass Bakeware

On our last grocery shopping trip my husband noticed non-stick glass bakeware in the sundry aisle.  We have been eliminating as much plastic as possible in the kitchen in favour of glass.  We have a fair amount of glass bakeware but another piece is always welcomed.  We decided to buy a piece of this new non-stick glass bakeware to try it out.  If we like it there are a couple of nice sizes that would be perfect when baking for two.

nami coated glass bakeware
This glass 9" x 14" baking dish has Nami silicone non-stick coating giving the non-stick capabilities of silicone bakeware with the sturdiness and rigidity of glass bakeware.  It is made of borosilicate glass that provides excellent heat distribution, durability and resistance to extreme temperature changes.  Metal utensils should be avoided with this coating as affect the appearance of the dish but will not impact the performace of the Nami coating.  The coating may absorb colours from certain foods and some discolouration is likely to occur but will not affect performance or flavour.  The baking dish should be hand washed only with warm, soapy water.

I could not find a lot of information on the Nami silicone-based coating.  The coating is PTFE-free and PFOA-free.  It is an environmentally safe, anti-bacterial and eco- friendly alternative to Teflon® non-stick coating.  The coating is FDA approved.  The coating gives the glass a frosted appearance.   I think this will be the best of non-stick in that there is the convenience of silicone without having to use a second pan.  I will post an update on how I like the performance of this baking dish after using it a few time.

Garden Gnome
©2006-2012