What does a Garden Gnome do when she is not gardening, in the kitchen or doing genealogy? Well the answer might just surprise you so read the entries to find out more. This blog focuses on everything we do to make our house a home. There will be a strong emphasis on home energy efficiency and do-it-yourself (DIY) projects. At the same time there will also be crafts, knitting and crocheting projects along with any other little tips we do to create that down to earth, I want to be here home. Please enjoy your visit :)


Tuesday, July 24, 2007

Dishwasher Installation

Over the past eighteen months, we have replaced all of our major appliances. Energy efficiency and function have been the top deciding factors. In an earlier entry on Shopping for a Dishwasher I indicated we had narrowed down our choices for the new dishwasher. After considerable reseach we decided on the Bosch SHE44C02UC instead of the SHE44Co5UC. The installation was a planned DIY project with the help of our son-in-law who recently installed model SHE33C in their home.

Bosch SHE44C02UC

We chose the Bosch SHE44C02UC based on energy efficiency, features and lack of features. This is a tall tub model with stainless steel interior and nylon coated racks. A flow-through heater heats the water temperature to 161ºF. One of the first questions we have been asked is does the additional cost of a Bosch warrant it? We think so.

The dishwasher is reported to be one of the quietest in North America. Our kitchen opens onto the family room so noise level was a consideration. We were impressed with the condensation drying freature that hygienically dries the dishes without a heating element making it very energy efficiency. If using a gas hot water heater this model uses 315 kWh/year. We pay 5.5¢ per kWh but with the service charges the total price per kWh is about 11¢. This dishwasher will cost us approximately $25.58 per year to operate based on the Energy Star rating based on average usage without factoring in the cost of dishwashing detergent.

There were certain features we were not interested in. Similar dishwashers had a delay start and china setting. We had both of these features on the dishwasher at our old home and never used them.

The manufacturer's instructions indicate that a rinse agent must be used even if you use a detergent with a rinse agent included. They also specify using powdered detergent but tabs can be used if desired. Powdered detergent has less packaging so environmentally is friendlier plus it generally is more economical. This dishwasher uses less water as well so you need less detergent. The recommended amount is 1 tbsp (15 ml) for most loads to a mizimum of 3 tbsp (45 ml) if you have hard water. Liquid, gel or using too much detergent can damage dishware and cause etching in glassware.

The Old

The old dishwasher was an ancient KitchenAid with a rusted through tub (1). The dishwasher is in this condition due to neglect by the former owner of our home even though when it was installed it was a higher end unit. We had considerable debate where to install the dishwasher. We had the existing location (1) and the location where the built-in oven (2) was. Finally we decided to install in the existing location. In order to install the new dishwasher the old dishwasher had to be removed. We removed the built-in oven at the same time.

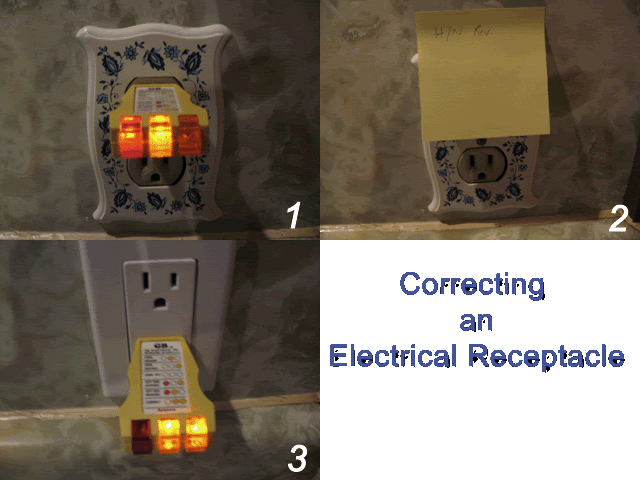
Removing the old dishwasher proved to be a bit more difficult that the built-in oven. My husband and son-in-law spent a good couple of hours removing this beast. It was heavy as well. The electricity to both areas had to be turned off. The electricity to the dishwasher needed to be hardwired while the electricity to the old oven was disconnected at the panel then removed. Once both appliances were removed, it was time for the cabinet prep.

Cabinet Prep

The dishwasher connections can be seen in the existing cabinet (1). The cabinet from the built-in oven (2) is being turned into either shelving or drawers but the drawer idea is winning out. We have a cabinet maker who will make matching fronts. There was a little sealing work to do but not a lot in the existing cabinet.

A closer look around the window and patio door areas show the depth and the paint colour. The wall area by the microwave is the only real wall in the kitchen to be painted. The new countertop is scheduled to be installed hopefully before Aug 6. The backsplash is being tiled with an aqua glass tile as soon as the countertop is installed. I feel like I'm on one of those shows with a time limit for renovations!

Installed

The dishwasher installed (1) looks wonderful! The guys ran into a problem with drainage since the old dishwasher drainage was practically blocked. That had to be removed and replaced. The almost 1 foot deep windowsill and patio door trim (3) has been painted with Behr Tide Pools to create a shadow effect to the walls painted Country Mist.

I would like to address the much advertised quietness of this machine. It is quite quiet but there is still some noise so don't expect not to hear anything. Still it is very, very quiet. All in all, we are very happy with our decision of buying this dishwasher and installing it ourselves.

Garden Gnome
© 2007


Monday, July 23, 2007

Electrical Problems


Hydro One Workers
July 17, 2007

The saga of our electrical problems continued...

In a previous entry I detailed how we tested an marked all the electrical receptacles for problems. Since most were on the rather old side we decided to replace all receptacles and switches. We had hoped that this would solve our brownouts and to some degree replacing the kitchen receptacles and switches helped but did not eliminate the brownouts nor did it help with the power surge followed by a brownout then back to normal whenever the dryer was started. The dryer is a gas Whirlpool Duet less than a year old that I talked about in a previous entry. Electricity is need for the electronic control of the dryer so we knew it should not create this type of problem.

Part of being a good DIYer is knowing when to hire professionals. There is a lot of household repairs my husband and myself can do many gained by renovating a turn of the century home several years back. One of the first things we learned with that project is sometimes it is better to hire a professional. It is certainly false frugality to attempt a repair yourself that is beyond your abilities and has the potential to put your family or property at risk. The brownouts and power surges were a concern so we called our electrician. He has worked with us for almost 20 years and did portions of the rewiring in the house previously mentioned. Whenever we run into an electrical problem beyond our abilities we call him. I showed him the problems and he said he needed to look outside.

Brownouts indicate a decrease in the voltage through the electrical lines while power surges indicate an increase in the voltage of electricity through the wires. Both can originate from outside the home. Power surges can enter through telephone, power or cable lines and can damage computer equipment, household appliances as well as heating and cooling units. Brownouts can be damaging to electrical motors such as your HAVC fan. In our case the power surge was of more concern than the brownouts since our HAVC fan wasn't being used but the brownouts could have damaged our refrigerator, freezers and microwave oven.

He was outside for a couple of minutes. When he came back in he asked for a hydro bill and immediately called Hydro One, Ontario's electricity provider. He explained what he found outside and what was happening. Workers from Hydro One arrived within 15 minutes! They had to access our roof from the neighbour's yard but that wasn't a problem. Apparently we had purple connectors on the main into the house that sparked as soon as the wire was touched. The workers said that we were very lucky the house hadn't caught on fire. Our electricity was off for about a half hour while they made the necessary repairs. We no longer have the brownouts or power surges and have eliminated a potential fire hazard.

Another problem our electician found and one that we would have found was a few burnt wires in the panel box. The simple solution was to trim these wires and reconnect them properly and install a new breaker. Our electrician did this repair while checking for other problems in the panel box. The burnt wires were likely due to an overloaded circuit and faulty breaker. This was another potential fire hazard.

Remember when working with electricity safety is first and if in doubt always call in a professional! Your life, your family's lives and your home depend on this.

As far as the rest of our electrical concerns, most are DIY projects that I will be posting on later.

Garden Gnome
© 2007


Thursday, July 19, 2007

Replacing An Old Central Air Conditioner

There are several things to consider when replacing and old central air conditioner unit. In our last two houses we had old units with freon as a refrigerant. However, despite having minor leaks we were told to continue using the air conditioner unit until it finally quit. Given the age of both, I'm sure this wouldn't have take very long. We knew before we move into this house that the old air conditioner unit did not work and would need replacing. That gave me a little time to do research on central air conditioner units before the actual move.

Note: We are quite competent DIYers but I would not consider installing a central air conditioner unit a do-it-yourself project. This is one we left to the professionals. Our installation took about 5 hours with them doing it and at least we can rest easy knowing it was installed properly.

Old

I'm usually very careful to take before and after pictures of any renovations we do. The air conditioner installers arrived just after 8 am yesterday morning. After a few long days of painting, unpacking and organizing I had completely forgotten to take before pictures.

The old unit was set in the corner between the front porch and house (1). I didn't even think to check for the brand or model number but the installers said it was as old as the furnace that was installed in 1983. The furnace will be our next major replacement but again we have been told to use it until it no longer works. With our luck that will be about mid-winter! As you can see, the old unit (2) while in still fairly good physical condition is quite old. It did not work and has not worked for the past 15 years. When it stopped working in 1992 the previous owners decided against a repair opting instead to use a couple of window air conditioners. The evapourating coil (3) is larger than the new one. Freon, and environmentally unfriendly refrigerated was the coolant.

New

We settled on a Carirer® Comfort Series with Puron® Refrigerant Model 24ACA (1) for reasons I will discuss further. This unit qualified for a $50 rebate from the company but not our provincial rebate. The unit that did would have cost us $500 more for a $350 rebate but based on our usage and space limitations, it wasn't feasible. Carrier was the first company to use this environmentally friendly, energy efficient refrigerant that won't deplete the ozone layer. We had the following criteria:

  1. environmentally friendly
  2. energy efficiency
  3. size restriction
  4. effectiveness
  5. quiet operation
  6. cost
Air conditioner energy efficiency is measured by SEER, the Seasonal Energy Efficiency Ratio. SEER indicates the relative amount of energy to operate provide a specific cooling output. Had the existing unit been operational it likely would have been about a SEER of 7.0. The new unit is a SEER 13.0 giving at least a 30% savings over the cooling season. We could have gone to a higher SEER rating but were restricted by location. The more efficient units are larger and for our use did not warrant the additional costs. Based on your location and usage and higher SEER rating may be desireable.

Our house is earth bermed on the lower level making that level a fairly consistent temperature. The house is well shaded from afternoon sun almost to a fault. We are also on the water so get the cooling effect from that. A good portion of our cooling is through the earth berm, shading, water and ceiling fans. So in terms of cooling, we could go with a lower SEER unit given that it will only be running a few days a month early June to mid September. We've estimated the unit will run about 21 days per cooling season. However, we live in a very humid area so when the temperature soars it can get quite uncomfortable. Our previous house cost approximately $350 to cool for the season without an earth berm, very limited afternoon shading and massive windows resulting in a lot of solar gain. Projected cooling costs for this cooling season is about $120 or less.

The new evapourator coil (2) is a bit smaller but higher than the old one so the furnace had to be modified (3). Once the coil was installed in the furnace, the installer cut a custom made door. When we replace the furnace the duct work will be modified to fit but the coil won't need to be replaced. The new air conditioner unit fits in the old spot perfectly (4). It is a bit quieter than the older models we've had but I don't think by a lot. I trimmed back the boxwood shrub on the side closest to the unit. While the installers said that shouldn't be necessary, one of them said a 10" clearance around the unit was desirable so I did so. Anything that impedes the air flow will result in lowered energy efficiency.

As part of the installation an energy efficient, programmable thermostat was installed (not shown). There was a $50 rebate on the thermostat even though it is stamped with the company's logo with no other documentation. Total cost was $2,980 CDN less $100 in rebates including full installation. Installation included the removal and disposal of existing equipment and re-installation in the same location, re-connection or revision of gas piping, electrical and venting system along with necessary duct work modification. It also included new copper lines and 'A' coil. I would have liked to see a little discount for paying upon invoicing that I assume to be 30 days even though I wanted to pay upon installation. Their installers are not allowed to accept payment which I don't really understand and we have to pay either cash, money order or cheque as credit card payments have a 2% surcharge. At any rate the price was well within our budget. We were very pleased with the quality of the installation as well so will be recommending this firm to our friends.

Stay tuned tomorrow to learn about our fun with electricity!

Garden Gnome
© 2007


Thursday, July 12, 2007

Reviving Sheet Flooring


We do not wear shoes indoors so clean floors is very important to me. The bathrooms, utility room and walk-in pantry in this house have older sheet flooring. My husband took one look at the utility room and in an appeasing voice promised new flooring. But I had other plans! The floor itself was in good condition just very dirty looking. It wouldn't have been flooring I chose but it works well for the room and besides we have enough to do that the money for new flooring would be better spent elsewhere.

So I pulled out my trusty bottle of household ammonia and tested a small area in the corner. Just as I suspected, the area came up considerably cleaner so now I knew what I was up against. Sheet flooring can become dirty looking from dirt or wax build-up or a combination of waxing over not quite clean floors and trapping the dirt in between layers of wax. I suspected in this case it was several wax layers trapping dirt combined with surface dirt. I decided to do a larger patch to see if my suspicions were correct. I picked up another bottle of household ammonia and a stiff scrub brush from the dollar store*. Armed with a large bowl of water and rags for wiping down the area after cleaning I set to work (1). The ammonia solution thickened as I scrubbed the larger patch so I knew for sure there was a heavy wax build-up.

There is no doubt about it, this is a hands and knees cleaning job. Ammonia is hard to work with for any length of time especially for those like me with respiratory problems. It is essential to work in a well ventilated space for short periods at a time when using ammonia full strength. My method was to pour the undiluted ammonia onto the floor then scub with the brush spreading the ammonia in about a 2 square foot area. I had the ceiling fan on as well as all windows in the area wide open. As the ammonia became thick with the built-up wax and the ammonia smell dissapated somewhat, I wiped down the the section with clean water. Wiping the section well with clean water is very important to prevent any wax from resettling on the floor. The edges of each section remain sticky for quite some time allowing the next section to overlap and remove all the wax and grime. Then I would take a ten to fifteen minute break and do another section. By mid-afternoon almost half of the room was finished (2) and by the time my husband arrived home only a large strip in front of the utility room door remained (3). I was very pleased with my frugality and the outcome so proudly told him to come and see what I had done. He could not believe how the floor came out looking like new! The next morning I finished up the large strip with the final picture taken (4) at the entrance between the family and utility rooms. Once the entire floor was cleaned, I went over it again with clear water checking for any sticky spots. This particular sheet floor still has a wonderful shine to it even though I did not wax it but some floors will come up dull after cleaning so will need a coat of good quality floor wax. For a total cost of $4.50 and a little elbow grease the floor ( ~ 10' x 10') looks like brand new! Not bad, eh?

*Watch for a post on dollar stores shortly as many available household items can really help stretch the dollar when renovating, decorating or simply cleaning a new to you home.

Garden Gnome
© 2007


Wednesday, July 11, 2007

Kitchen Reno Phase 1 - Installing the Stove

Tomorrow will be the second week mark since we officially moved into this house. There are so many things we have done, some minor and some a little more work. I want to share all of them with you as we turn this house into our home. Today I'm going to focus on the work it took to get our JennAir slide-in stove installed.

Installing the stove was a DIY project that involved removing an existing range hood, built-in stovetop and cabinet. This project involved capping off existing wiring and running a new line from the main. If you are not familiar with electrical wiring how-tos, hire an electrician!

1. The ancient and likely never cleaned range hood was the first to go. It was hard wired so we shut the breaker off, removed the hood then taped off the wires using wire connectors on each wire then covering well with electrical tape. The covered wire remains showing because we haven't decided whether we want a light over the stove or not. If so, it can be wired here. If not, we will pull the wire through and disconnect it from the electric panel.

2. The built-in stove was direct wired as well so had to be disconnected before being removed. This thing was grotty to the max! At one time it was a higher end appliance but because of neglect became a cesspool for bacteria and grease. As you can see, the sink is very close to the stovetop making me question whether the contractors who obviously installed this expensive kitchen actually knew what they were doing! Talk about a poor kitchen design.

3. Removing the stovetop took a little more work than anticipated. We had hoped to save the lower cabinet for another location. That ended up being impossible due to the way the cabinet had been installed. These were obviously expensive cabinets that had been professionally installed. We salvaged the two drawer covers and doors but the cabinet unit and frame was damaged beyond salvaging. The countertop had to be cut as well. We were not concerned about precise cutting as the countertop will be replaced as soon as the sink is moved

4. With the cabinet removed it was time to secure the new stove receptacle. The new wire (220 volts) goes to the main with the box secured to the wall behind the stove. Older electric stove plugs didn't have the nice cover like we bought for this wiring job. We like the idea of the cover plate even though it is behind the stove.


Here you can see the new plug in a little more detail. Before putting the stove in place, the downdraft system had to be installed. It will not be connected to the stove or to the outside until after the new countertop is installed but it was essential to be in it's proper place for the stove installation. This allows for the stove to be slid out easily for the counter installation. To vent to the outside we have to drill through a thick cement wall. We also had to add wood shims to raise where the stove would sit on the old flooring to the level of the ceramic tile.

We ended up removing the backsplash from the countertop for the stove installation. We had hoped the main backsplash covering the walls extended lower so we wouldn't have to remove it but that wasn't to be. As you can see, the cuttings a the counter level are rough but that is fine as this countertop is being removed as is the matching back walls. I hung a Strippa from IKEA for my hotsauces to see if I liked the look. I do but am not sure if it will match what we intend to do for the walls so it is likely only temporary. At any rate the stove is now operational and ready to use.

The only painted wall in the kitchen is where the patio door is. The other two walls are covered with flat laminate the same as the countertops. The painted wall runs without any barriers into the family room. It is wood tongue and groove real wood paneling with the top half originally wallpapered. We removed the wallpaper and are painting with Behr 480E-1 Country Mist. We found a wonderful glass tile that would match this colour at Home Depot for the other two walls. We've tiled before but only a small area and not using glass tiles so this should be interesting!

Stay tuned,

Garden Gnome
© 2007


Thursday, July 5, 2007

Correcting Electrical Receptacles


We have now been in this house officially for one week regardless that it was past midnight last Thursday that we finally finished the move. If you look at the list from yesterday you will see we have noticed a few problems. Some of these problems are a little more pressing than others and so it was with the electricity. We were experiencing brown-outs.

Brown-outs occur because of a dip in the voltage along the electric line resulting in the opposite of a surge. This results in lights dimming or flickering especially during heavy loads. If the brown-outs are occuring because of the electric company there is little you can do about it. In our situation, the brown-outs were occuring because of plugs that were not properly wired. This happens often in older homes where a plug has been added without the proper knowledge to do so. For this reason you need a household tester kit with GRT-500A. This tester detects common wiring problems in standard outlets. It uses a series of light patterns to test for wiring conditions. In 1 this kitchen plug was showing the hot and neutral contacts were interchanged. As each plug was tested the result was noted with a post-it note as seen in 2. It is easier to test all the plugs then correct room by room later. The electricity was turned off to the plug then tested to be sure it was off. The plug was replace and wired correctly then retested after the power was turned on.

We are replacing all plugs and switches throughout the house. Most of them are quite old and even if wired correctly are likely faily to some degree. What we want to see is the two orange lights as indicated in 3 as this indicates the wiring is correct. This is the method we will be using as we go from room to room. We redid the kitchen and switches in two rooms. We have already seen a reduction in brown-outs!

The majority of the electrical problems we found were hot/neutral reversed. However, we found one bathroom and two bedroom plugs with an open ground reading. The bathroom plug is easily fixed using a GFI plug something that would be needed anyway. A new ground will have to be added to the bedroom plugs.

Materials Needed: receptacle tester, wire cutters, flat head screw driver, builder's package replacement plugs, builder's package receptacle covers, electrical tape

Now I would be remiss if I did not give a warning. We are very comfortable working with most electrical issues. This is NOT a DIY project if you do not have the working knowledge for wiring and electrical problems. If in doubt, hire an electrician.

Garden Gnome
© 2007


Wednesday, July 4, 2007

Our New Home


Our New Laneway

This is a picture of our new laneway. I really love it! So we are now all moved in and the fun begins. Now we start finding the problems the previous owner neglected to tell us or maybe didn't even know about. The property itself is divided into three major areas. The portion from the garage to the deadend road is the laneway and official front yard. The portion from the garage to the house is grassed surrounded by mature landscaping. The side yard is minor but leads to the back (aka our front) yard that is maturely landscaped ending at the breakwall on the water's edge. A dock completes the setting. The house is bermed slopping to ground level on the lower level with one foot thick walls making it quite energy efficient. It is a beautiful peaceful setting but not without problems. I will be discussing a lot of these problems as we remedy them.

Here are some of the problems in no particular order that we have discovered:
  1. rodents - there is evidence of an indoor rodent infestation at some point but we have no idea if it is recent.
  2. electrical - there are obvious brownouts
  3. an ancient freezer with no ground
  4. outdoor lighting issues
  5. AC not working
  6. aged furnace
  7. in need of caulking and sealing
  8. vegetation trimming for view and pest control
  9. kitchen retrofit
  10. indoor lighting - very minor, mainly upgrading some fixtures
  11. gas line to grill is very wobbly
  12. gas line to dryer is non-existent
There are likely more problems but we will deal with them as they arise. The next few posts will be before and after shots of how we solved the problems plus a bit more since there is decorating and other non-essentials to consider. So watch for them shortly.

Garden Gnome
© 2007


Sunday, July 1, 2007


Happy Canada Day


Garden Gnome
© 2007