What does a Garden Gnome do when she is not gardening, in the kitchen or doing genealogy? Well the answer might just surprise you so read the entries to find out more. This blog focuses on everything we do to make our house a home. There will be a strong emphasis on home energy efficiency and do-it-yourself (DIY) projects. At the same time there will also be crafts, knitting and crocheting projects along with any other little tips we do to create that down to earth, I want to be here home. Please enjoy your visit :)
As of tomorrow it will be two weeks that the patio has been dug up with a hole about the size of a grave. The good news is everything appears to be draining fine. The bad news is our plumber is on holidays so we still have the hole. He is supposed to come out the first of the week. So there's where we sit with out plumbing problem. I'll update more as soon as the plumbing is being worked on. In the meantime tomorrow I will post how we finished off the down draft vent.
Garden Gnome
©2006-2009
 Broan® EcoVent
August 16, 2009
One question immediately arises with the final installation of our Jenn-Air® down draft system and that is
why use a Broan® EcoVent? In the winter of 2006 we installed our Jenn-Ai® slide in range (more on my range
here) with down draft system in our previous house then moved it here in June of 2007. At the same time we installed our front loaders in the old house in February 2007 and also moved them here. All three appliances are high efficiency appliances but what we noticed as a flaw was the venting on both the dryer and the range. Both had regular vent covers. Cold air despite everything we did came back up through the vent! I actually resorted to placing a folded up towel over the down draft grate of the range.
When we moved here we looked for an eco-friendly, energy efficiency dryer vent (more
here) and found it in the Broan® EcoVent. This is a Canadian made vent cover designed for Canadian winters. It is larger than regular vents because it is insulated preventing cold transfer. It has a unique floating ball check valve that prevents back draft as well as insects entering and the design also prevents rodents from getting in. It definitely solved our dryer vent problems. I decided I wanted this vent for the Jenn-Air® down draft even though it meant reducing the air flow from 5" to 4". The problem is and there has been complaints over the vent cover meant for the Jenn-Air® down draft ranges which includes both back draft and rodents getting in. We live on water front property so rodents are a huge concern! We also live in Canada so cold back drafts is a major concern in terms of energy efficiency. Reducing the air flow but using an energy efficient vent cover made a lot of sense. First the reduction would actually create a stronger flow of air from the range increasing it's efficiency. Second using this vent cover virtually eliminates the back draft and rodent problems making this vent cover an extremely eco-friendly choice for the down draft system. It meets all of our needs as well as providing energy efficiency!
Garden Gnome
©2006-2009
We have had on and off plumbing problems since buying this house. We actually are dealing with two drainage systems possibly three, faulty design for both and roots. The first system is the municipal sewage system. The two bathrooms and laundry room drain into the municipal sewage system. Shortly after moving in we discovered a problem with this system which we thought was fixed until another problem appeared the following spring that involved using a porta-john and digging up the neighbours' yard. That ended up being a rooting problem so once the roots were removed that system has been working fine. During the second repair we installed additional drain clean-outs for that system and the system that drains into the natural water body. Ground water, rain water and the kitchen grey water drains into this natural drain system. This means we have to be careful to use a no or low phosphate dish and dishwasher detergent as well as scrap plates before washing either by hand or in the dishwasher. Before you ask, yes this is a perfectly legal, acceptable and common drainage system here. Now we know there is a septic system that we suspect may still be in use for rain water drainage but we haven't found it yet.
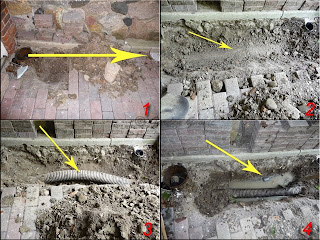 Just outside of the kitchen patio doors there is a pit, brown circular object at beginning of the arrow. Water from the kitchen, rain water and two drains from the patio (one pictured end of arrow) (1) drain into this and from there travel down another solid pipe to the natural water way. We suspected a blockage of this solid pipe that forced water up and back into the house. The only solution was digging up the patio.
We discovered a corrugated drainage pipe that was obviously bowed (2) and (3) so now things got interesting. When the solid pipe was snaked, the snake went through the 'Y' joint instead and snaked the corrugated pipe instead of the smooth pipe. We do not know and the plumber can't figure out why the corrugated pipe is there in the first place unless it was a shoddy repair. At the same time we found the solid pipe (4) that had obviously been patched at some point. The end solution is we are tying all of the drainage pipes together in one solid fashion so nothing can get inside the pipes. The pit is going to be replaced with a clean-out. What we will end up with is a solid plumbing system into the natural system with 3 clean-outs covering all bases.
 Pictured is the machine our plumber uses to snake the drains. A large coiled, flexible metal rod attaches to the front. It is then fed into the drain and the machine is turned on forcibly clearing any blockage. Additional rods are added as required. When the blockage is cleared is shows as a thick, black and very smelly sludge. In a normal system you would not see this as it would go directly into the sewage system. In our case we could both see and smell it!
Once we got the blockage cleared we discovered another problem. The pipe end in the pit (1) was more than half blocked with cement reducing the diameter considerably which reduces the flow of water from the pit. This creates a greater chance of water backing up into the house. Then when the blockage was cleared it was obvious the patch in the solid pipe wasn't sealed. So we are replacing the solid pipe from the pit that will no longer be a pit to the connection of the first patio drain.
The majority of the work happened Tuesday afternoon. The good news is there is no flooding in the house. It has drained and dried up. The trench my husband dug has also mostly dried. As you can see from the bottom picture the water coming out of the drainage pipe has cleared considerably. The bad news is the plumber wants to leave the open trench as is for at least one week before hooking things up properly. That means we are left with a nice trench, piles of bricks and a pile of dirt for the next week.
Garden Gnome
©2006-2009


