What does a Garden Gnome do when she is not gardening, in the kitchen or doing genealogy? Well the answer might just surprise you so read the entries to find out more. This blog focuses on everything we do to make our house a home. There will be a strong emphasis on home energy efficiency and do-it-yourself (DIY) projects. At the same time there will also be crafts, knitting and crocheting projects along with any other little tips we do to create that down to earth, I want to be here home. Please enjoy your visit :)


Tuesday, January 27, 2015

New Entrance Ceiling Fan

As much as I liked our new house when we bought it in 2011, the existing light fixtures were much to be desired.  Some were plain Jane basic fixtures and all were dated.  The only one I decided to keep for the time being was the kitchen ceiling fan.  The classic black ceiling hugging design looks good in the kitchen.

entrance chandelier
The front entrance lighting was a large drop chandelier.  I was so impressed with this horrid fixture complete with plastic prisms, that I couldn't find a picture of the full fixture!  The closest I could find was this picture take in July of 2014 before painting the doors and trim.  The door is now red on the exterior with white interior and trim (more on that to come).  Either the builder or previous owner liked plastic prisms because they are also on three more fixtures in the house, two in the upper level bathroom and one in the dining area.  The fixture in the dining is just all kinds of wrong including location but that is another project.  Back to the front entrance fixture.

Shortly after moving into our home, I saw a gorgeous ceiling fan that I thought would look great in our entrance.  I showed the picture of it to one of our kids who found a similar but smaller one for us.  They brought the new Banvil ceiling fan down but it ended up sitting in the box for over a year while we decided if that is what we really wanted.  We started working on the room that we are turning into a home gym.  The ceiling fan in the box was in there so my husband decided to install it this past weekend.

new energy efficient ceiling fan
Updating light fixtures is not difficult if you are comfortable working with electricity.  We turned off the breaker to the fixture, tested to make sure the power was off then my husband installed the ceiling fan in four stages.  The base was installed first then he assembled each blade and installed them on the base.  Once the blades were installed, he assembled the light and finally attached the chain pulls before turning on the power.   We are very pleased with the end result!

The ceiling fan is energy efficient.  Given it's location, it will push warm air from the upper level to the lower level in the winter months.  In the summer months, we will reverse the blade rotation so cool air is pulled from the lower level to the upper level.  This will save us on heating and cooling while making the house more comfortable.  We used two 13W CFL bulbs in the light but will change those to LEDs at some point since this fixture will be tied into our home automation. 


Monday, January 26, 2015

Easy Indoor Clothesline Solution

Quite often one project leads to another.  So it was in the utility room.  The previous owners of our house installed a cord indoor clothesline that spanned the distance between the far wall of the utility room to the wall where we recently installed the dry bar cabinets.  This gave us about 30 feet of drying space. 

old indoor clotheslineThe line did not detract so was visible when not in use which really wasn't a problem.  The closet doors cleared the line so the only issue was aesthetics.  We removed the mounting strip for the clothesline when we installed the cabinets.  The line wasn't much but looked so much nicer gone!  We decided to take the old clothesline down. 

Still, we needed a solution for drying clothes indoors.  There are certain items that we always hang to dry rather than put in the dryer.  We have a very flimsy folding rack that isn't suitable for hanging much of anything.  The space really isn't big enough to leave a rack sitting out for any length of time.  At the same time, we knew any solution would take up valuable space in the small room.

new indoor cloghesline
Our first thought was to install a rod on the end wall over the end of the washer but that would only give us about 4 feet of usable drying space without climbing over the washer.  Instead, we installed a rod between the closet and furnace room walls.  The rod is a 1- inch wooden dowel that can be easily lifted out of the mounting brackets if desired.   I think I will look for a plastic cover meant for shower rods to cover the wood mainly for looks but also to protect the wood from getting wet. 

Four feet of drying space does not seem like a lot especially in comparison to the old 30 feet span.  However, I hung a few clothes in the lower level bathroom while we were working on the cabinets.  That was ample room so the new rod should work fine.  I may add a fold down drying rack on the end wall if necessary.

The wall needs patching which will be a small project.  I also plan on painting the trim and replacing the closet doors.  As mentioned in yesterday's post, the ceiling tile needs replacing it's in the jar for weekend projects.  I'll be working on decluttering the closet this week!  We are also in the process of converting a lower level room into a home gym so I'll be busy painting too. 


Sunday, January 25, 2015

Dry Bar Cabinets Installed

While I have plans of painting a couple of rooms, we are working on several smaller, weekend projects over the next few weeks.  The utility room is L-shaped with the refrigerator and dry bar spanning the wall adjacent to the entrance.  The back, long arm of the L has a large double door closet, the washer and dryer.  Across from the washer and dryer is the very small furnace room that really is just big enough for the furnace, hot water tank, central vacuum canister and shallow shelving.

The total area is small but for the most part quite functional.   It does need a bit of organizing and could use a fresh coat of paint.  The ceiling is a drop ceiling.  Some of the tiles need replacing, another of our planned easy weekend projects.  We would like to update the lighting as well.  It is currently two fluorescent double bulb fixtures in the L-shape and a bare bulb fixture in the furnace room.  All come on at the same time.  The ample sized closet is very much lacking in light so we would also like to add lighting there.  So there are a number of small, inexpensive projects planned that will make the space better suited to our needs.

dry bar area before cabinets installed
We brought our relatively new (bought in 2005) Whirlpool refrigerator to our new home in 2011.  We installed it just inside the entrance to the utility room.  Then as luck would have it, my husband found a base cabinet with countertop included on clearance at Home Hardware.  He installed it the same day creating a much needed dry bar.  We do a lot of entertaining so need the extra storage space for that purpose.  And so the dry bar sat where it quick became the perfect hotspot for horizontal clutter.  There was the fear that glasses would accidentally get knocked off during heavy use.  The horizontal clutter spilled onto the top of the refrigerator.  In short, the dry bar while providing much needed storage was not functioning in the way we envisioned it.

dry bar cabinets installed
My husband went to Home Depot where he found pre-finished cabinets.  He bought two of the cabinets for an easy, DIY solution to our dry bar area clutter problem.  They were very easy to assemble and hang.  Doors are available for the cabinets.  We decided to leave the cabinets open for the time being to see how we like it.  My concern is of course dust even though we like the way the cabinets look without the doors.

Once the cabinets were installed, we washed them down and started organizing the glassware.  We also took the opportunity to do a bit of decluttering.  Some of the glassware went into the donation bin.   That little bit of decluttering has spurred the start of house-wide decluttering.


Tuesday, January 13, 2015

Converting to LED Bulbs

Ontarians currently pay the highest hydro rates in Canada despite the fact that we produce natural sourced, inexpensive electricity.  Apparently our government deems it prudent to send our cheap hydro to the US then turn around and charge us premium prices, but that is a whole other story.  At any rate, our hydro rates are high.  We have always been fairly energy conscious because it is both frugal and environmentally responsible. Supplementary lighting is a necessity even if you are blessed with an abundance of natural lighting especially task and security lighting.  Lighting actually only comprises about 4% of hydro usage so there isn't a lot of savings even if not using hydro powered lighting.  The reality is every kWh not used is a good thing.

led bulb packaging showing wattage and lumens
Several years ago, I was excited to buy our first CFL bulb.  The base was big and bulky, limiting what fixtures it could be used in and at $30 was cost prohibitive to use in any number.  A few years later, smaller, spiral CFL that fit in most fixtures became available.  In comparison to incandescent light bulbs, the spiral CFL used less than half the wattage. 

Lowes had LED light bulbs on sale for $4.98 which is still more expensive than CFL but quite reasonable.  The price of LED bulbs is quickly coming down.  The key thing to look for is the lumens, the brightness of the bulb.  This will be the new value replacing wattage according to some sources.    I bought four of the 800 lumen bulbs (9.5 W = 60 W).

led compared to cfl bulbs
CFL bulbs have come down in price to as low as 70¢ per bulb and while they do save hydro, they have their own unique problems.  CFL take a few minutes to come to full brightness  They emit mercury when broken as the glass shatters in a million tiny, very sharp pieces.  CFL still don't fit in all fixtures and they perform poorly outdoors in cold weather.  Many complain there is a slight flickering to the CFL bulbs.  They can also interfere with other frequencies like garage door openers.

It's easy to see that the LED bulbs are lower wattage thus reducing hydro usage saving money.  They are by far the most energy efficient, cleanest and most eco-friendly light bulbs.  One of the CFL replaced was a 26 W bulb in the great room that is left on 24/7 when we are away.  It didn't behave nicely with the timer so we just left it on.  The three kitchen bulbs replaced were 13 W.

The LED bulbs are very similar in shape and size as the old incandescent light bulbs.  Aesthetically, they are a bit more appealing than the spiral CFL.  The A10 base will fit in most light fixtures but smaller based LED bulbs are available for specialty lighting.  LED bulbs contain no toxic materials and are 100% recyclable which is a huge improvement over CFL bulbs.  They produce little infrared light, close to no UV emissions and the operate in extremely cold or hot temperatures.  The light is instant with no warming period to reach full brightness. 

We are planning on replacing the ceiling fan in the kitchen with a solar tube.  That will be after we finish the deck.  If we put a roof on the beck, it will change the roof line so the solar tube is on hold until we decide what we are doing. 

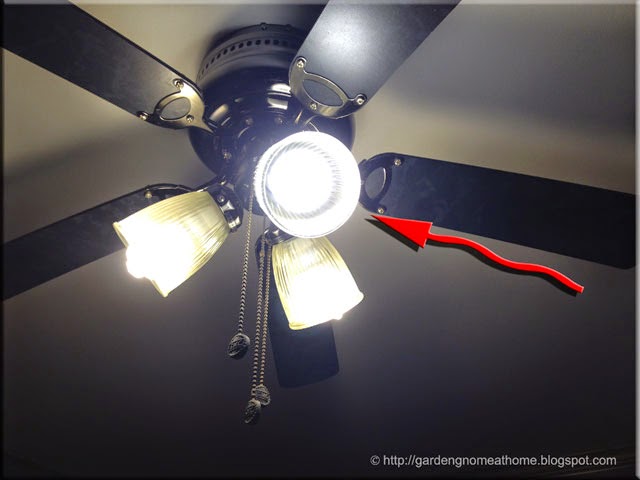
It is a bit hard to see here but the back two bulbs are CFL and the front one (red arrow) is an LED.  The difference in lighting is significant!  The LED bulbs put out a nice bright, crisp, clean light in comparison to the CFL bulbs.  They really light up the kitchen while saving us 10.5 W total.  We are getting more light for less hydro.  We have even questioned whether we still want a solar tube. 

We are replacing most of the lights in our house with LEDs.  Some are the basic ones like these while others will be part of our home automation project.  These basic LED bulbs will be moved to fixtures not tied into our home automation system.  I talk more about that system when it is up and running.  LEDs really are the way to go with respect to lighting.  The greatly reduced energy usage makes them suitable for solar applications.  They can be used with dimmers as well.  You can even get colour changing LED bulbs for use in home automation so you can simulate dawn, dusk and personalized settings.  I bought two colour changing LED strips to replace the kitchen florescent strips.  I'll  discuss that as well when they are installed.  In the big picture, we will be reducing our lighting from 4% of our overall hydro usage to less that 2% which isn't bad but the payback period will be about 5 years at current hydro rates and replacement bulb costs.


Thursday, January 8, 2015

Picking A Colour for the Greatroom

paint chips
Paint Chips

We are home now and the holidays are over so it is time to turn our attention to getting a bit of decorating done.  We had deep crown moulding installed in the entrance, greatroom and hallway back in November before we returned to our vacation home. The crown moulding still needs painting.  I'm rather partial to a pale grey for the walls with white trim.  I'm currently looking for just the right grey.

I brought paint chip samples home to see how they would look in the intended rooms.  These are Behr paint chips but our Home Hardware does colour match so can mix to Behr paint chips.  The one that I was immediately attracted to in the store (second from left) has a bit too much blue tone while the far right one has a green tone.  The second chip from the bottom of the far left sample is close to what I want but not quite. 

I'm planning on doing the painting prep work next week so that gives me the weekend to find a paint colour.  This will be a big project but the walls are in excellent conditions so there isn't a lot of repair work to do.  We will be replacing the doors in the hallway, the door trim and baseboard as well.  This should be a fun project!


Wednesday, January 7, 2015

Reducing Household Waste

Our municipality just announced that effective January 19, the bag limit for curbside collection will be reduced from four to three.  Our waste collection here is testy at best.  There is a 40 lb limit per bag and if there are more bags put out than there should be, they simply don't pick up any.  Seriously, if the limit is four and you put out five, they take none!  This is rather discerning since sometimes a resident forgets and waste not picked up quite often is driven into the country side to be dumped in ditches.  The recycle collectors are not quite as testy but they will pull items that shouldn't be in the recycle bin out, leaving them on your lawn to blow around.  At any rate, those not playing to the rules end up with problems.  There is a bit of resentment too since those living in apartment buildings apparently have no restrictions so it does take a bit of adjustment if they move into a residence with curbside collection.

There are a multitude of ways to reduce your household waste.  We seldom have more than one kitchen catcher size of household waste per week in addition to our recyclables that are collected every two weeks.  I personally think we still produce too much actual waste so am working on reducing it, ideally to one kitchen catcher per month or less.  Here are a few ways to reduce household waste put to the curb:

  • kitchen scraps - garburator, compost, give large bones to friends with dogs
  • paper - go paperless wherever possible including newspaper and magazine subscriptions,
  • cardboard/packaging - avoid excess packaging especially single serve items, avoid blister packs, buy loose produce instead of packaged, avoid wrapped produce
  • plastic - use reusable shopping bags
  • miscellaneous - repurpose or donate
The easiest and quickest way to reduce household waste is to avoid all excess packaging since a good portion of packaging cannot be recycled.  A good portion of excess packaging is food packaging, mainly single serve foods like snacks.  Replacing these items with alternatives that have less packaging can not only reduce your household waste but also save you money.

Curbside waste should be the last consideration for any household item that can either be repurposed or donated.  There is something inherently satisfying about repurposing an item that is no longer needed for its intended purpose.  Even old socks can be repurposed for crafts or dusting.  Old T-shirts can be turned into pillows or cut into strips then crafted into throw rugs.  If you truly can't repurpose and item then consider donating it. 


Monday, January 5, 2015

Curbside Waste and Privacy

Back when I was knee high to a grasshopper, there were a few town folk who were regular garbage pickers.  Like clockwork, they would come to rummage through your trash before the garbage collectors picked it up.  It was small town Canada, a gentler time and my Mom knew them so never minded.  Over the years the garbage pickers persist but quite often especially in larger areas they are not so benign.

Household waste put to the curb for collection can tell a lot about the residents living there.  Personal information can sometimes make its way to the curb making it easy pickings for someone trying to get information on you.  Items in your trash can give a would be thief not only personal information but clues about what may be in your house, your interests and your lifestyle.

We have a garburator and paper shredder which significantly reduces what goes to the curbside.  We seldom have much more than a kitchen catcher size garbage bag of waste and our recycle bins when we are home.  Our curbside waste never goes out the night before collection mainly due to a few folks who like going through the recycle bins for cans to sell.  Most of our cans go directly to the recycler anyway so it isn't a big concern other than having to clean up the mess they make looking for can.  If the weather is nasty or I don't plan on being home to pick up the empty recycle bins as soon as they are emptied, then the curbside waste waits until the next collection date.

Surprisingly, even though there is no personal information or food scraps there is still a lot to be learned about us in those bins.  Some of that information could be used negatively, mainly to determine where we shop or some of the activities we are involved in.  I'm not concerned because it would take a lot of extrapolation on the part of anyone snooping through what little there is there in the very short window of time it is out there.

However, certain items put to the curb can be a potential problem or present privacy issues for some.  For example, an unnamed employer here had the practice of checking employees recycle bins for alcohol containers then finding a way to get rid of those employees where he found the containers because he was against the use of alcohol.  He was wrong, definitely overstepping his bounds, and finally got caught but just like incriminating Facebook posts, incriminating items in your curbside waste can have negative effects.  Curbside waste can be a target during a nasty break-up.  Packaging from electronics can be as good as an open invitation for someone to break in.  Children's schoolwork can end up in the recycle bin giving a stalker at the very least your child's name but sometimes their grade and/or teacher's name.  Armed with that it's easy to find where your child goes to school.  Some items can even give would be thieves clues as to when you're away from home or what type of security measures you are using. 

Counteract the privacy concerns of curbside waste by putting it out as close to pick-up as possible.  Be conscious of what you put to the curb.  Don't put electronic boxes to the curb.  Take these to the recycle station yourself.  Remove shipping labels as well as labels from containers that you might not want neighbours know you are using.  Really, does your neighbour need to know your hair colour is from a box?  Crush smaller boxes and containers, then put inside larger ones.  Shred anything with your name, address or other personal information.  When it comes to paper waste, if in doubt, shred it.  Take a pro-active approach when it comes to curbside waste and your privacy.


Sunday, January 4, 2015

Paper Shredder is a Must

We live in the age of digital technology so while many are concerned with securing their computers and mobile devices, they overlook all the bits and pieces of paper with their personal information that has the potential to be misused.  These include financial statements, personal documents, expired credit or identification cards, and any correspondence that could be misused.  The main concern with this type of information getting into the wrong hands is of course identity theft but there have been cases where it has been used as evidence in civil or criminal cases, as well as stalking.  Once you put your waste to the road, any of this type of information could easily be misused.

paper shredder
There are several solutions to this problem.  The first rule of thumb is to never put anything with your personal information including your name and address to the curb.  Set this information aside in your home where it is safer than at the curb then purge at regular intervals.  A very secure and permanent way to purge is to burn this type of information.  Burning works well if you have a fireplace, fire pit or go camping where it can be burnt as fire starter for your campfires.  The second most common method is to use a crosscut paper shredder.  The shredded information can then be put to the curb or in the recycle bin OR burnt if possible later. 

Paper shredders are not expensive.  I consider a paper shredder a must have for anyone concerned with privacy.  We have a Royal 12 sheet crosscut paper shredder with ultra quiet motor at our primary residence and our vacation home.  I leave the shredder turned to the auto position then shred any personal information as needed, usually when opening mail.  That way, we don't have a build up of paper clutter with personal information with the potential for misuse.


Saturday, January 3, 2015

Houzz Interior Design Ideas App

I use my iPhone for a multitude of tasks in addition to communication.  It is my key tool for health and fitness as well as entertainment!  I want to add finer detail to our home so am constantly looking for different ideas.  It was only a matter of time before I discover home design apps on the App Store (Apple). 

Houzz app
I installed Houzz Interior Design Ideas from the App Store.  This is an easy to use free app full of high end decorating ideas.  The app will ask if you want to sign-up but you don't really have to unless buying from them.  Certain items in some of the design photos have little green sales tags on them that you can click to add to your shopping cart.  I signed up even though I don't plan on buying.  Signing up also allows you to save the ideas you are interested in.  A screenshot is an alternative way to save without signing up.  I've used screenshot to have the ideas at my fingertips when shopping.  This app does not give any instructions or methods for recreating the look.  That's up to you.  It is basically an idea resource for home decorating. 

Don't let the fact that these are high end ideas discourage you.  A lot of these ideas can be duplicated for a fraction of the cost if you DIY.  When you first open the app a full sized image of a design idea (eg. full room, focal point, colour theme, landscaping, interior, exterior) is shown.  Swiping to the left shows the next image and so on.  You can go back and review a previous image as well.  I tend to focus more on specific design elements because I already have vague ideas of what I want.  All in all, I think this is a great little app that will help me get the look I'm after.


Friday, January 2, 2015

Starting 2015 Projects

It's a brand new year!  It promises to be an exciting year as I have a lot of household projects planned.  I also have a few projects from last year to share as well.  We have been in our home now for almost four years and despite all of the work we have done there is a lot more that we want to do to make this house our home.  We started our large two level deck last year so there are several smaller projects to do to get the backyard to completion.  We installed crown moulding in the great room and entry and painted the front door which has led to a long list of additional projects indoors including painting, and replacing baseboard and doors.  I also have plans to turn an unused room into a home gym starting this month.  That project should be a lot of fun!  I'm picking up another piece of exercise equipment tomorrow so once the room is cleaned out and painted, it will come together quickly.   I'm looking forward to sharing some of my ideas and completed projects with you this year!


Thursday, January 1, 2015

Happy New Year! Welcome 2015

Wishing each and everyone of you a very Happy New Year!  Welcome 2015...