What does a Garden Gnome do when she is not gardening, in the kitchen or doing genealogy? Well the answer might just surprise you so read the entries to find out more. This blog focuses on everything we do to make our house a home. There will be a strong emphasis on home energy efficiency and do-it-yourself (DIY) projects. At the same time there will also be crafts, knitting and crocheting projects along with any other little tips we do to create that down to earth, I want to be here home. Please enjoy your visit :)


Wednesday, June 30, 2010

Organizing the Spice Cabinets

Yesterday I needed curry powder for a recipe I wanted to try.  Like most foodies I have more than an abundance of various herbs and spices.  I'm always picking up new herbs, spices and blends to try.  I also dry herbs and various vegetables for vegetable powders.  The result of this constant influx of seasonings is my spice cabinets tend to get rather on the unruly.  Of course it is a bit of an annoyance to know that a certain seasoning in in the cupboard only to have to spend several minutes shifting things around to find it.  As things like this happen before I knew it the entire contents of the cabinet were piled on the counters.

small container spice cabinet
Tearing apart the cabinet happened so automatically that I never even thought to get a before picture.  Once the cabinet was emptied shook my head at the mess then got busy.  I don't like keeping herbs, spices or blends in packets or worse yet plastic zip bags even though many come packaged that way.  Originally I had 2 plastic bins with lids on the top shelf to hold these types of packets until they could be transferred into glass containers.  The problem with the plastic bins is I would forget to check them so end up buying more of the same seasoning.  I decided to eliminate them.  I also had a few jars of dried onions and mushrooms on the top shelf that I moved into the main pantry. 

Pictured is the organized spice cabinet.  I use a fair number of mason jar for herb and spice storage.  This works well for herbs I dry as well as herbs and spices bought from the bulk food store.  While I do have smaller spice bottles most of them are recycled bottles.  There are a few packets on the top shelf destined for glass jars later today.  The final part of the organizing of this cabinet will be taping the inventory list to the door.

large container spice cabinet
The large container seasoning cabinet is in the lower cabinets of the breakfast bar.  This area opens from both the kitchen and family room side.  I keep the larger containers on the kitchen side and my collection of hot sauces on the family room side.  As you can see there are a fair number of larger containers of seasonings.  The large containers of seasoning that I use a lot of work out to be considerably less expensive than smaller containers.  The seasonings are arranged alphabetically for easy finding.  They tend to get mixed up occasionally especially if the grandkids visit.  It took me a few minutes to reorganize ready for use.

Garden Gnome
©2006-2010


Tuesday, June 29, 2010

House Sale Update

If you have been following this blog you will know we listed our house privately for sale upon getting the news that the sale of vacation home we wanted had gone through.  At that time we were officially the owners of two houses.  After trying to sell our house privately we finally listed with a real estate and set about finding another permanent house to buy.  We found a house and after a bit of negotiations the offer was accepted.  And here we sit getting closer to the mark where we are going to have to ask for a second extension on that offer.  To date trying to sell this house has been on the frustrating side.

We actually showed the house more and had more inquiries when the house was for sale privately.  To date we have had no offers on our house so we are currently sitting with owning two houses and and accepted offer on a third house.  The real estate agent added a take-me box to the sign for the pertinent details of our house with a few pictures on flyers.  Apparently take-me means just that.  Over 50 flyers have been put out and gone without so much as a call to see the house.  We don't have high traffic on this small dead end street so the flyers are going somewhere.  Our neighbours are the type to take them and there's only 5 school aged kids on our street that are always with their parent(s) if walking past our house.  So where the flyers are going remains a mystery.  At any rate they are very effective.

Hopefully my next house sale update will be sharing that the house is sold...

Garden Gnome
©2006-2010


Friday, June 25, 2010

Candle in a Jar

I make most of the candles we burn in our home using either soy wax or 100% beeswax.  Both of these are natural products that do not contain any colourants or scents.  There are two reasons I like using these waxes for candle making.  First the are natural waxes not petroleum based wax like paraffin wax is.  Second unlike paraffin wax both soy wax and beeswax burn clean.  Beeswax has additional properties as well.  It has a mild honey scent that smells lovely but burning beeswax candles is said to actually clean the air.   Burning beeswax candles is also said to have health benefits such as reducing the severity of or even eliminating sinus attacks.

candle in a jar
Candles in a Jar have become quite popular.  The problem with most purchased candles in jars is they are heavily scented.  The scent can cause problems for those with allergies, asthma and other respiratory problems.  At the same time what many don't realize is these scents pollute indoor air.  They are often heavily dyed another source of indoor air pollution.  Finally purchased candles in jars tend to be over priced going for as high as $10 per candle.  Both beeswax and soy wax can be used to make candles in jars.

Pictured is one of the beeswax candles in a jar I made.  I used a fancier, squatty 250 ml (half-pint) mason jelly jar and decorative two-piece lid.  The jelly jars with decorative lids can be bought in a 4 - pk or you can buy a 12-pk of regular mason jars with plain either gold or silver tone lids.  Traditionally the two-piece lids have been gold tone but recently Bernardin has moved to silver tone lids.  The decorative lids can be bought separately as well but the regular lids that come with the jars can be used.  Both jars and lids can be found in the canning section of any store that sells canning supplies.  There are larger canning jars but the best size for candles in jars is the 250 ml size.

Materials

1 mason* jar per candle
1 two-piece lid
1¼ c melted wax per candle
1 3-inch wick holder/wick per candle
sauce pan
metal can for melting the wax

Place jars in oven then set oven to 80ºC (175ºF) to warm this.  This will prevent breakage when pouring the hot wax into the jars.  Cover your work surface with newspaper to protect from wax drips.  Place wax in metal can.  Pour enough water in the sauce pan to come half way up the outside of the can.  Bring the water to a boil then reduce heat to a simmer while moving the metal can to allow the wax to melt on the inside.  Add more wax if desired.  Once the wax is melted place one wick with holder into a warm jar.  Carefully pour the hot wax into the jar.  Centre the wick.  As the wax cools it will shrink and the area around the wick will sink down (concave).  Top up the candle with more hot wax while the candle is still warm.  Set aside to cool.  Once cooled, place the two-piece lid on the jar.  The candle is now ready for storage, gift giving and using.

how to use a candle in a jar
Pictured is a beeswax candle in the jar ready for burning.  Before burning the candle the two piece lid should be removed. Trim the wick to ¼- inch before lighting the candle.  Place the ring of the two-piece lid back on the candle jar.  Place the candle on the lid portion.  Light the candle.

When burning use all safety precautions such as keeping away from out of reach of children and pets as well as away from combustible materials like curtains.  Never leave the candle burning unattended.  Do not let the candle burn down to lower than ¼ - inch from the bottom of the candle as this can cause the jar to overheat and break as well as cause scotching of furniture.  The remaining candle wax can be removed from the jar then the washed jar can be re-used for another candle.

Garden Gnome
©2006-2010


Thursday, June 24, 2010

Glass Canister Sand Souvenir

glass canister sand souvenier

Glass Canister Sand Souvenir

Like many families we like to bring home souvenirs from our travels.  Years ago when the kids were young we made our first trip to Florida.  Of course the kids wanted to bring home sand and shells.  These weren't fancy purchased shells but rather shells the kids had found on the beach so they wanted to keep them.   I wanted a way to display the sand and shells that was a bit different.  One day I happened upon small glass canisters in the craft store and thought that would be a good way to display the sand and shells. 

The canister could be filled in so many ways!  The canister is 10 cm (4 in) diameter and 10 cm tall.  Both the bottom an top of the canister can be filled.  The lid has a plastic cap on the bottom that can be removed for filling.  I poured sand into both the bottom and top of the canister then added a few sea shells to each, replaced the plastic cap on the lid then put the lid onto the canister.  Similar canisters can be found in craft stores as well as the kitchen section in department stores.  They may even be available in dollars stores with the kitchenware.

Garden Gnome
©2006-2010


Wednesday, June 23, 2010

Two Experiments with SoilMoist™ for Crafting Purposes

One of the great things about crafting is using products that are not necessarily labelled as a craft item.  Yesterday I posted about SoilMoist™ a crosslinked polyacrylamide granular product intended for use as a horticultural water management aid.  While I bought the granules for horticultural purposes for non-edible plants I immediately saw the crafting potential for this product.  So I decided to do a bit of experimenting.

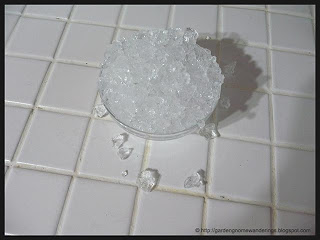
dyed SoilMoist™
I wanted to see how well the SoilMoist™ would dye using food colouring.  My idea was that being able to tint the gel would give a greater versatility for crafting projects.  I allowed the granules to hydrate using plain water.  Then I mixed up a solution of about 2 oz of water with about 5 drops of blue food colouring.  I poured the solution over the gel then let it sit overnight.  This morning I poured off the extra liquid which wasn't much.  The gel had taken on a nice blue from the food colouring.  This means that the gel can be easily and inexpensively dyed using non-toxic food colouring greatly increasing the decorative use for this crafting product.  I can even see using the coloured gel to help colour chrysanthumum and daisys for a centrepiece application.  I think that after using the dyed gel it could be returned to clear by multiple soakings to remove the food colouring.  I still have to test that theory.

scented SoilMoist™
A few years ago I came across a very popular homemade air freshener gel made using Knox gelatin.  While this worked fairly well there were reports of the gelatin molding so I never did try it.  Since the SoilMoist™ gel resembles gelatin I decided to see if it would hold scent.  Vanilla is a natural deodorizer that is water soluble.  I used enough of the gell to almost fill a 5 oz bowl.  I poured 1 tsp of 100% pure vanilla over the gel then covered and let sit over night.  The gel did take on the colour of the vanilla but it also took on the scent of the vanilla.  I did not pour any extra liquid off.  Using a lidded container allows to have the air freshener working only when desired.  Several of these could be made up then placed in areas where you don't necessarily see them where they will continue to deodorize the air without being obvious.  The scented gel could even be incorporated into other decorative room elements so they will never be noticed but the room will continue to be deodorized.  Once the granules dry up then I plan on rinsing well, reactivating then adding more vanilla.

The important thing to remember when using dyes or scents using the SoilMoist™ is anything used must be water soluble.  However I think for a crafting project it might be possible to add mica or glitter for additional effects as these particles are small enough they could be shaken off the dried granules allowing the granules to be re-used.  I will certainly be doing a bit more experimenting with this medium as a craft product.

Garden Gnome
©2006-2010

Tuesday, June 22, 2010

Using SoilMoist™ Granules for Craft Projects

I just blogged about my waterball garden followed by another post on SoilMoist™ granules.  My main purpose for buying both of these were the decorative use for vases as well as a water management system for non-edible potted houseplants and outdoor planters.   As I was getting the waterballs and the related SoilMoist™ granules hydrated I could immediately see the crafting potential of this product.   I invisioned centerpieces using the gel, candles and embellished with fresh flower blooms.  The gel would keep the blooms looking lovely for a few days.  I also reasoned the gel could be used as is to surround candles with the gel adding a lovely sparkle to burning candles. 

SoilMoist™ packets
I bought 4 - 3oz (85 g) packages of SoilMoist™ online for $3.  According to the package the granules are used for as a horticultural water management aid.  The premise is the granules absorb water then release it as the soil dries preventing the plant from drying out.  The instructions for using SoilMoist™ as a horticultural aid are on the back of the package.  I'm experimenting with this soiless medium both indoors and outdoors so will be reporting on how well I like it as a water management aid on my gardening blog over the next few months.  The granules will last several seasons outdoors so with care they will last several years indoors.  When used indoors as a crafting product the granules can be cleaned and re-used making this product a rather frugal craft product. 

SoilMoist™ gel
The granules are a crosslinked polyacrylamide that is an opague milky white, hard granule until hydrated.  Then it becomes a clear, gel substance similar to stirred set jello.  It is very glittery with the gel reflecting any light that hits it.  It is quite pretty without doing anything to it!  This is a product that should be kept away from any drains where it has the potential to cause blockages.  Although the granules are non-toxic they should be kept out of reach of children and animals. 

I have already started experimenting with a couple of ideas for using this gel as a crafting product.  Tomorrow I will post a couple of the ideas I am testing with pictures and the how-tos.

Garden Gnome
©2006-2010


Monday, June 21, 2010

Vacation Home Office

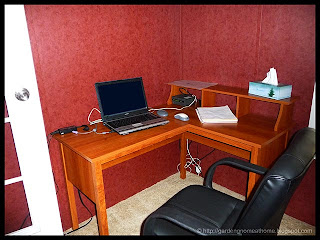
vacation home office desk and chair
Desk & Chair
May 22, 2010

Most people don't think of setting up a small office in their vacation homes but in our case it is a necessity.  We will be using the laptop and iPod Touch for communicating while away and while a week of having computer equipment set up in a kitchen or bedroom may be fine while on vacation, longer term vacations require a bit more suitable arrangements.  In addition to our needs we are trying to consider the needs of our guests (family, friends) and tenants.  Our vacation home will likely be rented out for the months of January through March so a lot of tenants would appreciate having a separate office space available for that 3 month period. 

The room being used as the office is about 9' x 9' with double French doors cutting off the front corner making the room square footage smaller than it would be if square.  It is intended as a den or office but can easily be used as a third bedroom.  We bought knockdown furniture for the office.  Knockdown furniture is furniture you assemble yourself.  It is available from stores like Big Lots and Wal-mart as well as the more famous IKEA.  The brand to look for in the box stores is Saunder (I'm not affiliated with Saunder just a happy customer.)  This company offers a wide range of knockdown furniture from desks to shelf units, dressers, tv stands and more.  As far as quality goes in knockdown furniture, IKEA (no affiliation just a happy customer) is the best as many of their pieces are solid wood.  We honestly have a coffee table and end table bought in 1980 from IKEA that still look great even after having been refinished a few times as they took up temporary residence at the kids apartments during their university years.  What is really nice is we were still able to buy a table that matched these two pieces as they still carry the line in the stores.  Next in quality is Saunder followed by most of the other brands of knockdown furniture.  We have a Saunder 6' wide tv unit stand bought in 1994 that still looks good after a couple of moves.  So knockdown furniture can be just as durable as as good looking as furniture bought elsewhere.

We chose a Saunder knockdown computer desk ($69.84) for the office along with a knockdown computer chair.  The desk presented a bit of assembly problems but that is to be expected with all knockdown furniture especially if you don't interpret the instructions clearly.  Once assembled the desk was quite sturdy.  The instructions called for gluing as well as using joiners.  The back of the short end is not finished but the long end is giving a couple of possible orientations in the room.  The chair ($49.99) assembly including attaching the arms and the swivel base.  The total cost for both pieces came in at $128.22 including taxes.  It was a low cost way to start furnishing the vacation house home office.  We hauled out an exercise glider that had been left behind in the garage so the office looks somewhat like an office.  We intend to buy a day bed for extra sleeping capacity for that room as well.

Garden Gnome
©2006-2010


Wednesday, June 16, 2010

The Ant Colony

I have written a few posts here on dealing with insect control in the house.  The first line of defense in any infestation is to do a complete knock-down followed by sealing as many ports of entry as possible.  Sealing insects out is one of the most effective ways to prevent any insect problems.  For the most part I don't concern myself with insects outdoors unless they are damaging the garden or have the potential to cause problems indoors.  In some cases as with fire ants, the potential to cause physical harm is high especially for little ones. 

Spotting a swarming ant colony on the sidewalk about a foot from our bedroom window that is a ground level was a concern.  Ants swarm when their colony is disrupted for some reason meaning they are looking for another location to re-establish.  When they do this close to windows and doors there is a very good chance of them getting indoors.  The most effective way to deal with a swarming ant colony is boiling water.  Pour the boiling water directly on the swarming ants to kill them off on contact.  There may be a few stragglers let behind but unless you notice them swarming in the same location again the colony has been effectively killed off without the use of pesticides and without having to deal with problems if they get into the house.  Be warned that the boiling water method will kill vegetation and is an effective weed control.  If the ants are swarming in a location where there is vegetation other than grass you may need to use a manual or chemical control method.  Stomping is an effective manual method without resorting to chemicals. 

Here's a short video of the ant colony swarming.  There has been no digging or other disruption where this colony was so I'm not sure why they were swarming.  At any rate they were too close to the house to not take action.


Garden Gnome
©2006-2010

Monday, June 14, 2010

Laureate 2010: Michael Grätzel for Organic Solar Cells

As a result of Hydro One moving to Time of Use (TOU) pricing and the HST that goes into effect July 1, 2010 that will see an additional 8% tax on our electric bill, I have moved up my plan to become totally solar powered.  Going solar is definitely heading in the right direction.  Not only will it eliminate a utility bill, going solar will bring us one major step closer to reducing our carbon footprint.

I have been doing a lot of research on solar energy.  Solar is either passive or active.  For example the solar tube alternate lighting I have on my list of must have solar items is passive as is most electricity producing solar panels.  Active solar is usually found in solar water and air heating where a pump in the case of water heating and a fan in the case of air heating is used.  In most cases the fan or pump is also solar powered. 

The main deterrent for most homeowners looking to go solar is the cost.  Solar panels are expensive.  While it is true there are a number of homemade devices for using solar power to heat water and air, if you want to generate electricity using the sun you need solar panels.  Despite their cost the beauty of setting up any solar system whether partial or entire household is it is a DIY project that is quite flexable and expandable.  The 2010 Millennium Prize Laureate Michael Grätzel is the father of third generation photovoltaic dye-sensitized solar cells (DSC).  These cells promise electricity-generating windows and low-cost solar panels.  The cells have just made their debut in consumer products so this is quite exciting news for homeowners.  Just imagine being able to replace your old energy inefficient window panes with these new cells that will turn your windows into electricity producing solar panels.  I am extremely excited about this!  Here is a video of Michael Grätzel explaining his new solar cells:


Garden Gnome
©2006-2010


Thursday, June 10, 2010

Palmetto Bug (Waterbug)

palmetto bug
Palmetto Bug
May 25, 2010


On the last day of our vacation I spotted what I thought was a Palmetto bug on the outside of the lanai so snapped a picture to find out what we were dealing with.  Despite the house being empty for a year and a half it was surprisingly free of any signs of insect infestation.  There were a few tiny flies that were dead on some of the windowsills which would be quite normal even if the house had been open.  Other than that the only other bug in the house was again what I thought was a live Palmetto bug in the toilet but I was half awake so didn't think much more about it other than flushing.  When we arrived home I decided to do a bit of research.

The bug in the toilet and outside the lanai were Palmetto bugs.  The Palmetto bug aka Waterbug is also called the American cockroach.  They are frequent house pests in the southern United States.  Palmetto bugs reach a length of about 2 inches.  They can walk across ceilings and fly.  Palmetto bugs will not hurt you unless trapped in something like a shoe then they will bite.  They may fly at your face mistaken you for a tree if trying to get to safety.  Great just what I need!  The solution to Palmetto bugs is much the same as any other insect that invades the house.
  • remove all sources of food and water
  • block and seal all entry points
  • manual removal
  • in the case of large infestations do a complete knockdown with a residual pesticide
  • clear any encouraging vegetation (habitat) from around the perimeter of the house
  • hang damp clothing and towels rather than leave them on the floor
In the case of Palmetto bugs it is advised to keep all drains plugged when not in use.   Since the vacation home will be closed up when we are not there or when rented out keeping the food area meticulously clean won't be a problem.  There won't be any food in the cabinets the bugs could get into either.  I will take the precaution of sealing the toaster in a large sealable bag as well, a trick I learned when dealing with the large black ants here.  We don't have any potted houseplants so that removes that source of water.  On our next trip I will put out a few of the sticky mouse traps.  I don't think it is really necessary but it won't hurt when the house is closed up just in case.  I will also be going around the house to caulk any cracks or openings these bugs could get in. 

Again this is a fairly new house (2007) so this is not going to be a big task and I certainly don't think there is any real infestation but the time to deal with this is the first time the pest is spotted.  I think the area to focus on is the lanai as we know the small gecko can get in.  Geckos will catch and eat Palmetto bugs so the lanai to some degree is protected with out little guy.  From experience if the patio door between the lanai and kitchen is not closed then anything that gets into the lanai can get into the house.  So I will focus on sealing the lanai then check for any other areas that need sealing.


Garden Gnome
©2006-2010


Monday, June 7, 2010

Faulty Contract Work

On April 26 of this year we replaced all the satellite rental receivers with purchased ones including a new PVR (personal video recorder). At the time of the installation the technician had to drill two holes for wires through our foundation and he drilled one through the newly installed floor of the one bedroom that was slated to be my craft room.  The technician took some time drilling the holes but before he left he said he had caulked them on the outside.  I took him at his word which I should not have done.  Also during the installation I noticed it said rental on the PVR box so I questioned him about that and he said that was on every box.  He finished up with the installation leaving me quite the mess to cleanup in the bedroom and family room.  I should have taken a walk outside right then and there to inspect what he had done but I didn't otherwise I would have been on the phone right then.

When he left I called Bell Expressvu and asked them about the PVR expressing my concerns we had been given a rental PVR rather than the new one we were paying for.  The customer service representative said that no we had bought that one.  So with the weather and vacation (gone 11 days) it came as quite a shock when the PVR quit working last Saturday.  Essentially we had got at most 2 weeks out of that unit for a supposedly new unit.  My husband called Bell Expressvu who said the PVR was under warranty so they would send us out a new one within 7 to 10 business days.  Yesterday I was doing a bit of yardwork and noticed the first hole.  It was a good quarter inch opening, wide open that had the wire going through but had not been caulked at all.  I went around to the other opening and the hole was large enough a small mouse could have easily have got through!  I quickly got out the caulk gun to correct both holes then told my husband I would be calling Bell Expressvu in the morning which I did.

The problem with the PVR was technically fixed on Saturday with them saying they would send out another unit but that did not clear my mind that the technician had left us with a used PVR in the first place as there is no way a brand new PVR would go the way it did after 2 weeks worth of use.  My suspicions were confirmed that we had indeed been given a used unit even though we were paying for a new one.  The technician should have cleaned up the mess he made and in their rules they must seal any holes they make during an installation job.  I would have caught this had I inspected the job before the technician left.  While I suspected the PVR problem I really had no choice at the time but to take the technician's word that it was a new unit and confirmed by their customer service.  Despite that giving someone used equipment when they arranged to buy new and are expecting new equipment is fraudulent!  All in all I am not happy with this installation that was fraught with faulty contract work.

Garden Gnome
©2006-2010


Sunday, June 6, 2010

A Bit of A Housing Update

If you recall our house has been on the market since March when we found out about buying the vacation house. At that time we kept the price high while finding the house we wanted then kept it high to give us the time to really hash it out whether or not we actually wanted to sell this house. The problem is this house has a lot of excellent features including location, location, location as it is waterfront property. The second problem is the house we have the conditional offer in will eliminate a lot of driving, is bigger and because it is urban has a lot more conveniences. So both properties have some very great amenities. Depending on the day we lean towards staying here and other days moving is the choice. My personal preference would be to getting an offer then making a decision. I want the bigger kitchen of the new house and the challenge of once again creating a very energy efficient home but at the same time I want the rural area.

We showed the house again today with the new reduced price. Having your house up for sale is always a pain because perspective buyers expect perfection. Keeping a house neat and tidy isn't a problem as long as you aren't living there. Right now everything is up in the air as to whether or not we are moving including my gardens. Do I expand knowing we might be moving or do I not expand because a potential buyer might not like the expansion? Everything is so very much in limbo. At this point I just want a decision either way.

Garden Gnome
©2006-2010


Friday, June 4, 2010

Repairing the Outside Natural Gas Grill

Our outdoor natural gas grill is about 6 years old.  Grills like any other appliance need maintenance from time to time.  Basic maintenance will keep the grill working with few problems but sometimes an actual repair is necessary.  Over the winter we noticed the burner was not heating properly so it was likely starting to go in the fall.  Gas burners take awhile to actually go so at first you might just notice one side isn't burning as hot as it should.  When the burner needs replacing it becomes quite noticeable.  Ideally the burner should be replaced prior to it getting to this point.

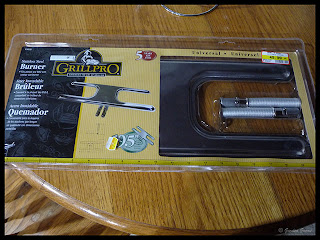
new burner
Generic (universal) replacement burners are available for most natural gas or propane grills.  There are two very important things to know when replacing a grill burner: the shape and the size.  Grill burners come in a couple of different styles.  Our burner is an H shape as opposed to the I shape.  The next important thing to know is the size.  In our case we needed a 19.5" (50 cm) universal H shape burner.  We found one at Home Hardware by Grillpro for $49.99. This burner is stainless steel so will greatly reduce any later rusting problems.  This was a very easy to do DIY repair that will keep our grill operational for a few more years until we decide we want to replace it.

cleaning out the barbeque
Doing any maintenance repair on gas grills is not difficult but it is dirty and messy!  Make sure you wear work clothes to do this repair.  My husband removed all of the grates and the flame spreader then disconnected the old burner.  The light brown blur to the left of the picture is the stick he was using to push all the burn ash on the bottom of the grill through the holes.  It's surprising how much this ash does build up but in most cases you leave it until the end of the season because it helps add a bit of flavour to your grilled foods. 

It is important to keep both the interior and exterior of the gas grill in good condition.  If you notice we do have a bit of pealing paint on the grill frame.  I will be posting about that repair as well in a later post. 

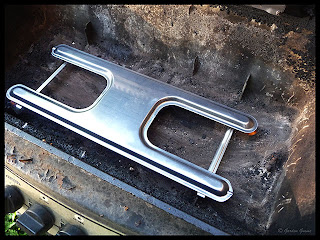
the old burner
The old burner was total scrap!  Burners go on gas grills for a couple of reasons.  First and foremost rubs and sauces used on the grill contain salt.  Salt is a corrosive that will eventually cause your burner to rust out.  If you want your burner to last then don't use salt.  If you want your food to taste good use the salt knowing at some point you will need to replace the burner.  At the same time your grill is exposed to the elements and while rain should not get into your grill humidity will further helping the effects of salt.  In addition to salt and moisture the simple fact that the metal is subjected to high heat on multiple times will eventually cause the metal fail resulting in a bit of slight buckling and warping. 

testing the new burner
Once the new burner was in place and secured it was time to test the burner.  It was difficult to get a good picture of testing the burner because natural gas when burning properly should be blue with very little to no orange flame.  This doesn't make the flame very photogenic in daylight hours.  Suffice to say the burner worked perfectly.  My husband then re-assembled the gas grill and fired it up to clean off the inside.  It was then ready to use again.  My husband did the final test of grilling T-bone steaks the following day.  The burner worked as it should with nice even heat so we were able to enjoy a perfectly grilled steak!


Garden Gnome
©2006-2010


Wednesday, June 2, 2010

Vacation Home Lanai (Sunporch)

lanai (sunporch)
Lanai
May 24, 2010

There is a lanai (sunporch) on the front of our vacation home.  I'm not sure why it is called a lanai but lanai is the Hawaiian term for sunporch or verranda so likely lanai sounds a bit more tropical.  We are not new to sunporches as the turn of the century home we renovated had a small all season sunporch on the main level and this house has a 3 season sunporch spanning the width of the house on the upper level.  The house we are planning on moving to if we sell this house also has a large 3 season sunporch. 

Sunporches are usually designed as all season or 3 season with most 3 season being convertable to all season by installing windows in front of the screens and providing some type of heat.  They are light, bright and airy shielding from the heat of the sun but with lots of light for growing a multitude of plants.  Screening keeps them for the most part pest free but insects can and do get inside unless they are well sealed.  In northern regions such as our permanent home in Ontario, Canada a sunporch can double as a heat sink in the wintertime.  As the sunporch warms on sunny days it can heat up enough to provide passive solar heating for your home.

The vacation home lanai is off of the kitchen with the only entrance being through the kitchen.  This is the one room where we will be doing the most work.  The previous owner left an artificial fig tree, a small plant stand and a patio set.  The chairs were in such rough shape we discarded them.  The new chairs are black while the table is a faded olive green that I will likely paint black during our next trip.  There was indoor/outdoor carpeting on the cement pad.  We pulled it up simply because we thought it looked awful and since we only have screens both rain and dust can get it making the carpet a horrid dirt trap.  We had the inside of the lanai power washed when the outside of the house was done.  Since we are not there all the time I will keep the plants to artificial ones that can be brought in while we are gone.  Any decorations will also be brought in as we already had a taste of how violent some storms can be there.  Here's what we have planned for the lanai so watch for all these projects as we get to them:
  • install ceiling fan
  • paint floor
  • install windows to make it all season
  • install window treatment to shade afternoon sun
  • basic, low maintenance decorating
Garden Gnome
©2006-2010


Tuesday, June 1, 2010

Coming Down From Vacation Mode

My gosh!  We have been home almost a week and I still am in vacation mode even though we did a massive amount of garage clean-up on the weekend.  The weather is hot and humid but with the house still up for sale we have to keep on top of things.  We made the executive decision to reduce the price of our house in the hopes of getting out of limbo mode as to whether we are moving or not.  In the meantime we keep plugging along a normal as possible the best we can.  The gardens are going in and we're focusing on the outside that needs the power washer to make the windows and trim sparkle.  We have our own power washer so won't be hiring this job out.  My husband is fixing our natural gas outdoor grill and I'm looking for a few summer projects to work on once planting is finished.  So watch for all of those homemaking tips, projects and repairs coming up in the next couple of weeks.

Garden Gnome
©2006-2010