Our outdoor natural gas grill is about 6 years old. Grills like any other appliance need maintenance from time to time. Basic maintenance will keep the grill working with few problems but sometimes an actual repair is necessary. Over the winter we noticed the burner was not heating properly so it was likely starting to go in the fall. Gas burners take awhile to actually go so at first you might just notice one side isn't burning as hot as it should. When the burner needs replacing it becomes quite noticeable. Ideally the burner should be replaced prior to it getting to this point.
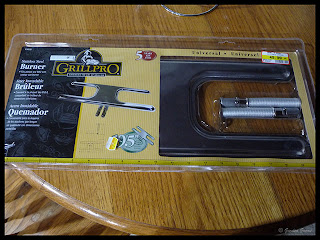
Generic (universal) replacement burners are available for most natural gas or propane grills. There are two very important things to know when replacing a grill burner: the shape and the size. Grill burners come in a couple of different styles. Our burner is an H shape as opposed to the I shape. The next important thing to know is the size. In our case we needed a 19.5" (50 cm) universal H shape burner. We found one at Home Hardware by Grillpro for $49.99. This burner is stainless steel so will greatly reduce any later rusting problems. This was a very easy to do DIY repair that will keep our grill operational for a few more years until we decide we want to replace it.

Doing any maintenance repair on gas grills is not difficult but it is dirty and messy! Make sure you wear work clothes to do this repair. My husband removed all of the grates and the flame spreader then disconnected the old burner. The light brown blur to the left of the picture is the stick he was using to push all the burn ash on the bottom of the grill through the holes. It's surprising how much this ash does build up but in most cases you leave it until the end of the season because it helps add a bit of flavour to your grilled foods.
It is important to keep both the interior and exterior of the gas grill in good condition. If you notice we do have a bit of pealing paint on the grill frame. I will be posting about that repair as well in a later post.
The old burner was total scrap! Burners go on gas grills for a couple of reasons. First and foremost rubs and sauces used on the grill contain salt. Salt is a corrosive that will eventually cause your burner to rust out. If you want your burner to last then don't use salt. If you want your food to taste good use the salt knowing at some point you will need to replace the burner. At the same time your grill is exposed to the elements and while rain should not get into your grill humidity will further helping the effects of salt. In addition to salt and moisture the simple fact that the metal is subjected to high heat on multiple times will eventually cause the metal fail resulting in a bit of slight buckling and warping.
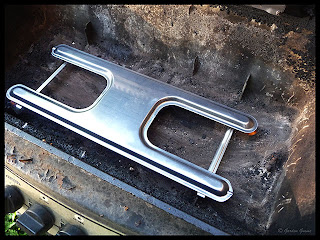
Once the new burner was in place and secured it was time to test the burner. It was difficult to get a good picture of testing the burner because natural gas when burning properly should be blue with very little to no orange flame. This doesn't make the flame very photogenic in daylight hours. Suffice to say the burner worked perfectly. My husband then re-assembled the gas grill and fired it up to clean off the inside. It was then ready to use again. My husband did the final test of grilling T-bone steaks the following day. The burner worked as it should with nice even heat so we were able to enjoy a perfectly grilled steak!
Garden Gnome
©2006-2010