What does a Garden Gnome do when she is not gardening, in the kitchen or doing genealogy? Well the answer might just surprise you so read the entries to find out more. This blog focuses on everything we do to make our house a home. There will be a strong emphasis on home energy efficiency and do-it-yourself (DIY) projects. At the same time there will also be crafts, knitting and crocheting projects along with any other little tips we do to create that down to earth, I want to be here home. Please enjoy your visit :)


Thursday, October 1, 2015

Meet a Few of Our Home Automation Devices

Yesterday, I wrote about the brains of our home automation system, the SmartThings Hub 2.   I currently have 30 connected devices connected to the hub with more waiting to be connected.   I purposely left Nest thermostat and Sonos speakers independent of the hub although both can be used with SmartThings.  Nest requires a SmartApp but Sonos works directly through SmartThings.  I do have the Sonos speakers on smart outlets though.   At some point, I will be connecting our Sonos speakers directly to the hub though.  I have also kept all of our home automation independent of our home security system.  Home automation should not be used as a security system although it is a good compliment to existing independent systems.  The following are some of our connected devices.  Of course, we have multiples of most of these devices. 

Cree, GE Link and Wemo connected bulbs
Connected bulbs (ZigBee) are by far the easiest and least expensive of our connected devices.  The beauty of the connected bulbs are simply connect and start using.  They replace standard A19 base CFL or incandescent bulbs.  They are not suitable for enclosed fixtures or use outdoors.  Connected bulbs are dimmable as well.

Pictured are Cree bulbs (fan, bottom right), Wemo (middle right) and GE Link (upper right).  These bulbs cost between $20 and $30 when I bought them.  Each brand has pros and cons.  The Cree bulbs have a grate venting that some do not care for but I have found these bulbs have the cleanest, whiter light with problem free performance.  The Wemo bulbs made by Belkin can be used via their own hub and app or through the SmartThings Hub.  These bulbs have a nice clean appearance and are just a little warmer colour than the Cree bulbs.  They tend to lose pairing occasionally which although minor is an annoyance.  The GE Link has a clear covering and has the warmest light of the three brands.  It is problematic not only for initial pairing but also losing pairing.  My preference is the Cree bulbs so I have several in use.

SmartSense, Aeon Labs, Schlage outlets
Plug-in controlled outlets are extremely convenient and flexible but they are big, often covering part of the other outlet.  Aesthetically, these are best for use in locations where they can be hidden like behind furniture.   These outlets are for indoor, dry locations only and are rated for maximum W which determines the use.   The plug-in controlled outlets can be used for lamps and small appliances (if rated for such use.

I have a Schlage (Z-wave, 600 W incandescent maximum, top), two Aeon Labs (Z-wave,  1875 W maximum, middle) and SmartThings (ZigBee,  480 W incandescent maximum, bottom).  These plugs all have an indicator light but the Schlage is the only one that can be controlled in the app to lit when on, lit when off or not lit.  This is a plus if you want to keep light pollution in the house low.  The Schlage is has a controlled dimmable outlet on the left side of the plug and a regular outlet on the right side.  Although this controlled outlet is likely best for lamps where dimming may be desired, I'm using it for a Sonos speaker for the time being.  The SmartThings outlet gives energy usage (W).  The Aeon Lab plug-in outlets are suitable for small appliances like coffeemakers.  They also give the energy usage (W, kWh) of the appliance being used so rules can be set up based on that in addition to time or occupancy.

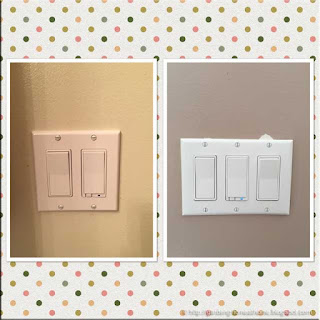
GE wireless switches
Connected switches are expensive at $40 to $70 depending on the switch.  Some are on/off while others are dimmable with dimmable switches being more expensive.  Three-way switches are more expensive as well.  Connected switches simply replace regular paddle switches so it is not an obvious change.  The downside is they only come in white or almond.  One brand offers both light and dark almond but no black or brown.  Connected switches are used to control non-connected light fixtures such as enclosed fixtures, ceiling lights, bathroom lights. 

I have a few wired connected switches all GE (Z-wave).  The switch on the right in the duplex outlet is a single pole controlling the bathroom light.  The middle switch in the triple outlet is a 3-way switch that also has an accessory switch (not shown).  The GE switches require a neutral wire so may not be suitable in older homes.  Each connected switch has a small blue indicator light that can be set to on when lit, off when lit or off in the app.

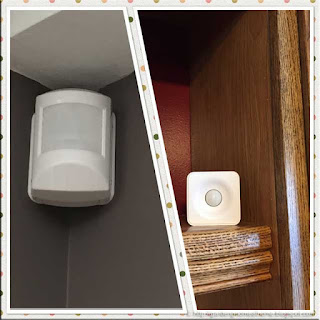
Ecolink and PEQ (Centralite) motion sensors
You can actually get a fair amount of home automation based simply on bulbs, outlets and switches by using schedules and rules.  However, your home automation comes to life via motion sensors.  Motion sensors can be paired with other controlled devices, turning them on or off depending on motion.  I have two styles.  The Ecolink (Z-wave, left) motion sensor is corner mount.  This limits where the sensor can be placed and hiding it is rather difficult.  The PEQ by Centralite (ZigBee, right) is a smaller motion sensor that can be set on a shelf or mounted on a bracket.   The PEQ motion sensors also measure temperature so the sensor can be configured to control other connected devices by motion and/or temperature.  It is also one of the more flexible sensors in terms of placement.  I have one sitting on a cabinet covered almost entirely by a vining plant that can barely be seen yet it registers motion just fine.  There are no extrnal indicator lights on either brand of motion sensor.  Rather the front cover is removed for pairing where a connection button is pressed and an indicator lights during the process.  Both brands have a battery indicator in the app and notification when low.  The motion sensors take one CR123A 3V battery.

PEQ (Centralite) open close sensor
A fundamental device in home automation is the open/closed sensor.  This device is mounted on a door or window.  The contact is either broken (open) or together as pictured (closed).  Rules can easily be created based on this.  For example, if the sensor is open 'notify me if rain is coming' or 'notify me if I leave" or 'turn off AC" or "turn on light".   More importantly, an open/closed sensor can be used on any item  that would cause the contact to open or close such as refrigerators, freezers and mailboxes.  There are a lot of creative uses for open/closed sensors!

There is no external indicator light.  Pairing is achieved in the same manner as the motion sensors.  There is a battery level indicator in the app as well as notification for low battery.  The open/closed sensor uses one  CR2 3V battery.

SmartSense presence sensor and Rad beacons
Presence sensors are very useful for home automation systems.  The arrival sensor by SmartThings (ZigBee, bottom) can be used as a person or pet tag.  It can be configured to trigger a set of actions when the sensor arrives or leaves the geofence.  It has an audible beep to so is the perfect addition to your set of keys.  It will make finding them a lot easier!  The arrival sensor uses a CR2032 3V battery.  There is a battery level indicator in the app and notification when the battery is low.

Beacons are just starting to be used in home automation but they are already in wide use commercially.  Beacons can track you through malls and stores, tracking your shopping style.  If you don't want this to happen, be sure Bluetooth is turned off on your phone when shopping.

I have three Radius beacons (Bluetooth).  While the SmartThings Hub 2 does have Bluetooth it is not enabled currently.  In order to use the Radius beacons, two additional apps BeaconThings and SmartRules are required.   The beacons are small about the size of a quarter in diameter and three quarters stacked thick, easy to place out of sight and yet still work.  The beacon can be stationary registering presence when cell phone/tablet comes into proximity of the beacon or the cell phone/tablet can be stationary registering presence when the beacon comes within proximity of the cell phone/tablet.


Tuesday, September 29, 2015

The Brains of Our Smart Home

Yesterday, I shared a few more thoughts on our smart home.  I honestly would have set up my X-10 components in this house.  Even though it is an old (1970's) technology it does still work although there can be problems with dirty signals.  We bought our Nest the first year here and it was love at first sight!  Unlike traditional programmable thermostats, the Nest can also be controlled via a cell phone app which became a huge benefit.  We have no kids or pets at home so staying overnight on a whim is normal.  If using a traditional programmable thermostat, the temperature would be set to the schedule but with Nest the temperature settings is automatically set to "away" or it can be manually adjusted through the app.  Last year heading home from our vacation home, the anticipated two day trip ended up being a straight drive though so we simply used the app to warm the house by the time we arrived home.  This had me itching to be able to do the same thing with other home automation.

The brains behind the connected home automation is a hub.  Devices are paired to the hub.  The devices communicate to the hub which deciphers the signal, sends it to the cloud which then sends back a signal causing the device to perform as desired.  The hub essentially allows remote access to the devices.  When you are away from home and want to control a device manually, you open the app and tap on the desired device to turn on, off or dim.  This sends a signal to the cloud which sends to the hub at your house which sends the signal to the device to perform as desired.  All this happens in seconds.  Some hubs are propriety (Iris, Staples D-Link), some are Z-wave only (Vera) and some like Wink and SmartThings are capable of controlling multi-brand, multi-language (ZigBee, Z-wave, Bluetooth, WiFi).  It is also compatible with IFTTT app for additional rules and schedules.  Wink only controls ZigBee, Z-wave and some WiFi but be warned that its parent company has filed bankruptcy and Wink is for sale so this is not one to invest money in.   

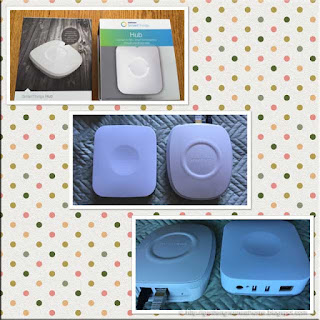
SmartThings Hub 1 and Hub 2
My first hub was Wink and less than two weeks later I was a victim of the great Winkening.  I returned the Wink hub and immediately ordered SmartThings Hub 1 (black & white box, on right middle picture, left on bottom picture).  SmartThings Hub 1 can control a large number of multi-brand ZigBee, Z-wave and WiFi devices. Certain devices use their own hub (eg. Phillips Hue) that can also be controlled by SmartThings.  What makes SmartThings unique is the community supported SmartApps and ability to create your own custom SmartApps using Groovy.  You can even tweak existing SmartApps!  Let's say you want a device to perform a certain action like using an open/close sensor to turn on a light when the mail arrives, simply look for a SmartApp, add it then configure.  If you can find SmartApp then you can either write one yourself using the developer's tools on the IDE (website) or ask in the community forums.  They are a wealth of knowledge, always happy to help.  SmartThings support is one of the best there is too!

A smartphone (iOS 6, Android OS 4.0) and internet connection is required for the setup of the hub.   I downloaded the SmartThings App then set up my SmartThings Hub 1 (ZigBee, Z-wave, WiFi).  It came with an ethernet cord for a secure connection and power cord.  When first connected, the hub updated then was ready to connect devices.  I only had 3 bulbs at that time, a GE Link and 2 Cree.  They paired nicely so I was off shopping.  What I really liked was being able to customize.  PEQ motion sensors (made by Centralite) were on sale for $19.99 so I checked the forums to find they worked with SmartThings even though they aren't on the list.  I bought 3 motion sensors, three more Cree bulbs and three-way switch which brought immediate home automation with lights being controlled by motion/occupancy rather than just schedules.  SmartThings Hub 2 was announced shortly after I got my Hub 1, with a expected third quart release.  It was delayed but I knew I was going to buy it anyway.  In the meantime, I continued adding devices to my system. 

I pre-ordered SmartThings Hub 2 (ZigBee, Z-Wave, Bluetooth,WiFi) on Sep 9 and was pleasantly surprised when it arrived six days later.  Hub 2 (colour box top, middle left, bottom right) has an updated square design and updated features like battery back-up.  It came with an ethernet cable, power cord and 4 AA batteries.  There is LED indicator light on the front of the hub for a quick visual of hub status.  Hub 2 has two USB ports for local image storage and offers the coveted local control.  It is limited local control but still an improvement.  Like Hub 1, a smartphone (iOS 7+, Android OS 4.0+, Windows Phone 8.1+) and internet connection is required to setup the hub.  The hub software will be updated during the process before any devices can be added.  The updated app has "Smart Monitor" which can be armed (away, stay) and disarmed similar to a home security system which is a nice feature.  Devices (things) once paired can be placed in rooms making it easy to find them for control.  The devices can be controlled manually, via SmartApps, and Routines. 

Currently there is no migration tool for moving devices from Hub 1 to Hub 2.  This becomes a project with larger number of devices.  I had a problem with the app recognizing the hub even though the hub was showing in the IDE.  Despite trying several solutions, I had to get help from support.  Once they solved that problem, I had most of my 30 devices up and running.  I had to redo my schedules and rules but in one way that was a good thing as it helped clean up my configurations a bit.  Other than that, the migration was rather smooth.

Of note, you cannot use two hubs in the same location.  That means there will likely be a lot of Hub 1 for sale in the near future.  There is no need to upgrade to or even start with Hub 2 unless you want the new features Hub 2 has to offer.   Rumour has it that Hub 3 is already in the works so some with Hub 1 are holding out for it. 

Next up: components of our smart home


Monday, September 28, 2015

Moving Forward With Our Smart Home

Back in June, I wrote a few thoughts on a connected home aka smart home.   I have recently migrated our devices over to SmartThings Hub 2 from SmartThings Hub 1.  I'll post pictures of some of our devices with their pros and cons but in the meantime, I would like to extend my thoughts on a connected home.

A smart home consists of the use of technology and certain devices to automate actions in the house but it is so much more.  Even a small amount of home automation can save you time and money as has already been shown by refrigerators, dishwashers and washing machines.  These appliances are automated, they save both time and money but in the true sense of a smart home, they really are standard issue.  The devices used in smart homes, talk to each other via ZigBee, Z-wave, BlueTooth, or WiFi.  Even the older X-10 can be incorporated into smart homes.  In order for the devices to communicate with each other they require a hub and that is where things can get confusing.  If you want dependable smart home control of lighting, music, alarm systems and monitoring then it is best to go with a professional service like Control4 or Homeseer.  If you want a dependable but limited DIY home automation system then Staples D-Link, Loew's Iris or Vera (Z-wave) propriety systems are a good choice.  If you want to have complete control and flexibility, then SmartThings is the winner hands down.  Wink owned by Quirky was a contender but Quirky has filed for bankruptcy and Wink is up for sale so it's future is unknown.  There are some stand-alone devices (thermostats, speakers, lights) that do not require a hub and can be controlled via their own app.

I started with X-10 years ago and have been dabbling in home automation ever since.  These are exciting yet frustrating times for many in the home automation field.  The reality is, home automation especially inexpensive DIY is in its infancy.  Now, that 'inexpensive' is relative as your investment can really add up.  Sure the hub only cost $99 but a single 3-pole Z-wave switch costs $65 plus installation if you can't do-it-yourself.  That single 3-pole switch really is automated although it can be controlled via SmartApps in the app, like a rather fancy timer with remote access.  The real magic comes from adding proximity and/or motion sensors so that switch which controls those lights works without touching the switch or app based on occupancy or proximity.  Each motion costs about $40 and bulbs $20 so a quick calculation reveals that it doesn't take long to have $1,000 plus invested in your home automation system.

I currently have 30 connected devices (bulbs, wired switches, plug-in outlets, bulbs, motion sensors, open/closed sensors) not counting my iBeacons plus the hub.  The Nest thermostat, Sonos speakers and security system are independent of our home automation system.  I highly recommend not incorporating your existing security system into your home automation for several reasons but both Nest and Sonos can be connected if desired.  Some of my devices have multiple functions reporting temperature, humidity, light level and/or energy use, and battery levels in addition to their main function.  Rules can be set up based on these additional functions so a switch that is used to turn on or off a small appliance can also be set to turn that appliance off once a certain amount of energy has been used.  Most of our lights are now controlled in some manner, mainly presence but also scheduling.  We receive notifications if there are weather warnings in our area or if the windows have been left open and rain is coming.  We get notifications when the temperature reports of a couple of the motion sensors are too hot or too cold.  These could also be set to turn Nest on or off.  We get notifications when the motions are triggered when we are away so we know when the house has been checked or plants watered.  More importantly, we know if there is an issue like a water leak at the house that needs to be checked so we can get someone there.   The house is genofenced so certain actions and reports are based on our proximity to our house rather than proximity within the house.  I have three devices (switches, bulb) to connect yet and plans for more shortly.  With each addition, our house gains function working for us, making things more comfortable. 

All this said and as pleased as what I am with what I've been able to accomplish thus far with home automation there are some drawbacks.  DIY home automation is certainly not plug and play, forget about it.  The DIY home automation has been cloud based meaning you must have internet for it to work.  That can be problematic in many areas where the internet connect is not stable.  SmartThings just introduced limited local control with Hub 2.  Prior to that if the internet when down or SmartThings was down, then schedules and app control did not work.  Now, if either is down those devices using SmartApps under local control will remain functional.  A device is paired to the hub in order to control it.  Some devices (especially GE Link bulbs) lose their pairing so have to be manually paired again.  Another problem is poling where the app will show a light is on when it is actually off and visa versa.  The only time I notice poling problems is when the hydro flickers off.  This is not a real problem with the bulbs as they are LED so low energy use but it can be a problem with switches used to control small appliances.  Many are using the smart switches to power their televisions on and off but this is similar to hitting the power button on your computer rather than shutting down.  There are reports of damaging televisions using smart switches so I wouldn't recommend using one.  I also don't recommend using a smart switch on an already smart appliance (programmable appliance).  Use a smart switch to make a dumb appliance smart but not a smart appliance smarter. 

My biggest pet peeve with home automation is I don't want to see the devices.  In other words I want the convenience and effects without seeing the how-it's-done.  The connected bulbs (Cree, GE Link, Wemo) are the same size and shape as an incandescent light bulb.  The Cree has a vent system but otherwise looks like a normal bulb.  Wired in outlets and switches are great but they do have a little LED indicator light some may not like.  Otherwise, they fit right in.  Plug-in outlets are bulky and while versatile, suitable only for areas where they won't be seen but can still pick up the mesh network.  Motion sensors and open/close sensors are the most problematic to hide.  Both have to be accessible to change batteries as well.  Cameras have the wires that can be problematic to hide as well. 

Next up, I'll introduce you to some of our smart devices and tell you how I'm using them to make our home a smart home. 


Wednesday, June 24, 2015

Thoughts on a Connected Home aka Smart Home

As mentioned previously, I have been interested in home automation for as long as I can remember.  In many ways, homes have been automated for a few decades thanks to washing machines, dryers, dishwashers and timers.  Even small appliances quickly became automated simply by the addition of timers.  Aside of plug in timers and timer equipped small appliances, home automation was and still is not very much of a DIY.  Strictly speaking home automation is the control of lighting, heating, cooling, and entertainment via devices that go through a main contoller, usually wired.  The new generation of home automation takes that a step further by using smart devices that can control each other via means of a hub and controller (eg. smart phone, tablet).  More importantly this new generation allows the control of your devices wirelessly from anywhere you have internet connection.  In most cases, only the hub is connected to your router although at least one hub connects to the router wirelessly.

We have had a Nest thermostat for about three years now.  It has its own app.  The Nest is a treat to use, has paid for itself and it has been virtually problem free except when the Wink hub booted Nest offline even though Nest was always kept separate from Wink.  We've had Sonos for about a year and a half with no problems at all.  It has its own app.  Both Nest and Sonos are smart devices that don't talk to each other and have separate app controls.  Wink was a huge disaster so I switched over to SmartThings which controls Z-wave and ZigBee devices.  It has added control for Belkin Wemo (WiFi) as well as numerous other brands like Aeon Labs, Ecolink and GE.  Both Apple and Google are doing their version of home automation and then there is Lowe's Iris and Staples Connect, both using a propriety version of ZigBee.  Herein lies the problem and it is a huge problem for consumers.  It doesn't take long before you have four or five apps just for home automation taking up a lot of valuable space on your space limited cell phone not to mention the aggravation of having to click one app for HVAC, another for music, another for lighting and yet another for locks. 

We currently have Nest thermostat, Sonos 3, Sonos 1, 5 motion (1 Ecolink, 4 PEQ), 1 GE bulb, 3 Wemo bulbs, 5 Cree bulbs, GE 3-way switch, and GE on/off switch installed as part of our home automation.  We have 2 PEQ motions, 1 PEQ tripper and 1 Cree bulb to install yet.  Two GE plug in switches and a GE on/off switch are on their way.  All rooms are automated to some degree, some more than others.  We have two Quirky products: egg minder and spotter.  We use four apps: Nest, Sonos, SmartThings, Wink; but that will go to three quickly the way Wink is going.  SmartThings can control Sonos but not Nest yet.  So here are a few tips:

  1.  follow home automation forums, Facebook pages, Twitter - These resources can be a wealth of information especially for the how-tos and troubleshooting.  They are also ideal for keeping up to date with what's new in home automation and where the great sales are.  Twitter is especially useful for outage notifications.
  2. do not buy all your devices at once -  Buy the hub and one or two devices.  Add to that as the need arises.  Focus on need first then fill in with your wants.
  3. shop the sales - If you are willing to wait, some of the sales can be quite good.  I picked up the PEQ motion sensors for half price at Best Buy!  The plug GE plug in switches were also $50 off on Amazon.  Keep an eye on Best Buy, Lowes, Amazon and eBay. 
  4. avoid Wink like the plague - This all talk, broken promises company is nothing but a headache with the hub continuously going down, having to reconnect devices multiple times often daily for some, dwindling customer support and failure to deliver.  The second major outage was just last night, on the heels of the first a month ago!
  5. opt for a hub that supports numerous protocols (eg. Z-wave, ZigBee, WiFi, Bluetooth) - SmartThings is quickly proving itself to be stable as is Vera.  SmartThings allows the most as far as customizing with SmartApps using your own code or templates as well as published SmartLab apps.  Be aware there are a lot of home automation brands coming onto the market but they haven't proved themselves. 
  6. stay away from any propriety protocols (eg. Staples Connect, Iris) - Some components will work with other systems while others won't.  If that system is eliminated like Revolv, you will be left high and dry with a bunch of devices that won't work with anything else.  Some of these systems have monthly subscription fees as well.
  7. keep home security system separate - Home automation devices will increase your home security but do not use them as a security system and do not tie your existing home security system into your home automation.  The last thing you want to deal with is doors that are unlocked when the app says they are locked!


Tuesday, June 23, 2015

Meet Mr Chicken

I have been a huge fan of home automation ever since seeing the Jetsons eons ago.  Over the years my home automation skills have grown with available technology.  By our third home, I was heavily into X10 so most of our lighting was automatically controlled by that, turning on and off depending on occupancy.  Over the winter, my project became move from X10 to the newest of the new 'smart things' that can be controlled from anywhere using our cell phones.

One of the first places I started automating was the kitchen.  I'm using SmartThings hub and non-propriety Z-wave and ZigBee devices.  The ceiling fan is now equipped with ZigBee bulbs controlled via motion.  Each bulb can be controlled separately or as a group and they can be dimmed via the app.  I have different modes set up in the app as well.  A mode is simply a high tech, customizable timer that allows me to set up lighting depending on certain events.  The motion device in the kitchen also tracks temperature which is quite handy.  If the temperature gets too hot or cold, I have it set to send me a notification so I can then turn on fans or HVAC.  I could have this happen without the notification which will come once I get the system fully functional.  In terms of energy savings, there will definitely be some however I don't expect a payback for a couple of years especially when I am still adding to the kitchen.  I have a Z-wave switch for the under shelving lighting on the way and the next purchase will be leak detection devices.

Quirky egg minder
There are a lot of practical IoT devices available.  The biggest barrier is getting your devices to talk to each other.  This is where certain hubs come into play, basically acting as translators so Z-wave can control a ZigBee device or vis-a-visa.  Early on and without doing the research I bought a Wink hub.  That turned out to be a huge mistake!  I was part of the Winkening in April which left a rather nasty taste in my mouth.  Wink has/had devices that works with the hub and a few that didn't.  I originally had a few bulbs that needed the hub.  Those bulbs were switched over to SmartThings and I haven't looked back.  It's a good thing as Wink who owns Quirky has announced that Quirky will not be putting out more devices; they aren't fulfilling orders and basically both are taking a huge downward slide into a bottomless hole of no return.

However, even though I returned my hub, I kept the egg minder which does not require the hub.
Our egg minder, affectionately named Mr Chicken, works on WiFi.  Seriously, this is a fun but useless gadget.  The original retail price was $79.99 but the usefulness drove the price down to $12 when I purchased mine (with free shipping).  It is now going for $9 and quite frankly is really worth about $2 but it is fun!

Quirky egg minder as seen in appOnce the egg minder is connected to your WiFi, you simply fill it up.  The egg minder does the rest.  If working properly, it will indicate the oldest egg to use first by an illuminated blue light.  The eggs are recognized by the tray as they are added not by actual age of the egg so it is not accurate as far as egg age.  Sometimes it loses connection or doesn't register an egg.   As the eggs are used, you can set it to send a notification.The egg minder status is visible in the Wink app on your cell phone or tablet.  The oldest egg is indicated by a blue circle with 'pick me'.  Empty spots in the egg minder show on the app as an empty spot. 

I have the egg minder set to send notifications when I'm down to three eggs.  A few days ago, I decided to make egg salad.  Hubby (at office) got a notification for each of the last three eggs.  He promptly sent me a text with several chicken emoticons.  Well, then it was a texting war with hubby still laughing when he came home.  Mr Chicken had redeemed itself!

Wink itself is not doing good so at some point the app and support for Mr Chicken may cease to be unless SmartThings can use their API.  If that doesn't happen, then we have a fancy egg carton.  I could always take the egg minder apart and re-purpose it in another home automation project.  I'm sure some of the fine home automation tinkerers will come up with a way to use the egg minder.  For now, we are enjoying a few chuckles!


Monday, May 4, 2015

The Big Wink More Like Yawn

Over the next few posts I will be discussing my home automation project, making our home a smarter home.   Before I do that, I want to share a company to stay away from.  Given my very negative experience with Wink [wink.com] I cannot in good conscious recommend using any of their products especially the hub.  Avoid like the plague!

After using Wemo for a week, I realized I really wanted to get back into home automation the way I had been with x10.  With x10 fully set up in our third house, lights were fully automated using motion, a camera watched over our ponds and various small appliances were automated.  While I still have most of my x10 devices, I really liked how Wemo devices could be controlled from any location so doing a little research, I settled on trying a rather inexpensive option of Wink. 

Wink's parent company is Quirky.  Quirky partnered with GE, the with an exclusive to sell both Wink Certified and Quirky products through Home Depot.  So on the surface, this seemed like a solid choice.  Boy was in for a lesson the hard way!

Wink uses an app to control hub dependent and hub independent products, mainly Quirky but a few others.  I bought a Quirky spotter and egg minder, two of their hub independent products.  Both are incredibly useless!  They look nice but they don't live up to their expectations.  Had I researched further, I would have discovered all of the negative press regarding these two products.  At the same time I bought the Wink hub, one GE link bulb and three Cree Connected bulbs.  The hub was a nightmare from the start!  It connects to the modem/router via Wi-fi.  It took me two days to finally get it connected but after that the hub seemed stable so after some fiddling I paired the GE bulb.  The Cree bulbs connected without a hitch.  My negative instinct was subsiding.  A couple of days later, Nest (our learning thermostat) kept losing connection.  We've had the Nest for almost two years and had never had this problem.  Then my iPhone would not connect to Wi-fi and finally my laptop kept losing connection.   I checked all the settings on the modem/router but the problem persisted.  I called my provider who did troubleshooting and finally after a lot of tech work, sent out a new modem/router.  With a day Nest was again losing connection so we went through their tech support.  Nothing seemed to work, with each Wi-fi connected device randomly losing connection except the Wink hub.  You can set Wink to control Nest but I had left Nest control to it's own app and there was no apparent interaction between Wink and Nest.  Finally, the app showed no hub paired devices as both Twitter and Facebook lit up with the current Wink hub problem.  Trust me, there have been a lot but this was the worst one so far!

According to Wink, someone forgot to renew their security certificate so no hubs could connect.  Essentially they bricked their hubs.  Their solution was to get everyone to send in their hubs so they could fix it and they would return it within a week.  As of this date some are still waiting for their boxes to return the hub to Wink!  Second, Wink immediately offered a $50 discount code that was abused within about two seconds so they issued personalized codes sent to customers via email but many of those codes don't work and the majority of products the codes can be used with are mysteriously unavailable.  In the meantime, Wink offered a way to unbrick the hub by changing the DNS on your router for those that were able or wanted to.  As hubs started coming online new rumours began circulating that the reason for the hubs going offline was an untested update that would prevent rooting the hubs.  Since Wink is cloud only meaning your app sends a signal to the cloud via the internet and the cloud sends back the signal to the device to respond in the desired fashion.  That is all well and good until Wink's servers go down then your devices don't work.  Rooting the hub gave local control so it didn't matter if their servers went down.  Now, the vast majority of folks using Wink were not using rooted hubs and for many it was their first step into home automation, buying into a promise that could not be fulfilled.   I tend to believe the second scenario of Wink trying to prevent rooted hubs from connecting to their servers.  If it was just updating a security certificate there is no need to return the hub.   Clearly they uncovered a physical problem in the hub that they were being quick to hide and get the hubs back.  Either way Wink was 100% negligent in causing the bricking of the hubs.

As a company, Quirky has a reputation for putting out products that really have not been tested so it was no surprise that Wink does the same thing.  The Wink hub is larger and aesthetically intrusive in comparison to other home automation hubs.  Everything is done via the cloud with no local control.  During this latest outage, folks had lost automation of lights, motion sensors, triggers, switches, and locks.  The site informs the user to not depend on Wink for security even though the implication is there for using as DIY security.  The funny thing is during this fiasco, I unplugged the hub and suddenly all of my device Wi-fi problems were gone!  I left the hub unplugged for a day, plugged it back in and one by one watched my devices get booted off of Wi-fi.  That was it for me.  I took the Wink hub back and moved onto to another brand home automation hub.  Luckily, I did not buy into the Wink environment significantly so my light bulbs made the switch over just fine.

Lessons learned from my Wink experience:

  • don't buy into the hype - pretty does not equal function
  • don't buy propriety - make sure all of your devices will work with alternate connection devices
  • insist on local control
Warning:  Do not use home automation especially cloud based as a security system.  Do not tie your home automation system in with your existing security system.  I personally do not recommend using home automation for entry locks or garages. 


Tuesday, February 24, 2015

Loving Our Eclipse California Shutters

Window treatment always presents a problem when you first move into a new home.  You either have no window treatment at all or what was left behind is not to your liking.  The former owners of our home left behind vertical blinds in the kitchen, office and games room.  There were mini blinds in the master bedroom and two lower level bedrooms, and sheers on the Great Room window.  There were no window treatments on the two half circle windows or one bedroom.  All window treatment left was at best suitable for a bit of privacy until replacing.

California shutters in Great Room
We live in southern Ontario so energy efficient window treatment is a must during the heating and cooling seasons.  The uncovered half circle windows presented a bit of a problem as far as treatment but I had visions of California shutters in mind for the Great Room before we even moved into the house.  About this time last year, we had California shutters installed on the Great Room windows and half circle window over the entrance door.

We chose Eclipse 2 1/2 - inch ultra satin with gears in cotton (white).  We had them professionally installed.  They transformed the room with the clean, crisp lines.  More importantly we quickly realized these shutters were quite energy efficient.  There are ten sections on the window pictured.  Each can be controlled individually giving a lot more options than other types of window treatment. 

games room California shutters
Last week, we had the same shutters installed on the games room windows on the lower level.  These windows originally had vertical blinds with one missing vane.  Each window has four sections that can be controlled individually.  The look is clean and crisp,  amplifying the natural light into the room when opened.  They increase the privacy level and energy efficiency.  The California shutters are basically maintenance-free other than dusting.  They won't shrink, warp or fade and never need painting.

Overall, I am very pleased with our California shutters.  Not only do they look good while saving on heating and cooling costs, they have increased the value of our house!  We have one on order to be installed in the soon-to-be completed home gym and we plan on installing California shutters in the three upper level bedrooms.  When all is said and done we will have invested about $8,500 in shutters for all but the patio door and pantry window, all professionally installed.  Now, that sounds like a lot of money and it is but consider that these blinds will be saving us money year round in both heating and cooling costs AND they have already increased the value of our house.  If we average an energy savings of $30 per month, the payback period is 283 months or 23 years, not exactly good but better than no payback.  However, the payback period will actually be less than that given the ever rising cost of heating and cooling.  If we were to sell in the near future, we should recoup the entire amount of the shutters according to the realtor we spoke to.  She said the shutters should also help our house sell quicker.  I say 'should' because there are never any guarantees with real estate.  As long as we own the house, the California shutters will make our experience more enjoyable.  In short, the California shutters are more of an investment that started paying off as soon as they were installed!


Thursday, February 5, 2015

Briggs & Stratton Simplicity 1226L Snowblower

We have been talking of buying a snowblower ever since our third house that had a huge driveway.  Our fifth house was rural with a very, very long driveway so before our first winter hit there, we discussed it again.  However, one of our neighbours cleared all the driveways on our short street with his tractor so we never did buy one.  We've been in this house almost four years.  Each year gets rougher clearing the driveway so until now we have hired it out even though a couple of our neighbours have cleared it for us a few times.  We are getting older, noticing both the cold and work of winter.  Yesterday, we bit the bullet and bought a snowblower.

Briggs Stratton Simplicity 1226L snowblower
Mother Nature decided to grace us with an abundance of snow Superbowl Sunday.  My husband shoveled enough of a path to get to the road then walked to work.  He called to have our guy come out to clear it but his truck was broke down.  On to plan B, a snowblower.  The time to buy a snowblower is not when there is almost three feet of snow on the ground and folks are still trying to dig out!  He made a few phone calls. 

One of our friends had a snowblower for sale.  It had only been used three times so my husband bought it.  He went over with the truck and they both brought it back on a trailer.  The snowblower is a Briggs & Stratton Simplicity 1226L dual-stage, self-propelled  model.  It has an electric start with recoil back-up.  The clearing path is 26 - inches (66 cm) and 40 ft (12.19 m) maximum throwing distance. 
The guys gave me a brief tutorial, left the snowblower running then left as I set about clearing the drive.  The snowblower is heavy, much heavier and considerably bulkier than a lawn mower.  It took a bit of getting used to but once I got the hang of it, the clearing was fairly easy.  Then it ran out of gas so I texted my husband who had just left from dropping off the trailer when the brake lines blew in the truck so I had to go rescue him.  He dropped me off then went for gas.  We had gas tank but no gas since our lawnmower is battery operated.  Once back, it was time to finish the driveway.

The snow was quite deep.  I had cleared the sidewalk portion (bottom right) by hand.  The worst part to clear was at the road where the plow had gone buy pushing a lot of snow into the driveway.  I was rather pleased with the final results especially since we have interlocking brick that is not quite as smooth as an asphalt or cement surface. 

It started snowing again last night and by morning there was a fair amount of accumulation so my husband cleared out the driveway again with the snowblower.  Then he cleared our elderly neighbour's and a friend's driveways.  It took about 45 minutes to clear the three driveways.  Although the snow held off during the day, it was back to snowing in the evening.  At this rate, the snowblower is going to get a lot of use!

I found the snowblower easy enough to use in theory but harder to use in practice.  I'm petite so even though the snowblower is self-propelling, I sure felt the effects.  Much of the soreness was more than likely due to hand shoveling as I had done a fair amount, the sidewalk and almost half of the driveway.   I can't advise on what to look for when buying a snowblower other than buy quality.  A snowblower will need both maintenance and repairs but should last a number of years when cared for properly.  Size does matter as a friend of ours bought a small snowblower that can barely do his short driveway after heavy snowfall but is suitable for lighter snowfall.  A snowblower will lessen the need for manual snow removal although some hand shoveling will still be needed.  At any rate, a snowblower is definitely a worthwhile investment!


Wednesday, February 4, 2015

Easy Indoor Clotheline Follow-up

We replaced the existing indoor clothesline with an easy DIY clothesline when we installed the dry bar cabinets.  Our solution was simply a removable, heavy wooden dowel spanning the distance between the closet and furnace room walls set into brackets.  The total cost for this quick project was under $10.  The true test to whether this solution would meet our needs came with the first couple of uses.

easy DIY indoor clothesline in use
We don't hang a lot of clothes but certain items for one reason or another are always air dried, usually on plastic clothes hangers.  There may only be four or five articles that need hanging in our average sized dark load unless it is athletic wear that comprises the entire load.  Once dried, the clothes are easily transferred to the appropriate closet. 

My concern was reducing the drying space from the existing 30' to about 4'.  Even though we never used the entire 30', the space was there if needed.  I hung nine articles of clothing from a large dark load which is about the average.  There was plenty of room for the clothes.  By morning, the clothes were dried ready to be put away.

Overall, this very simple, low cost, DIY solution meets our indoor drying needs nicely.  I leave a hanger on the rod to hang wet T-towels and dishcloths that are then placed in the laundry basket until there is enough for a load.  We have extra capacity, front loading washer and dryer so I do a load of laundry about once a week to ten days.  It takes awhile to accumulate enough whites for a full load! 


Tuesday, January 27, 2015

New Entrance Ceiling Fan

As much as I liked our new house when we bought it in 2011, the existing light fixtures were much to be desired.  Some were plain Jane basic fixtures and all were dated.  The only one I decided to keep for the time being was the kitchen ceiling fan.  The classic black ceiling hugging design looks good in the kitchen.

entrance chandelier
The front entrance lighting was a large drop chandelier.  I was so impressed with this horrid fixture complete with plastic prisms, that I couldn't find a picture of the full fixture!  The closest I could find was this picture take in July of 2014 before painting the doors and trim.  The door is now red on the exterior with white interior and trim (more on that to come).  Either the builder or previous owner liked plastic prisms because they are also on three more fixtures in the house, two in the upper level bathroom and one in the dining area.  The fixture in the dining is just all kinds of wrong including location but that is another project.  Back to the front entrance fixture.

Shortly after moving into our home, I saw a gorgeous ceiling fan that I thought would look great in our entrance.  I showed the picture of it to one of our kids who found a similar but smaller one for us.  They brought the new Banvil ceiling fan down but it ended up sitting in the box for over a year while we decided if that is what we really wanted.  We started working on the room that we are turning into a home gym.  The ceiling fan in the box was in there so my husband decided to install it this past weekend.

new energy efficient ceiling fan
Updating light fixtures is not difficult if you are comfortable working with electricity.  We turned off the breaker to the fixture, tested to make sure the power was off then my husband installed the ceiling fan in four stages.  The base was installed first then he assembled each blade and installed them on the base.  Once the blades were installed, he assembled the light and finally attached the chain pulls before turning on the power.   We are very pleased with the end result!

The ceiling fan is energy efficient.  Given it's location, it will push warm air from the upper level to the lower level in the winter months.  In the summer months, we will reverse the blade rotation so cool air is pulled from the lower level to the upper level.  This will save us on heating and cooling while making the house more comfortable.  We used two 13W CFL bulbs in the light but will change those to LEDs at some point since this fixture will be tied into our home automation. 


Monday, January 26, 2015

Easy Indoor Clothesline Solution

Quite often one project leads to another.  So it was in the utility room.  The previous owners of our house installed a cord indoor clothesline that spanned the distance between the far wall of the utility room to the wall where we recently installed the dry bar cabinets.  This gave us about 30 feet of drying space. 

old indoor clotheslineThe line did not detract so was visible when not in use which really wasn't a problem.  The closet doors cleared the line so the only issue was aesthetics.  We removed the mounting strip for the clothesline when we installed the cabinets.  The line wasn't much but looked so much nicer gone!  We decided to take the old clothesline down. 

Still, we needed a solution for drying clothes indoors.  There are certain items that we always hang to dry rather than put in the dryer.  We have a very flimsy folding rack that isn't suitable for hanging much of anything.  The space really isn't big enough to leave a rack sitting out for any length of time.  At the same time, we knew any solution would take up valuable space in the small room.

new indoor cloghesline
Our first thought was to install a rod on the end wall over the end of the washer but that would only give us about 4 feet of usable drying space without climbing over the washer.  Instead, we installed a rod between the closet and furnace room walls.  The rod is a 1- inch wooden dowel that can be easily lifted out of the mounting brackets if desired.   I think I will look for a plastic cover meant for shower rods to cover the wood mainly for looks but also to protect the wood from getting wet. 

Four feet of drying space does not seem like a lot especially in comparison to the old 30 feet span.  However, I hung a few clothes in the lower level bathroom while we were working on the cabinets.  That was ample room so the new rod should work fine.  I may add a fold down drying rack on the end wall if necessary.

The wall needs patching which will be a small project.  I also plan on painting the trim and replacing the closet doors.  As mentioned in yesterday's post, the ceiling tile needs replacing it's in the jar for weekend projects.  I'll be working on decluttering the closet this week!  We are also in the process of converting a lower level room into a home gym so I'll be busy painting too. 


Sunday, January 25, 2015

Dry Bar Cabinets Installed

While I have plans of painting a couple of rooms, we are working on several smaller, weekend projects over the next few weeks.  The utility room is L-shaped with the refrigerator and dry bar spanning the wall adjacent to the entrance.  The back, long arm of the L has a large double door closet, the washer and dryer.  Across from the washer and dryer is the very small furnace room that really is just big enough for the furnace, hot water tank, central vacuum canister and shallow shelving.

The total area is small but for the most part quite functional.   It does need a bit of organizing and could use a fresh coat of paint.  The ceiling is a drop ceiling.  Some of the tiles need replacing, another of our planned easy weekend projects.  We would like to update the lighting as well.  It is currently two fluorescent double bulb fixtures in the L-shape and a bare bulb fixture in the furnace room.  All come on at the same time.  The ample sized closet is very much lacking in light so we would also like to add lighting there.  So there are a number of small, inexpensive projects planned that will make the space better suited to our needs.

dry bar area before cabinets installed
We brought our relatively new (bought in 2005) Whirlpool refrigerator to our new home in 2011.  We installed it just inside the entrance to the utility room.  Then as luck would have it, my husband found a base cabinet with countertop included on clearance at Home Hardware.  He installed it the same day creating a much needed dry bar.  We do a lot of entertaining so need the extra storage space for that purpose.  And so the dry bar sat where it quick became the perfect hotspot for horizontal clutter.  There was the fear that glasses would accidentally get knocked off during heavy use.  The horizontal clutter spilled onto the top of the refrigerator.  In short, the dry bar while providing much needed storage was not functioning in the way we envisioned it.

dry bar cabinets installed
My husband went to Home Depot where he found pre-finished cabinets.  He bought two of the cabinets for an easy, DIY solution to our dry bar area clutter problem.  They were very easy to assemble and hang.  Doors are available for the cabinets.  We decided to leave the cabinets open for the time being to see how we like it.  My concern is of course dust even though we like the way the cabinets look without the doors.

Once the cabinets were installed, we washed them down and started organizing the glassware.  We also took the opportunity to do a bit of decluttering.  Some of the glassware went into the donation bin.   That little bit of decluttering has spurred the start of house-wide decluttering.


Tuesday, January 13, 2015

Converting to LED Bulbs

Ontarians currently pay the highest hydro rates in Canada despite the fact that we produce natural sourced, inexpensive electricity.  Apparently our government deems it prudent to send our cheap hydro to the US then turn around and charge us premium prices, but that is a whole other story.  At any rate, our hydro rates are high.  We have always been fairly energy conscious because it is both frugal and environmentally responsible. Supplementary lighting is a necessity even if you are blessed with an abundance of natural lighting especially task and security lighting.  Lighting actually only comprises about 4% of hydro usage so there isn't a lot of savings even if not using hydro powered lighting.  The reality is every kWh not used is a good thing.

led bulb packaging showing wattage and lumens
Several years ago, I was excited to buy our first CFL bulb.  The base was big and bulky, limiting what fixtures it could be used in and at $30 was cost prohibitive to use in any number.  A few years later, smaller, spiral CFL that fit in most fixtures became available.  In comparison to incandescent light bulbs, the spiral CFL used less than half the wattage. 

Lowes had LED light bulbs on sale for $4.98 which is still more expensive than CFL but quite reasonable.  The price of LED bulbs is quickly coming down.  The key thing to look for is the lumens, the brightness of the bulb.  This will be the new value replacing wattage according to some sources.    I bought four of the 800 lumen bulbs (9.5 W = 60 W).

led compared to cfl bulbs
CFL bulbs have come down in price to as low as 70¢ per bulb and while they do save hydro, they have their own unique problems.  CFL take a few minutes to come to full brightness  They emit mercury when broken as the glass shatters in a million tiny, very sharp pieces.  CFL still don't fit in all fixtures and they perform poorly outdoors in cold weather.  Many complain there is a slight flickering to the CFL bulbs.  They can also interfere with other frequencies like garage door openers.

It's easy to see that the LED bulbs are lower wattage thus reducing hydro usage saving money.  They are by far the most energy efficient, cleanest and most eco-friendly light bulbs.  One of the CFL replaced was a 26 W bulb in the great room that is left on 24/7 when we are away.  It didn't behave nicely with the timer so we just left it on.  The three kitchen bulbs replaced were 13 W.

The LED bulbs are very similar in shape and size as the old incandescent light bulbs.  Aesthetically, they are a bit more appealing than the spiral CFL.  The A10 base will fit in most light fixtures but smaller based LED bulbs are available for specialty lighting.  LED bulbs contain no toxic materials and are 100% recyclable which is a huge improvement over CFL bulbs.  They produce little infrared light, close to no UV emissions and the operate in extremely cold or hot temperatures.  The light is instant with no warming period to reach full brightness. 

We are planning on replacing the ceiling fan in the kitchen with a solar tube.  That will be after we finish the deck.  If we put a roof on the beck, it will change the roof line so the solar tube is on hold until we decide what we are doing. 

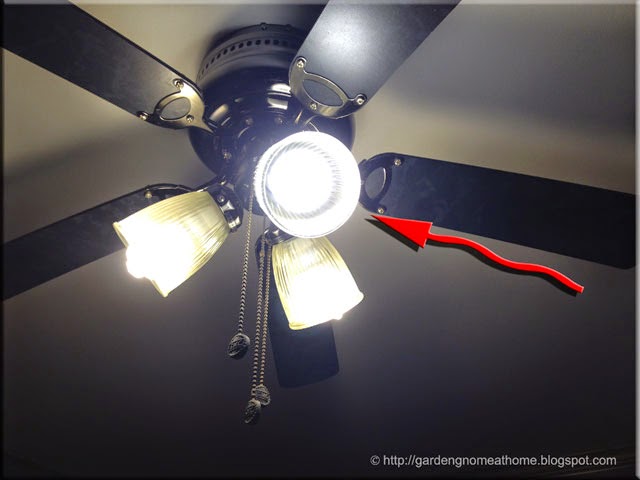
It is a bit hard to see here but the back two bulbs are CFL and the front one (red arrow) is an LED.  The difference in lighting is significant!  The LED bulbs put out a nice bright, crisp, clean light in comparison to the CFL bulbs.  They really light up the kitchen while saving us 10.5 W total.  We are getting more light for less hydro.  We have even questioned whether we still want a solar tube. 

We are replacing most of the lights in our house with LEDs.  Some are the basic ones like these while others will be part of our home automation project.  These basic LED bulbs will be moved to fixtures not tied into our home automation system.  I talk more about that system when it is up and running.  LEDs really are the way to go with respect to lighting.  The greatly reduced energy usage makes them suitable for solar applications.  They can be used with dimmers as well.  You can even get colour changing LED bulbs for use in home automation so you can simulate dawn, dusk and personalized settings.  I bought two colour changing LED strips to replace the kitchen florescent strips.  I'll  discuss that as well when they are installed.  In the big picture, we will be reducing our lighting from 4% of our overall hydro usage to less that 2% which isn't bad but the payback period will be about 5 years at current hydro rates and replacement bulb costs.


Thursday, January 8, 2015

Picking A Colour for the Greatroom

paint chips
Paint Chips

We are home now and the holidays are over so it is time to turn our attention to getting a bit of decorating done.  We had deep crown moulding installed in the entrance, greatroom and hallway back in November before we returned to our vacation home. The crown moulding still needs painting.  I'm rather partial to a pale grey for the walls with white trim.  I'm currently looking for just the right grey.

I brought paint chip samples home to see how they would look in the intended rooms.  These are Behr paint chips but our Home Hardware does colour match so can mix to Behr paint chips.  The one that I was immediately attracted to in the store (second from left) has a bit too much blue tone while the far right one has a green tone.  The second chip from the bottom of the far left sample is close to what I want but not quite. 

I'm planning on doing the painting prep work next week so that gives me the weekend to find a paint colour.  This will be a big project but the walls are in excellent conditions so there isn't a lot of repair work to do.  We will be replacing the doors in the hallway, the door trim and baseboard as well.  This should be a fun project!


Wednesday, January 7, 2015

Reducing Household Waste

Our municipality just announced that effective January 19, the bag limit for curbside collection will be reduced from four to three.  Our waste collection here is testy at best.  There is a 40 lb limit per bag and if there are more bags put out than there should be, they simply don't pick up any.  Seriously, if the limit is four and you put out five, they take none!  This is rather discerning since sometimes a resident forgets and waste not picked up quite often is driven into the country side to be dumped in ditches.  The recycle collectors are not quite as testy but they will pull items that shouldn't be in the recycle bin out, leaving them on your lawn to blow around.  At any rate, those not playing to the rules end up with problems.  There is a bit of resentment too since those living in apartment buildings apparently have no restrictions so it does take a bit of adjustment if they move into a residence with curbside collection.

There are a multitude of ways to reduce your household waste.  We seldom have more than one kitchen catcher size of household waste per week in addition to our recyclables that are collected every two weeks.  I personally think we still produce too much actual waste so am working on reducing it, ideally to one kitchen catcher per month or less.  Here are a few ways to reduce household waste put to the curb:

  • kitchen scraps - garburator, compost, give large bones to friends with dogs
  • paper - go paperless wherever possible including newspaper and magazine subscriptions,
  • cardboard/packaging - avoid excess packaging especially single serve items, avoid blister packs, buy loose produce instead of packaged, avoid wrapped produce
  • plastic - use reusable shopping bags
  • miscellaneous - repurpose or donate
The easiest and quickest way to reduce household waste is to avoid all excess packaging since a good portion of packaging cannot be recycled.  A good portion of excess packaging is food packaging, mainly single serve foods like snacks.  Replacing these items with alternatives that have less packaging can not only reduce your household waste but also save you money.

Curbside waste should be the last consideration for any household item that can either be repurposed or donated.  There is something inherently satisfying about repurposing an item that is no longer needed for its intended purpose.  Even old socks can be repurposed for crafts or dusting.  Old T-shirts can be turned into pillows or cut into strips then crafted into throw rugs.  If you truly can't repurpose and item then consider donating it. 


Monday, January 5, 2015

Curbside Waste and Privacy

Back when I was knee high to a grasshopper, there were a few town folk who were regular garbage pickers.  Like clockwork, they would come to rummage through your trash before the garbage collectors picked it up.  It was small town Canada, a gentler time and my Mom knew them so never minded.  Over the years the garbage pickers persist but quite often especially in larger areas they are not so benign.

Household waste put to the curb for collection can tell a lot about the residents living there.  Personal information can sometimes make its way to the curb making it easy pickings for someone trying to get information on you.  Items in your trash can give a would be thief not only personal information but clues about what may be in your house, your interests and your lifestyle.

We have a garburator and paper shredder which significantly reduces what goes to the curbside.  We seldom have much more than a kitchen catcher size garbage bag of waste and our recycle bins when we are home.  Our curbside waste never goes out the night before collection mainly due to a few folks who like going through the recycle bins for cans to sell.  Most of our cans go directly to the recycler anyway so it isn't a big concern other than having to clean up the mess they make looking for can.  If the weather is nasty or I don't plan on being home to pick up the empty recycle bins as soon as they are emptied, then the curbside waste waits until the next collection date.

Surprisingly, even though there is no personal information or food scraps there is still a lot to be learned about us in those bins.  Some of that information could be used negatively, mainly to determine where we shop or some of the activities we are involved in.  I'm not concerned because it would take a lot of extrapolation on the part of anyone snooping through what little there is there in the very short window of time it is out there.

However, certain items put to the curb can be a potential problem or present privacy issues for some.  For example, an unnamed employer here had the practice of checking employees recycle bins for alcohol containers then finding a way to get rid of those employees where he found the containers because he was against the use of alcohol.  He was wrong, definitely overstepping his bounds, and finally got caught but just like incriminating Facebook posts, incriminating items in your curbside waste can have negative effects.  Curbside waste can be a target during a nasty break-up.  Packaging from electronics can be as good as an open invitation for someone to break in.  Children's schoolwork can end up in the recycle bin giving a stalker at the very least your child's name but sometimes their grade and/or teacher's name.  Armed with that it's easy to find where your child goes to school.  Some items can even give would be thieves clues as to when you're away from home or what type of security measures you are using. 

Counteract the privacy concerns of curbside waste by putting it out as close to pick-up as possible.  Be conscious of what you put to the curb.  Don't put electronic boxes to the curb.  Take these to the recycle station yourself.  Remove shipping labels as well as labels from containers that you might not want neighbours know you are using.  Really, does your neighbour need to know your hair colour is from a box?  Crush smaller boxes and containers, then put inside larger ones.  Shred anything with your name, address or other personal information.  When it comes to paper waste, if in doubt, shred it.  Take a pro-active approach when it comes to curbside waste and your privacy.


Sunday, January 4, 2015

Paper Shredder is a Must

We live in the age of digital technology so while many are concerned with securing their computers and mobile devices, they overlook all the bits and pieces of paper with their personal information that has the potential to be misused.  These include financial statements, personal documents, expired credit or identification cards, and any correspondence that could be misused.  The main concern with this type of information getting into the wrong hands is of course identity theft but there have been cases where it has been used as evidence in civil or criminal cases, as well as stalking.  Once you put your waste to the road, any of this type of information could easily be misused.

paper shredder
There are several solutions to this problem.  The first rule of thumb is to never put anything with your personal information including your name and address to the curb.  Set this information aside in your home where it is safer than at the curb then purge at regular intervals.  A very secure and permanent way to purge is to burn this type of information.  Burning works well if you have a fireplace, fire pit or go camping where it can be burnt as fire starter for your campfires.  The second most common method is to use a crosscut paper shredder.  The shredded information can then be put to the curb or in the recycle bin OR burnt if possible later. 

Paper shredders are not expensive.  I consider a paper shredder a must have for anyone concerned with privacy.  We have a Royal 12 sheet crosscut paper shredder with ultra quiet motor at our primary residence and our vacation home.  I leave the shredder turned to the auto position then shred any personal information as needed, usually when opening mail.  That way, we don't have a build up of paper clutter with personal information with the potential for misuse.


Saturday, January 3, 2015

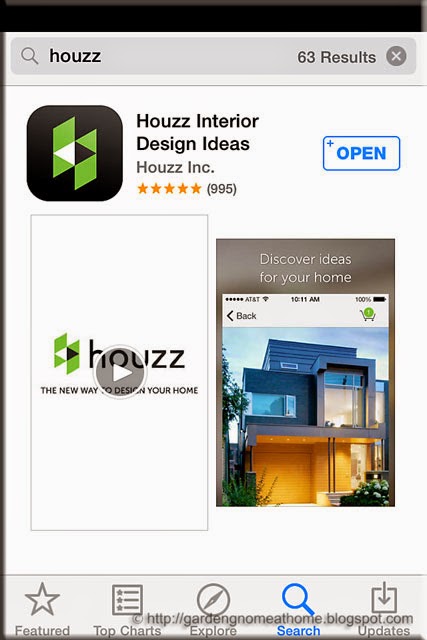
Houzz Interior Design Ideas App

I use my iPhone for a multitude of tasks in addition to communication.  It is my key tool for health and fitness as well as entertainment!  I want to add finer detail to our home so am constantly looking for different ideas.  It was only a matter of time before I discover home design apps on the App Store (Apple). 

Houzz app
I installed Houzz Interior Design Ideas from the App Store.  This is an easy to use free app full of high end decorating ideas.  The app will ask if you want to sign-up but you don't really have to unless buying from them.  Certain items in some of the design photos have little green sales tags on them that you can click to add to your shopping cart.  I signed up even though I don't plan on buying.  Signing up also allows you to save the ideas you are interested in.  A screenshot is an alternative way to save without signing up.  I've used screenshot to have the ideas at my fingertips when shopping.  This app does not give any instructions or methods for recreating the look.  That's up to you.  It is basically an idea resource for home decorating. 

Don't let the fact that these are high end ideas discourage you.  A lot of these ideas can be duplicated for a fraction of the cost if you DIY.  When you first open the app a full sized image of a design idea (eg. full room, focal point, colour theme, landscaping, interior, exterior) is shown.  Swiping to the left shows the next image and so on.  You can go back and review a previous image as well.  I tend to focus more on specific design elements because I already have vague ideas of what I want.  All in all, I think this is a great little app that will help me get the look I'm after.


Friday, January 2, 2015

Starting 2015 Projects

It's a brand new year!  It promises to be an exciting year as I have a lot of household projects planned.  I also have a few projects from last year to share as well.  We have been in our home now for almost four years and despite all of the work we have done there is a lot more that we want to do to make this house our home.  We started our large two level deck last year so there are several smaller projects to do to get the backyard to completion.  We installed crown moulding in the great room and entry and painted the front door which has led to a long list of additional projects indoors including painting, and replacing baseboard and doors.  I also have plans to turn an unused room into a home gym starting this month.  That project should be a lot of fun!  I'm picking up another piece of exercise equipment tomorrow so once the room is cleaned out and painted, it will come together quickly.   I'm looking forward to sharing some of my ideas and completed projects with you this year!


Thursday, January 1, 2015

Happy New Year! Welcome 2015

Wishing each and everyone of you a very Happy New Year!  Welcome 2015...