What does a Garden Gnome do when she is not gardening, in the kitchen or doing genealogy? Well the answer might just surprise you so read the entries to find out more. This blog focuses on everything we do to make our house a home. There will be a strong emphasis on home energy efficiency and do-it-yourself (DIY) projects. At the same time there will also be crafts, knitting and crocheting projects along with any other little tips we do to create that down to earth, I want to be here home. Please enjoy your visit :)


Showing posts with label appliance repairs. Show all posts

Tuesday, January 1, 2013

Our Vacation Home Kitchen Range Repairs

Happy New Year!


We spent three weeks in May (one week in Aruba, 2 in Florida), three weeks in October and three weeks Nov 29 through December 20 at our vacation home in Florida.  It had been rented out January through April of 2012.  I was absolutely disgusted by how we found our vacation home when we arrived in May.  Despite the cleaners being in apparently three times, the floors were dirty, the bathrooms had not been touched especially the mirrors, the stove and backsplash had not been cleaned and the list goes on.  We arrived with friends of ours so I hit the floor running just so they could use the guest washroom.  The problem in May was we had guests and the side trip to Aruba so little time to go through the house properly looking for damage.  During the October trip, we had my husband's sister and son, took them to the airport and picked up the guys the same day.  They stayed for a week.  We dropped them off at the airport and the next day left at 7 AM in the morning to meet up with a couple of our kids at Disney World for a couple of days.

On the second day of our October trip, we found out from neighbours that the agent in charge of rentals had been in our house several times, once with a plumber ALL without our permission.  In this case, there is no need for a viewing other than pictures because the tenants are usually from the northern states or Canada so aren't there to do any viewing and at most they rent for one or two months, but usually only a month.  It isn't like it is a long term rental situation or they are looking to buy.  My husband replaced the dead bolts to prevent any unauthorized entry while we were there and because we were coming back in December, we could leave our personal belongings out including food in the fridge and cupboards.  The deadbolts the park has the key to will only be on our home when it is available for rent with the new deadbolts (agent doesn't have key) on the rest of the year.  Finally, during our December trip I had time to do a full inspection and believe me, I was not happy!

damaged drip bowls on our vacation home stove
Our vacation home is a 3 bedroom, 2 bathroom manufactured home, manufactured in November 2007 and assembled in it's current location in the spring of 2008.  The gentleman that owned it was hardly ever home and he lost it so the home sat empty for a year and a half when we bought it without seeing more than pictures, in March of 2010.  During our first visit in May of 2010, I took a lot of pictures.

The Whirlpool electric range was in perfect condition with the exception of one small chip that we repaired that trip.  Other than that there were no chips on any of the grey porcelain drip bowls.  Much to my dismay, I discovered all four of the drip pans were chipped during our May trip even though there had been no chips prior to the 2012 rental period!  An online search showed replacement cost of $13 for each of the 6 - inch drip bowls and $40 for each of the 8 - inch drip bowls.  In the big picture, $106 to repair the drip bowls wasn't too bad but they would likely get chipped again with the next renters.  The bottom line is, even when renting someones home and even at a premium price ($2,200 per month January through April), they really don't care if they cause any damages. [As a result of damages, we now have a neighbour that will go through our house and let us know of any damages so the renters' credit card (mandatory requirement if renting through the park) will be charged the day after they vacate if there are any damages.  Both of the 2012 renters will not be allowed to rent from us again.]

replacement drip bowls
We decided to replace the drip bowls with chrome drip bowls that we found at Lowes.  The first set didn't fit properly so my husband took them back and bought ones that actually said Whirlpool on the label.  They cost us $19.99 for the four of them which is considerably less expensive than the porcelain drip bowls.

I'm hoping that we get a couple of years out of them which isn't an unreasonable expectation providing they are cared for.  The nice thing is, the chrome drip bowls won't chip and they should clean up fairly easily.  Realistically, we have already put replacing the drip bowls on our annual repair list.

an overlooked area of the stove that should be cleaned
Electric stoves have an open space between the outside of the top of the oven and the stove top.  Unfortunately, many folks over look this area when cleaning electric ranges even though it can get a bit gunky from overflowing pots, spills, grease splatters and crumbs.  The reason this happens is regular drip bowls have a hole in the centre and another hole where the burner connects through into the socket.  That means foods and liquids can find their way onto this surface which can cause odours, attract pests (eg. ants, mice) and in severe build-up create a fire hazard.

Our vacation home stove is cleaned from top to bottom at the end of each stay.  It is also cleaned by the paid cleaners each time a renter leaves.  However, and this will be an issue to discuss with the agent, this problem area had not been cleaned.  I removed the burners and drip bowls then gave this space a good scrubbing.  It didn't take long to clean it up but this is one area that should be cleaned every other week.

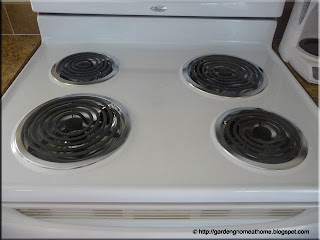
new drip bowls in place
Once the stove was cleaned up, I put the new drip bowls in place and popped the burners in.  I personally would have liked to stay with the grey porcelain but quite frankly the chrome looks clean and fresh.  We won't have to worry about chipping either so it was a nice, inexpensive solution to a problem.  We are likely the only ones that will know the original drip bowls were grey porcelain anyway.  Renters want things clean, neat and tidy even though some renters don't leave our home in the same condition they found it.  At any rate, I think the solution looks nice while being practical.

cleaning out the storage compartment
Many ranges have storage drawers underneath the over that are suitable for baking sheets and that type of thing.  I've only had one stove (JennAir down draft) that didn't have a storage drawer.  Storage drawers are another overlooked area for cleaning.  Yet they can get drips and crumbs in them from regular cooking. It is an area that should be regularly wiped down whenever cleaning the stove.

When we closed up our vacation home in December 2011, that storage drawer was squeaky clean along with anything that was in it.  I had to wash all the baking sheets and bakeware then vacuum out the storage drawer before washing it.  Once the storage drawer was dried, I gave it a good spray of rubbing alcohol to kill any remaining germs while seriously curing out the last renters.

a bit of rusting on the storage drawer
As I was cleaning I noticed a ridge of rusting on the inside of the storage drawer front.  Florida is moist and humid so that means potential moisture problems including rusting and mould that can happen very quickly.  Moisture problems can cause a significant amount of damage in a very short period of time.  That means you always have to be on the outlook for any signs of moisture damage.  We always leave the AC set to control any moisture when we aren't there.  The problem is we cannot force a renter to leave the AC on if they don't want to so we have to be extra careful when checking for moisture damage.

I honestly have only seen rust on a kitchen range twice.  The first was due to oven cleaner dripping into the storage drawer resulting in a couple of blisters that started to rust in our ancient Admiral (bought in late 1980's) and the area noted at our vacation home.  I know the rust was not there when we bought the house and I don't recall seeing it in December of 2011 even though I recall cleaning the storage drawer.  I cleaned off the rust with a wire brush, washed and let the area dry well including using a blow dryer to be sure it was dried.  Then I used a Rustoleum rust guard appliance paint to repaint the surface.  I used three coats so the area is well protected.  It's on my list of things to re-check during our next visit.


Tuesday, August 24, 2010

Refrigerator Water and Ice Dispenser

We bought our Whirlpool refrigerator model ED2FHEXSQ2 in early 2006.  It was bought specifically to fit the only spot available in the kitchen of our last house where there were both tight height and width restrictions. There are still a few models available that are shorter but many of them lack the features we wanted.  When I finally found a model that fit the space we had with the features I called the appliance place we deal with and had them order it in. It ended up being a wise purchase as it just fits in this kitchen.  New home builders have gone to a shorter cabinet over the refrigerator so the appliance manufacturers have responded by making refrigerators higher, wider and deeper.  While the new design size of the refrigerators fit well with new homes, fitting them into older homes can mean a major kitchen makeover to get them to fit but in some cases the space is too restricted that even a makeover won''t help get the newer fridges into the space.  This was the position we found ourselves in. 

water deposits on dispenser
I really like the refrigerator.  It has a lot of great features like extra lighting and glass cantilever shelving.  My husband's request as a refrigerator feature was an indoor water and ice dispenser.  There is a filter in the bottom of the refrigerator  that filters water to the fridge.  We had no problems at the old house that had a larger Culligan water filtration system under the sink.  We don't have the additional water filtration system here.

I started noticing that the drip tray (ridged portion) looked like it had adhesive residue on it.  Despite cleaning it got worse.  Then the guides developed brownish streaks (red arrows) that I thought was normal dirt but they wouldn't come off even with a Mr. Clean Magic eraser.  The streaks felt hard and crusty yet wouldn't flake off.  The other day I was doing a bit of blog hopping and came across a post about water deposits.  Well this was not new to me but for some reason it had not dawned on me that the problem with the water and ice dispenser was water deposits! 

soaking the dispenser guides
I removed the drip tray then set it in the sink and filled it with 5% acetic acid white vinegar.  I let it sit for 15 minutes then washed it.  All of the brownish markings were gone.  So I rigged up a coffee cup filled with vinegar propped up by two canning lid boxes to soak each of the guides as pictured.  I let each guide sit in the full strength vinegar for 15 minutes.  It was a rather low tech solution but it worked.  The guides were residue free with only the wipe of a dishcloth.  Now that I know what is causing the problem I can take the necessary steps to prevent and correct any future problems.  The left over vinegar did not go to waste either as I used it in the dishwasher to clean out any deposits. 

dispenser cleaned up
Pictured is the refrigerator water and ice dispenser after using the vinegar treatment.  I'm quite pleased with the way it cleaned up.  I routinely clean with a 1:1 vinegar to water solution so it will be as simple as spraying the dispenser when I do the counters. 

It might be time to consider installing an under sink or whole house water filtration system here as well.  I thought our area had soft water so water deposits have not been a huge issue but looking at the one shower head that needs replacing which we will do when we renovate the bathroom, water deposits may be a bit of a problem than I thought. 

Garden Gnome
©2006-2010


Sunday, August 22, 2010

Replacing a Stove Burner

bog pot burner

Well I can finally say I wore out a burner with canning.  I have a  Jenn-Air slide in range with various cartridges giving me the ability to grill indoors, save energy for day to day cooking and coil cartridges for canning.  I bought the heavy, reinforced burner element specifically for canning with my stove.  Late last year I noticed it arching a bit but with a bit of a twist the arching stopped.  I never thought much of of but when I mentioned it to my husband about a month ago he said that was dangerous and I should not have used the burner.  I went online to order a new burner since I will be very busy canning especially tomatoes this time of year. 

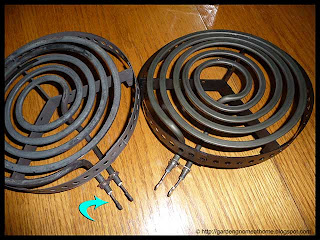
Pictured is the old burner to the right.  The contacts on the old burner were seared and the insulation around them was definitely a deteriorated (arrow).  More importantly the element itself was loose allowing movement over the reinforced base.  The new burner does not move over the reinforced base.  The problem really becomes the heavy canners themselves.  It is hard to move a canner from the element without using a sliding motion.  That sliding motion will eventually cause the entire burner to fail.  The fact that the burner performed well for over 5 years is almost amazing considering how heavy the canners are.  The new burner is in place and performing nicely.  We are going to try being a bit more conscious of not sliding the caanners over the burner. 

Garden Gnome
©2006-2010


Saturday, May 29, 2010

Appliance Chip Repair

Accidents happen around the house in the best of circumstances but when moving or settling in they are even more prone.  This is the time that little nicks and dings often happen.  While the nicks or dings don't affect the overall function they can make the appliance or piece of furniture look less than appealing.  There are a wealth of repair kits available for doing quick touch-ups for most furniture and appliances.  Most of these kits will cost less than $5 and with carefully following the instructions you can get a good, barely noticeable DIY repair.

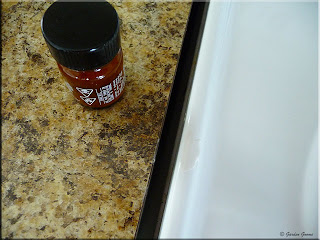
the appliance chip
The kitchen appliances in the vacation house are Maytag.  Quite frankly for this repair brand did not matter because each appliance manufacturer uses a slightly different colour if white to the point that a matching washer and dryer may not exactly match.  We are avid DIYers so that means even at the vacation house we will do it ourselves if at all possible.  My husband was removing the filter from the overhead built-in dishwasher when the screwdriver he was using slipped out of his hand crashing down onto the stove.  This left a rather nasty looking chip.  The chip could have been left as is but would be unsightly.  It would get worse over time with likely a bit of rusting.  We stopped at Home Depot to buy Porca-fix to fix the chip immediately.

appliance chip repair in progress
Porca-Fix is one brand of appliance chip repair products.  There are others but this formula will only need one application.  It is about $5 for the small bottle but most repairs you will only need  a drop or two from the built-in applicator.   It is rather easy to use with no special skills required. 

To use simple clean the chipped area good and be sure it is dry.  Then using the applicator dab on a drop or two.  If it runs a little wipe the drip with a paper towel.  The patch will be raised which is normal.  Let the patch dry fully.  Once the patch is fully dry it can be fine sanded using the provided sandpaper to give a smooth, barely noticeable repair.

appliance chip repaired
I let the patch dry for about 8 hours then sanded it.  The sanding brought the patch down to the same level as the original stove finish.  To the touch the patch is not noticeable at all.  If you look very close and know what you are looking for you might just barely notice the slight colour difference of the patch depending on the lighting.  This is something that cannot be helped given the colour variances in appliance manufacturers.  Your best results will be with black or white.  There is ivory but what is now called ivory is a lighter version of almond so if your appliance is actually almond then the repair will show a bit more but if done properly should still give good results.  At any rate this is an easy way to keep your appliances looking nice if a chip should happen.