
What does a Garden Gnome do when she is not gardening, in the kitchen or doing genealogy? Well the answer might just surprise you so read the entries to find out more. This blog focuses on everything we do to make our house a home. There will be a strong emphasis on home energy efficiency and do-it-yourself (DIY) projects. At the same time there will also be crafts, knitting and crocheting projects along with any other little tips we do to create that down to earth, I want to be here home. Please enjoy your visit :)


Showing posts with label cleaners. Show all posts

Tuesday, March 26, 2013

Homemade Orange Cleaner

Earlier in the month, I bought a Bella High Power juice extractor.  Most fruits and vegetables being juiced do not need to be peeled but citrus fruit does.  That leaves the peels to either candy or dehydrate, or discard.  I did a bit of searching for something else to do with the peels and came across making homemade orange cleaner.  Anytime I can replace a store bought, toxic cleaner with a non-toxic, homemade cleaner I will so I decided to make a batch the next time I juiced oranges.

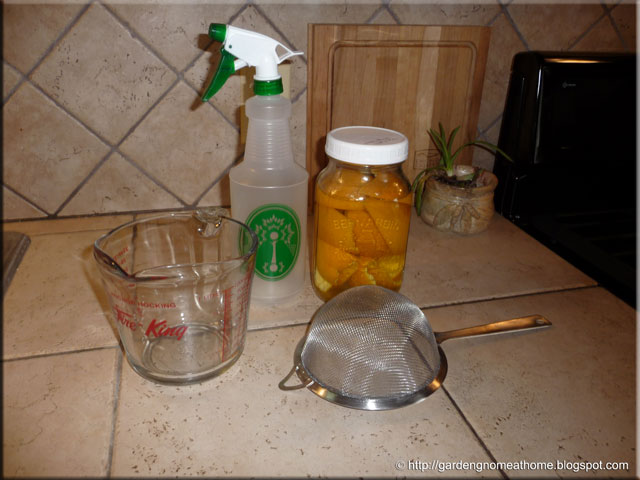
ingredients for orange cleaner
I recently made a orange pineapple juice (in mason jar) which left me with the peels from 7 navel oranges and the top of the pineapple.  I saved the seeds and pineapple top to grow.  I've had good luck with lemon seeds growing and now have three little lemon trees about 6 - inches tall. Pineapple tops will also root to grow into a lovely houseplant so I saved that as well. I set the orange peels aside to make the orange cleaner.  

Materials needed for orange cleaner: large mason jar or similar with lid, white vinegar; later you will need a large measuring cup, fine mesh strainer, funnel and spray bottle.

orange cleaner set up
Setting up the orange cleaner is very easy.  Simply put the orange peels into the jar then cover with the white vinegar.  I used a 1.5 L mason jar and a reusable storage lid. I also used all natural vinegar because I was out of the cheap white vinegar but next time will use the cheap one.  Label the jar with the date then set aside and let sit for at least two weeks.  That's it.  The sitting time is the time consuming part so you will want to start another batch before running out of the orange cleaner you are using.  

The orange peels in vinegar looked rather pretty so I was anxious to test the results.  Once the sitting time was finished, it was time to move to the next step of making my non-toxic orange cleaner.
orange cleaner ready to strain
I make a lot of homemade cleaners and have found the spray bottles from the dollar store work well for liquid cleaners I want to use as a spray.  As you can see, after sitting for two weeks, the orange peel had absorbed some of the vinegar.  This really wasn't a problem.  I was more concerned about the amount of cleaner I would get as well as how well the orange cleaner cleaned.  

I strained the orange cleaner into the measuring cup.  At that point the orange peels themselves were of no further use so were put down the food disposal.  I ended up with 24 oz (750 ml) of homemade orange cleaning solution.

orange cleaner ready to use
Vinegar itself is a good household cleaner that kills germs, cuts grease and leaves a sparkly finish.  Orange peel contains oils that give the characteristic orange scent.  I tested the homemade orange cleaner on the counter.  It cleaned well with no residue yet had a pleasant smell.  I was quite impressed!

As is, the cleaner does a nice job cleaning.  If a sudsing orange cleaner was needed, a couple of drops of liquid dish detergent could be added but for most cleaning purposes this really isn't necessary.  The total cost of the 24 oz of homemade orange cleaning solution using the natural vinegar which is more expensive worked out to 56¢.  If using the cheaper, store brand white vinegar the price is reduced to 37¢ at our current prices. 

I am very pleased with the results.  It is nice to be able to add one more homemade, non-toxic cleaner to cleaning supplies.  The nice thing is, this cleaner is made from orange peels that many simply discard to begin with.  It is low cost and effective, making it an eco-friendly cleaning product.  Do give it a try the next time you have a few orange peels.  You will be pleasantly surprised!


Wednesday, November 9, 2011

A Downside to Moving - Cleaning

Moving is undoubtedly a massive amount of work even if you hire some of it out.  Amidst the chaos of packed boxes, packing and moving in there is the extensive cleaning that needs to be done on both ends of the move.  The house or apartment you are moving from needs to be cleaned top to bottom before it changes ownership.  For the most part this means surface clean, no garbage or debris laying around, and everything neat and tidy.  If it is not the real estate agent can be held liable on a house or apartment that is sold or on a rental property it could mean you lose your security deposit. 

If the house or apartment has been reasonably maintained, the final cleaning shouldn't be much of a problem.  Simply dust down the walls, wash any marks on the walls off using a Mr. Clean Magic eraser, clean the windows, dust the wall, vacuum the floors and shine any chrome like faucets or mirrors.  That way the new homeowner/tenant is greeted to a clean house or apartment to which they can clean further to their specifications.

Moving into a new house or apartment means you will be cleaning, period.  You can hire some of it out or do it yourself but it still needs to be done.  The amount of work required will of course depend on the move-in condition of the premises.  The problem with this is you more than likely will have to deal with some cleansers you normally would not use.  We tend to use as natural of a cleaning process as possible (eg. steam, vinegar, baking soda, Mr. Clean Magic erasers, soap, Simple Green, Murphy's oil soap, household ammonia).  Our new house was left somewhat surface clean in that the surfaces were wiped down but definitely not what I would consider clean and the previous owners admitted they hadn't had the time to clean the house better. 

I was surprised at the amount of cleaning I have had to do.  The house was neat and tidy when we viewed it but quite frankly the previous owners either didn't know how to clean or were too lazy to do so.  We were lucky in that we took possession on September 1 but most of our furniture did not arrive until September 6 so that gave us five days for cleaning and moving smaller items.  The cleaning continues though.  I've spent more time on my hands and knees cleaning as well as getting into nooks and crannies for cleaning than I really wanted but it has to be done.  While I resorted to my tried and true, eco-friendly cleaning methods, I had to buy a special cleaner.polisher and sealer for the marble floor in the kitchen, another special cleaner for the laminate flooring and pinesol to clean the grout on four floors plus the countertop.  I bought a large container of TSP for the walls as that will be needed for painting anyway.  I've had every cleaning device imaginable (eg. handheld steam cleaner, steam mop, dust mop, wet mop, and etc.) in use almost daily.  The vacuum cleaner and electric broom have been huge assets for getting dust and dirt up and out of the house.  We even had the house powerwashed because it was quite obvious the previous owners had never washed the exteriour.  I'm looking forward to getting the major cleaning behind us!  Once everything is cleaned, maintaining it along with spring and fall cleaning is a cinch.

Garden Gnome
©2006-2011


Friday, November 26, 2010

A Bit of an Update on the No-Poo Shampoo Experiment

I recently posted about trying the no-poo shampoo as an experiment.  So far my husband has resisted trying this method mainly because he does not like the smell of apple cider vinegar.  On the other hand I am experiencing rather good results with the no-poo shampoo method.  I have two food grade plastic squirt bottles meant for salad dressings.  I used one for a 1:1 baking soda solution for washing my hair and another for undiluted apple cider vinegar.

Preliminary results:

One of my primary concerns was my scalp and hair would not look or feel clean.  I squirted on the baking soda solution then massaged into my scalp and gently worked through the full length of my hair.  I rinsed with clear water and my hair felt squeaky clean.  Then I squited a generous amount of apple cider vinegar over my scalp and worked it into my hair.  Let me tell you apple cider vinegar getting into your eyes is not pleasant.  That was the only negative other than the towel smelling like apple cider vinegar. 

I towel dried my hair then used the blow dryer and styled as normal without a problem.  My hair was shiny and soft.  I refrained from using my normal anti-frizz serum just to see what would happen.  I was pleasantly surprised.  Instead of problems with frizzing I experienced considerably less frizzing but an increase in fly away hair.  I honestly was surprised at how good my hair look and felt.  I will report back at the end of the experiment.

Garden Gnome
©2006-2010


Tuesday, November 16, 2010

The No-Poo Shampoo Experiment

I've made homemade soaps and toiletries for a number of years mainly as a way of getting healthier alternatives to the harsh, chemically laden commercial alternatives.  We found that switching from detergent based body cleansers to homemade, all natural vegetable based soap that our skin improved considerably.  As a result I am always on the look-out for natural and healthier substitutes for toiletries.  Well during my surfing a couple of weeks ago I came across the notion of no-poo shampoo.  The premise is by moving away from using shampoo entirely your hair is healthier, stronger and better behaved.  Then over the past couple of weeks I saw more bloggers blogging about this method.  It is getting rave reviews! 

The method is very, very simple.  Wash your hair with a 1:1 mixture of baking soda and water.  Rinse then rinse with apple cider vinegar.  That's it.  Unlike commercial shampoos that contain alcohols and salt, the natural cleansers do not strip your hair of it's natural oils.  There's no artificial scents or colourants either.

My hair is waist length prone to frizzing in high humidity, misbehaving just because but then other days behaves beautifully and my scalp is extremely sensitive.  I would never dream of washing my hair daily or my scalp would be a mess and my hair would be like a broomstick.  My favourite hair products are Pantene and Fructis but occasionally I use Aussi.  I have decided to give the no-poo shampoo method a try for a month.  It makes a lot of sense to me because baking soda is an excellent cleanser so getting my scalp and hair clean is not an issue.  Introducing cider vinegar that has anti-bacterial and detangling properties concerns be a little.  Of bigger concern is getting my husband on board with this experiment.  He is not fond of the smell of apple cider vinegar so this should be an interesting experiment all the way around.  Stay tuned.  I will report back on how well the non-poo shampoo method worked for us.

Garden Gnome
©2006-2010


Monday, September 13, 2010

Stove Cartridge Clean-up

I can on a Jenn-Air® customized slide-in range with cartridges so that I can change the stovetop features as desired.  I bought a special canning element to customize one of the coil cartridges.This time of year my stove takes a huge beating!  While I can year round usually at least once weekly this is the busiest of the canning season when I am canning oodles of tomato products.  That means the canners run two or three times a day. 

dirty stove cartridge
The problem with both boiling water bath (BWB) and pressure canner (PC) is both spew out water droplets over the stove surface.  The PC spits out water droplets but only until it comes to pressure whereas the BWB canner spits water droplets during the entire canning process.  These water droplets seem harmless but they turn into ugly black spots on the stove.  Compounding the problem is the splattering from various sauces cooking prior to being canned. 

As you can see the canning cartridge becomes quite unsightly.  Quite frankly I could leave it as is because the cartridge is only on the stove for canning so no one really sees it other than my husband or me but that's not the point.  I don't like it looking this grungy.  When I canned on a regular stovetop I had the same problem so I learned a few tricks to cleaning up after a canning session to keep the stovetop looking good.

cleaned stove cartridge
One of the best stovetop cleaners I've found is Bar Keepers Friend.  This cleanser comes in both powder and liquid form.  I like the liquid but they both work well and it is one of the best commercial cleansers I've found for stainless steel.  It's one of the very few commercial cleansers I buy.  This cleanser contains citric acid so it is quite effective on most surfaces including smoothtop stove surfaces.  A 13 oz bottle costs $4 so is a fraction of the cost of other smoothtop stove cleansers.

Pictured is the cleaned stove cartridge.  It's not perfect but it looks a lot better than after the canning session.  The majority of the cleaning was done simply by wiping on Bar Keepers Friend, letting it sit for a minute then rubbing.  Some small spots that remained were easily flicked off with the side of a paring knife tip.  Once the busiest of the canning is over I will take the canning element out, clean the drip pan well and clean up the rest of the cartridge.  Then I will be able to give the entire cartridge a good cleaning that will remove all of the spotting but for now it at least looks presentable.

Garden Gnome
©2006-2010


Friday, September 10, 2010

The Down and Dirty on Keyboards

Mac keyboard
My Keyboard
September 6, 2010

I am not a germaphobe but I like things reasonably clean.  Our main computer keyboard is used on a daily basis several times a day unless we are away.  While it is used mainly by my husband and me, it is also used on occasion by one or more of our kids and friends.  I do the old dust off routine so it usually doesn't look too bad.  The other day my husband said he heard that computer keyboards were less sanitary than toilets.  Well that doesn't surprise me all that much since most kitchen sinks are less sanitary than toilets [something to think about].  So I pondered his statement then decided to act because I couldn't remember the last time I gave the keyboard a good cleaning.  Note that I said I couldn't remember when not that I haven't cleaned it.  I've heard a lot of ways to clean a keyboard including putting it into the dishwasher.  Here's the way I clean ours:
  • unplug from the computer - Ours is a MAC but this method works on a PC as well.
  • turn the keyboard over and hold on an angle resting on solid surface
  • lightly tap the keyboard to dislodge any larger pieces dust or dirt
  • vacuum the keyboard to get any remaining dust or dirt
  • wipe the surface of the keys with rubbing alcohol
  • dip a Q-tip into rubbing alcohol to clean between each key, changing Q-tip as needed
  • any stains that remain can be removed with a Mr. Clean magic eraser
  • wipe the surface again with rubbing alcohol
  • plug the keyboard back into the computer - The keyboard is now clean and sanitized ready for use.
This method also works well for other well used surfaces like telephones handsets, cell phones, computer mouse and control devices.  Tapping may not be necessary for some items. Using the rubbing alcohol will not only get the surfaces squeaky clean but help spread germs during cold and flu season.

Garden Gnome
©2006-2010


Friday, March 26, 2010

Household Uses for Lemons


Lemons are naturally high in acidity making them a low cost, eco-friendly and healthy alternative to cleaning with harsh chemicals. Here's a few ways lemons can be used:

  • Pour lemon juice where ants are found to get rid of them.
  • Mix lemon juice with borax for a powerful toilet cleaner.
  • Place sliced lemon in the refrigerator to absorb food odours.
  • Mix lemon juice with baking soda. Rub on chrome or copper and let set for a few minutes. Wipe off with a clean cloth for a clean shine.
  • Use lemon juice as a natural air -freshener and mood lifter.
  • Cut a lemon in half then run it over a chopping block to disinfect.
  • Squeeze fresh lemon juice onto stained surfaces. Let sit for 20 minutes then rinse.
  • Sprinkle salt on a lemon wedge with a gentle scrubbing to shine the interior of copper cookware.
  • Add a ½ cup of lemon juice to the wash cycle to brighten whites.
  • Spray stained white socks with lemon juice then hang in the sun to remove the stains.
  • Run a half lemon through the garbage disposal to clean and freshen it.
  • Put ¼ cup of lemon juice in the soap dispenser of the dishwasher and run through the normal cycle to remove mineral deposits.
  • Use lemon juice to clean grout around tiles.
  • Rub lemon juice on brass to remove tarnish.
  • Apply lemon juice with a sponge on glass shower doors to clean to a sparkling shine.

Garden Gnome
©2006-2010


Monday, March 22, 2010

A Great Carpet Spot Remover

I don't do paid posts and never have so I want to make this very clear, this is my opinion on the following product. I paid for the product myself, I used it and now I'm passing on my experience to you.

My husband and I do not like carpeting. We had intended on removing all of the carpeting in this house but after being caught up in more urgent repairs then deciding to sell our house, well we just didn't get around to it. That meant for showing the house we needed to deal with a few small carpet stains without going to the expense of having all of the carpets cleans. In some cases to sell a house one of the best investments you can make it to have the carpets cleaned before the house is listed but in this case it really wasn't necessary. There were a few very small stains in the great room carpet that likely no one would have noticed but I knew they were there so I asked my husband to pick up a carpet stain remover.

Spot ShotSpot Shot

If you have been following this blog you will know we don't use toxic cleaners in our home. My husband came home with a product called SpotShot, a non-toxic carpet stain and odour eliminator that is safe for children, certified biodegradable, never tested on animals and earning the Environmental Choice seal. So this product really had my attention. I wanted to know if it worked as promised.

Using the product was as easy as spraying the stain then blotting up the stain or rubbing. I have to tell you I was skeptical. I tried it on a stain that almost instantly disappeared before my eyes. I tried it on another thaat did the same thing. The only hint that I had used the product was a bit of darkening from being damp. The next day I vacuumed to find all signs of the stains were gone. I was very impressed. As the product says it does work on older stains as well. However, it did not perform well on a small rust stain. It did lighten the stain but not remove it entirely.

I used the spray on a few spots the size of a quarter and smaller. I don't know how it would perform on larger stains. I found that spraying the stain then blotting worked best and the results improved with vacuuming when the spot was completely dry. The smell of the product is not offensive and it did not trigger my asthma. This will be a product I will use to keep the carpets spot free while trying to sell our house.

Garden Gnome
©2006-2010


Sunday, November 8, 2009

A Forgotten Cleaner - Rubbing Alcohol

When it comes to eco-friendly cleansers the top of the list cited are: baking soda, ammonia, soap, hydrogen peroxide and vinegar. However, rubbing alcohol has played a role in cleaning laboratories for years. In labs the alcohol of choice is 95% ethanol but that isn't available to the general public and if it was it would be more expensive than isopropanol or rubbing alcohol. Isopropanyl alcohol is not ingestible so does not present a health risk so is available over the counter at most pharmacies and department stores.

rubbing alcoholRubbing Alcohol

Isopropyl alcohol (isopropanol) serves two purposes when used for cleaning. First it will wipe out most biologicals like bacteria and virii on surfaces so it is a very effective disinfectant. Rubbing alcohol is the perfect shiner for mirrors, glass, windows, and your faucets. Not only that if you want your faucets or stainless steel to sparkle wipe them down with rubbing alcohol. It is one of the best cleaners for eyeglasses as well. Disinfect door knobs, counters, sinks and handles with a wipe of rubbing alcohol. if you have shiny ceramic tile floors a quick wipe down with a cloth dampened with rubbing alcohol will keep them shiny. It doesn't take a lot either unlike a lot of cleaners.

Isopropanol is flammable in liquid form so should not be used around an open flame. It dries very quickly which leaves no residue or fire hazard. I keep rubbing alcohol in a spray bottle in the kitchen for keeping my counters and faucets clean and spot free but it gets used on a lot of kitchen surfaces because it is one of the quick cleaners I reach for first. Rubbing alcohol is readily available in the dollar stores and because a little goes a long way it is a more than affordable but extremely effective eco-friendly cleanser.

Garden Gnome
©2006-2009
