What does a Garden Gnome do when she is not gardening, in the kitchen or doing genealogy? Well the answer might just surprise you so read the entries to find out more. This blog focuses on everything we do to make our house a home. There will be a strong emphasis on home energy efficiency and do-it-yourself (DIY) projects. At the same time there will also be crafts, knitting and crocheting projects along with any other little tips we do to create that down to earth, I want to be here home. Please enjoy your visit :)


Showing posts with label patterns. Show all posts

Monday, March 5, 2012

Rainbow Neck Warmer

rainbow neck warmer knitting pattern

I have been making a lot of knitted wash cloths for our new home.  I am particularly fond of the eyelet edged wash cloth, an easy to carry project for my knitting and crochet projects when visiting, traveling or sitting in waiting rooms.  I was working on one of the wash cloths while we were visiting a friend and his young daughter for the afternoon.  She was mesmerized by the knitting needles as I worked while chatting.  She commented several times how much she loved the edging so I told her I had just the yarn for her so would make her a scarf.  The pattern I came up with keeps the eyelet edge.  The neck warmer was knit in Redheart worsted weight from my stash of yarn using a 6 oz skein.  The label was gone so I don't know the colour code or even if it is made anymore.  Any worsted weight yarn will work with this pattern.

Rainbow Neck Warmer
  • 4.5 mm (US 7) knitting needles
  • 6 oz worsted weight yarn
Cast on 4 stitches.
K 2 rows
*K2 YO K to end of row
repeat from * until there are 30 stitches on the needle
**K2 YO K2tog K to end of row
repeat from ** until piece measures 30" or desired length
***K1 K2tog YO K2 tog
repeat from *** until there are 4 stitches on the needle
K 2 rows
cast off

Garden Gnome
©2006-2012


Saturday, May 8, 2010

Eyelet Edged Dishcloth

Last month I gave a very easy pattern for a knitted  simple plain edged dishcloth.  These are ever so easy for even a beginner knitter that you will want to work up several for gift giving.  Knitted dishcloths do not have to be plain jane though.  Adding a simple eyelet stitch to a dishcloth can make it look fancy while still being utilitarian.  This is one of my favourite knitted dishcloths.

eyelet edged dishcloth
Pictured are a few eyelet edged dishcloths I recently made waiting for the finishing touch of weaving the ends in.  I mentioned in my previous dishcloth post that I like using varigated yarns for utilitarian projects because they add a bit of interest.  While the varigated cotton does work up nicely for this pattern I thing the eyelets are a bit more prominent using a plain colour cotton.  Either way it is a very easy pattern that many beginner knitters will be able to knit.  This pattern introduces the eyelet stitch which simply is a yarn over (YO).  To do this stitch, knit as normal then when YO take the yarn from the back of your work and place it over your needle then to the back and knit the next stitch.  This results in an increased stitch that when knit on the reverse gives an eyelet.  In most projects the YO is paired with knit 2 together (K2tog) to keep stitch number the same while forming some type of pattern with the placement of the eyelet stitches.


Eyelet Edged Dishcloth Pattern

I used Bernat® Handicrafter® cotton 4 ply worsted weight and 4.5 mm needles.

cast on 4 stitches
K 2 rows
K2, YO, K2
K2, YO, K3
*K2, YO, K to end of row*
repeat * until there are 50 stitches on your needle
**K1, K2tog, YO, K2tog, K to end of row**
repeat ** until 4 stitches on needle
K 2 rows
cast off.


Tuesday, April 27, 2010

Simple Plain Edge Dish Cloth

Knitted dish cloths are quite easy to make, perfect for your own use or gift giving.  They range from very simple to complex patterns but most work up quite quickly.  They are an ideal take-along project when traveling do to the size.    Today's post will give the pattern for working up a simple, plain edge dish cloth, one of my favourite patterns  

The dishcloth is worked on the bias from corner to corner in simple garter stitch.  Shaping is done via a series on increases and decreases on the edge stitches.  The resulting square has a nicely finished edge on all four sides. 

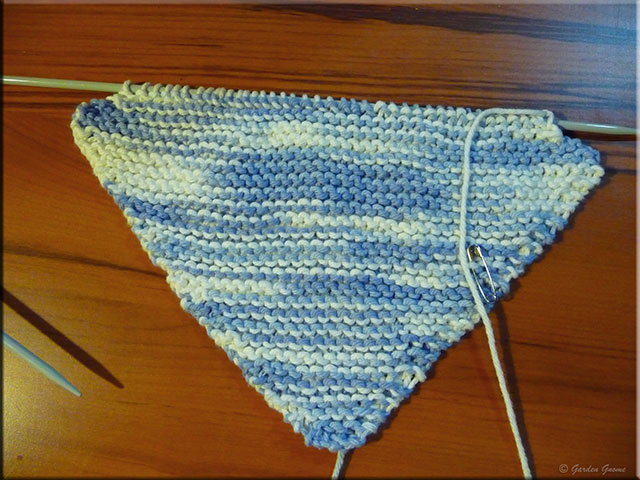
Pictured is the dishcloth in progress knit in Bernat Handicrafter® Cotton.  This is a 100% cotton perfect for dishcloths.  I like to use varigated colours when making utilitarian household items just because I like the effect so you will see varigated colours in things like slippers, afghans, and dishcloths that I make.  I started at the bottom corner then shaped to the size I wanted by increasing.  At the point where I start decreasing 2 corners are formed then continuing decreasing will form the final 2 sides of the dish cloth.  The cast off will form the fourth corner. 

Note that I use a safety pin to mark the front side of my work.  In this pattern the increases and decreases are done on the front side only.  Unless I'm working on a complicated pattern I seldom watch my work as I'm knitting.  The safety pin is a textural way of knowing which side of the piece I'm on. 

Pictured is the completed dishcloth with only the ends to be sewn in and trimmed.  On the lower left is the starting point (first corner) of the dishcloth and the fourth corner is in the upper right. The shaping give just a hit of a border.

Simple Plain Edge Dish Cloth Pattern

cast on  3 stitches
*row 1 - K into front of first stitch, K into back of first stitch (one increase completed), K to last stitch, K into front of first stitch, K into back of last stitch
row 2 - K*
repeat from * to * until there are 47 stitches on the needle
**next row - K2tog, knit to last 2 stitches, K2tog
next row - K**
repeat from ** to ** until there are 3 stitches
bind off


Garden Gnome
©2006-2010


Sunday, April 25, 2010

Knitting a Mitered Square

I've been knitting and crocheting since I was knee high to a grasshopper.  Like many who enjoy knitting I have a yarn stash that seems to just keep growing.  This happens because if I see a yarn I like I will buy enough to make something from it and there are always left-over bits and pieces of yarns, not quite enough for a large project but enough that can be worked into other projects.  Two of my favourite ways to use up left-over yarn is slippers and granny square afghans.

Mitered squares are extremely easy to knit.  If knit from cotton yarn they can be used as is for wash cloths.  However, they can be joined together to form an afghan.  The centre decrease forms a seam that can be oriented to create a pattern for the final afghan.  Here is a video of the basics.  At the end of the video there are pictures of a mitered square I made and the pattern for you.


Now that you've watched the video you have a good idea of how to proceed with this project.  The knitted mitered square is done in garter stitch using only one other stitch.  This is an excellent beginning project for someone just learning to knit.

The basic mitered square starts with a set number of stitches equal to 2 sides of the resulting square plus the 3 shaping stitches.  While it is not immediately apparent to a beginner, the piece is being knit from corner to corner in a diamond shape fashion with the 2 bottom edges of the diamond formed by the cast on stitches (1) and the 2 top edges of the diamond formed as the rows are knit.  Once a few rows are knit a peak becomes apparent (2) that when divided onto 2 needles the shape of the corner becomes clearer (3).  The final piece is square with a characteristic diagonal line from the decrease stitches (4).  I used size 4.5 mm needles and 4 ply cotton weight yar.

Mitered Square Pattern

Cast on 63 stitches.
1. K 30, S 1, K2tog, SYO, K 30
2. K
3. K 29, S1, K2tog, SYO, K 29
4. K
5. K 28, S1, K2tog, SYO, K 28
6. K
Continue in this fashion decreasing 2 stitches total on the right side (odd rows) and knitting the even rows until 3 stitches are left.
S1, K2tog, SYO, cut yarn and draw tail up though remaining stitch.

Garden Gnome
©2006-2010


Saturday, June 20, 2009

Feather and Fan Afghan

feather and fan afghan
A lovely way to spend a cold, blustery afternoon or evening is to snuggle up in a warm afghan with a good book. Over the years I have made several afghans in both knit and crochet. I posted earlier about a granny square afghan I made to resemble an Amish quilt (more here). As far as preferring knit over crochet or visa versa, I really don't have a preference even though the family favourite afghan requested is the crochet zig zag. Crocheted afghans work up quicker than knit ones but unlike crochet, for the most part I don't have to watch my work as I knit. Very pretty yet practical afghans can easily be made using only a few basic stitches. Pictured is the Feather and Fan afghan I made using Bernat® Soft BouclĂ© knit on circular knitting needles size 8.00 mm. Circular needles are better for large pieces like afghans than straight needles for the extra width.

The Feather and Fan stitch is formed by increasing using the basic yarn forward (yfwd) and the decrease is made by knitting two stitches together (k2tog). The other stitch used is the purl stitch. The result is a lacy pattern. There are many variations to the Feather and Fan stitch based on multiples of 18 plus 2 which forms a single stitch edging on row 3. An edging can be added by changing the 2 stitches to desired number (eg. 8) and knitting the first and last 8 or desired number stitches of the purl row. If adding a wider border knit 8 rows at the beginning and end of the afghan. The afghan I made does not have a border or either end.


Feather and Fan Stitch

Cast on any amount (divisible by 18) plus any amount for border. I used 200 stitches, tension 14½ st and 16 rows to 4 in. (10 cm) measured over pattern. Border stitches are knit on both sides all rows.

Row 1: Knit to end of row
Row 2: Purl to end of row
Row 3: K1, *[K2tog] 3 times, [yfwd, K1] 6 times, [K2tog] 3 times, K1, repeat from * to last stitch, K1
Row 4: Knit to end of row

Repeat these 4 rows for pattern until piece measures approximately 56 in (142 cm) from beginning or until desired length ending with Row 4. Cast off.


Garden Gnome
©2006-2009