Knitted dish cloths are quite easy to make, perfect for your own use or gift giving. They range from very simple to complex patterns but most work up quite quickly. They are an ideal take-along project when traveling do to the size. Today's post will give the pattern for working up a simple, plain edge dish cloth, one of my favourite patterns
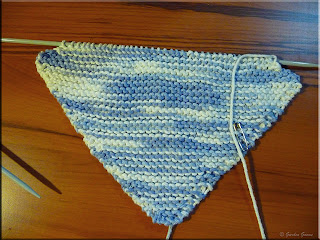
Pictured is the dishcloth in progress knit in Bernat Handicrafter® Cotton. This is a 100% cotton perfect for dishcloths. I like to use varigated colours when making utilitarian household items just because I like the effect so you will see varigated colours in things like slippers, afghans, and dishcloths that I make. I started at the bottom corner then shaped to the size I wanted by increasing. At the point where I start decreasing 2 corners are formed then continuing decreasing will form the final 2 sides of the dish cloth. The cast off will form the fourth corner.
Note that I use a safety pin to mark the front side of my work. In this pattern the increases and decreases are done on the front side only. Unless I'm working on a complicated pattern I seldom watch my work as I'm knitting. The safety pin is a textural way of knowing which side of the piece I'm on.
Pictured is the completed dishcloth with only the ends to be sewn in and trimmed. On the lower left is the starting point (first corner) of the dishcloth and the fourth corner is in the upper right. The shaping give just a hit of a border.
Simple Plain Edge Dish Cloth Pattern
cast on 3 stitches
*row 1 - K into front of first stitch, K into back of first stitch (one increase completed), K to last stitch, K into front of first stitch, K into back of last stitch
row 2 - K*
repeat from * to * until there are 47 stitches on the needle
**next row - K2tog, knit to last 2 stitches, K2tog
next row - K**
repeat from ** to ** until there are 3 stitches
bind off
Garden Gnome
©2006-2010


0 comments:
Post a Comment