

As a follow-up to yesterday's post, today I will show you how to use a custom image to create a unique 125 x 125 badge. Once you have created a couple of badges you will see how easy it is. Here are the steps to make your own custom badge using Photoshop Original Image
Open your original picture in your photo editing software. Go to Image/Image Size and note the size of the image. The size for the image I started with as pictured was 3456 px x 2592 px. To create a square image the smaller pixel size is going to be the limiting factor. Close Image Size. The original image will be locked so duplicate the image forming a new layer. Now go to File/New and create a new transparent image with equal size height and width according to the smallest size of the original image. This prevents any distortion problems. In this case I created a 2592 px x 2592 px transparent image. Use the move tool to drag the duplicated layer on the original to the new image. Note that it will not all fit so use the move tool to adjust the positioning of the image layer as desired. Square Image
The adjusted image as pictured is now a 2592 px x 2592 px square. From this point is all about design to get the look you want. Close the original image as you will only be working on the adjusted image.
For illustrative purposes I decided to play with filters and opacity so for this step I had to create a new layer then fill with white and drag that below the layer I was applying the filter and opacity changes to. This allowed me to see what I was doing. I adjusted the opacity of that layer to 35% and renamed the layer to opacity. Then I duplicated the opacity layer and used Filter/Filter Gallery/texturizer and renamed that layer filter. Next I duplicated the original background layer and added a 100 px black stroke using Edit/Stroke then dragged that layer to the top layer position. Using the magic wand tool I clicked on the black stroke to select then Select/Inverse that selected the inside portion of the image, hit delete and named this layer frame. I applied a 20 px ring bevel to the frame level using Layer Style/Bevel and Emboss. Next I used the text tool Brush Script std, 288 px to write the text and the move tool to position as desired. I applied Layer Style/Bevel and Emboss in size 20 px and Level Style/Drop Shadow distance 5, spread 5, size 70, contour linear. For the purposes of this blog I added my copyright using a custom made brush. Finally I was ready to turn the image into a badge.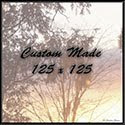 Custom Made Badge
Before going any further I saved the work as a .psd file to preserve the layers so if I want to edit the work in the future I can do so. Then I flattened the image using Layer/Flatten followed by File/Save for Web, clicked save and named my file. Once saved I uploaded it to this blog.
The image would be of little use if an URL was not added. So I clicked the image to highlight then clicked link button on the editing toolbar in Blogger. Now if you click on the image it will take you to the home page of this blog. If you want to add an URL to an image that is not part of a published post, upload your image as normal. This gives you an image location. Add the desired URL then go to Edit Html in blogger and copy the code to use where you want. Save the post as draft so if you need to use it again you always have the code.
Garden Gnome
©2006-2010


0 comments:
Post a Comment