Personalized greeting cards, invitations or thank-you cards are so much nicer than store bought. You can customize the colours, layout, fonts and details. You can print the number you need instead of being tied into buying cards in packaged lots. Homemade greeting cards are considerably less expensive than store bought. There are several sites online for greeting card verses as well or personalize your cards further with your own message.
Due to severe weather conditions the baby shower I was hosting mid-March for our soon to be second grandbaby was cancelled at the last minute. March was such a fickle month and with the due date so close we had to wait to reschedule until after the baby was born. So I wanted a very special, custom made invitation for the welcome the baby shower. I decided to use Photoshop to create a personalized digital layout of the card using scrapbooking techniques then once printed use a corner punch to make the front a bit fancier.
Here's what I did in Photoshop CS2 (it should work similar in Paint Shop Pro):
Note: I worked on a quarter of an 8.5" x 11" sheet of paper size on the computer then put the components together so there are several steps involved.
This method makes use of layers. Each I did something on the card I worked on a new layer. Leaving the file as a .psd will allow you to modify as needed. When ready to print merge the layers into a new "save as" file in .jpg format.
 Digital Card Front
Shown here is the card front without the baby's name and date of birth that I put in below the picture. Knowing the baby was a girl made my choice of colours easy.
- create a new transparent file size 4.25 inches x 5.5 inches
- open the image file you want to use on the front of the card
- drag the image onto the newly created transparent
- use Edit/Free Transform to get the resize boxes; click, hold and drag to get the image to the desired size; position as desired
- add a new layer then text above the image; use colour picker to pick a colour from the picture for the text
- repeat if adding a layer of text below the image
- if desired add layer effects to the text (I used drop shadow and outside glow for this effect
- save this file as a front.psd and a duplicate as a .jpg; when assembling the card you will be using the .jpg format.
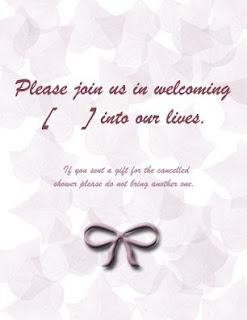 Inside Front
Some greeting cards will have a verse or message on the inside front of the card but others won't. I chose to use this space to add a message in reference to the cancelled baby shower. For privacy I have omitted the baby's name for posting on this blog on the inside front as well as all the details on the inside back but this will give you a good idea.
- create a new 4.25 inch by 5.5 inch transparent file
- create a new layer
- using the same font colour type in your text in the size and font design you want
- highlight the font
- go back to colour, click and choose custom then Pantone and go a shade or two darker
- adjust the text as desired
- create a new layer
- fill that layer with white
- drag the layer down between the first and second layers
- create a new layer
- drag that layer between the second and third layers
- choose a paint brush of your choice (I used ivy)
- dab the paint brush over the layer
- adjust the opacity to give a subtle effect (I used opacity 32%) - you now have a background
- create a new layer
- add embellishment (I used the custom shape tool to add a bow)
- add layer style if desired (I used beveling and drop shadow)
- merge the visible layers
- save as both a .psd file (editable) and a .jpg file (not editable)
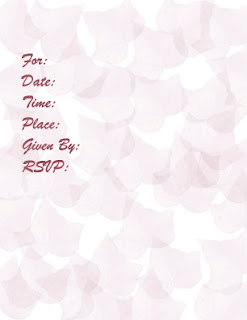 Inside Back
The inside back is made using identical steps as the inside front except you will be adding the details. This is where you would add the verse or message you want to convey. I've left off the details for this entry but this will give you a good idea of what I included on the inside back. Keep the font colour and style the same. An easy way to keep things consistent is to duplicate the inside front .psd file. On the duplicate with the text tool highlighted, click anywhere on the text. Delete this text then add the detail text you would like. Add any graphics by opening the desired graphic then clicking and dragging. Save as both a .psd and.jpg file.
When the inside back is complete you will have three .psd files and three .jpg files. The .psd files are kept for editing purposes so that the images can be changed as needed for future cards. Think of them as templates. The .jpg files have been flattened so the layers can no longer be edited. These are the files you will be working with to assemble the card.
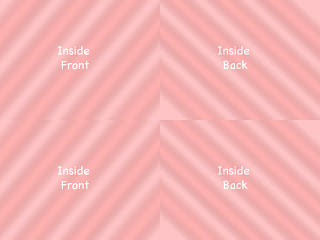 Generic Inside Layout
This is where the fun of assembling your card starts. Your card will be printed on two sides. The front picture will be print on one side, two to a sheet so you will end up with two cards per 8.5" x 11" sheet of ultra white card stock. Then you flip that printed side over and feed back through the printer to print the inside. When printed the cards, in this case two cards per sheet will be ready for cutting using a paper cutter and any extra textural embellishments.
I purposely made the inside layout pictured different from the card for illustration purposes.
- create a new image size 8.5" x 11"
- open your outside front
- click on the outside front image then with the move tool, drag onto the upper right of the new image
- repeat, dragging onto the lower left of the new image
You have now created the front of two cards. Save the image as a .jpg This will be the file you print first.
- create a new image size 8.5" x 11"
- open your inside front and back files
- click on the inside front .jpg then using the move tool drag a copy to the top left
- repeat dragging a copy to the bottom left
- click on the inside back .jpg and use the move tool to drag a copy to the top right then bottom right.
You have now created the inside of the two cards. It will be resemble the generic image above. Save the image as a .jpg You are now ready to print your card. Print the front on inexpensive paper with printer set to proof to conserve ink, then feed the paper back in to print the inside of the card on the reverse side. Make any adjustments necessary for printing. When you are satisfied with the way the cards print, change the print mode to quality print and proceed with printing on the final desired paper.
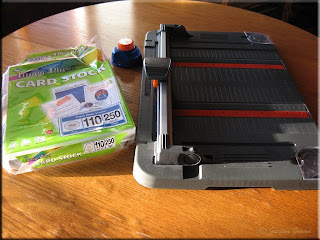 Tools Needed
The paper I recommend for printing cards is
Image Plus+ Card Stock. This is 110 lb weight and a bright white that makes colours pop. It is also acid free so cards can be later put into scrapbooks. But don't limit yourself to just card stock. While card stock is the most economical there are so many great papers out there giving you endless possibilities for cardmaking.
A rotary cutting system is a must for scrapbooking and card making. I highly recommend Fiskars
® 12" Home/Office Rotary Paper Trimmer. It comes with three cutting blades and a scoring blade. A scoring blade gives a nice, clean fold for making cards. The trimmer is designed to give clean, straight cuts. The grid markings help to ensure you cut the size you want.
Finally any scrapper will tell you punches are one of their most used tools. A punch can be used to create shaped cutouts. The cutouts can be used as
punchies to decorate other layouts. A piece of scrap paper can be punched and used as a stencil as well so punches are quite handy. I used a 3 in 1 Corner Punch (
Lace) for this project.
To score the card, lay the finished inside facing upwards, long side oriented with the long side of the trimmer. Score along the middle at 4.25 inches. This will allow the card to fold cleanly towards the inside. To cut the card, turn the inside facing upwards so the short side is facing the long side of the trimmer. Adjust to cut at the 5.5 inch mark. You now have two cards measuring 4.25" x 5.5" ready to fold and embellish with paper punching or any desired embellishment you want.
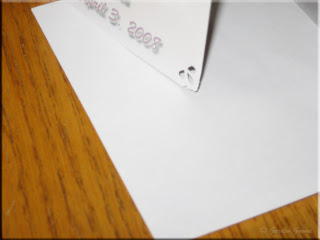 Corner Detail & Envelope
I used the punch on the two outer corners of the card. When closed the colour of the inside of the card peaks through. This is just a nice, subtle way of adding detail and making the card look expensive when in fact it wasn't.
Once the card is made you need an envelope. Here you have the choice of making your own or buying them. I used white invitation envelopes (
45727) sized 4⅜" x 5¾" from Staples. There are coloured invitation envelopes in the same size available. The envelopes can be customized as well by adding a liner, using the printer for digital embellishments or using scrapbooking techniques. So have fun with the envelopes as well.
Garden Gnome
© 2007





 Materials
 Cutting
 Taped
Taped Finished
 Digital Card Front
 Inside Front
 Inside Back
 Generic Inside Layout
 Tools Needed
 Corner Detail & Envelope





