What does a Garden Gnome do when she is not gardening, in the kitchen or doing genealogy? Well the answer might just surprise you so read the entries to find out more. This blog focuses on everything we do to make our house a home. There will be a strong emphasis on home energy efficiency and do-it-yourself (DIY) projects. At the same time there will also be crafts, knitting and crocheting projects along with any other little tips we do to create that down to earth, I want to be here home. Please enjoy your visit :)


Showing posts with label Photoshop. Show all posts

Monday, January 17, 2011

An Simple Stroke Frame for Pictures

We are back home at our primary residence after spending a month away mostly at our vacation home.  I took a lot of pictures while away so have been busy getting some of them ready for using on my blogs and digital scrapbooking.  I decided to use a unifying theme for the blog pictures that involved adding a rather simple stroke frame. 

picture without stroke frame
The first thing I did was copy the picture from iPhoto to the desktop so I could open it in Photoshop.  Once opened in photo shop I did whatever editing I wanted on a duplicate layer.  In this case I used the unsharpen mask filter to crisp up the picture a little.  This filter has quickly become one of my favourite Photoshop tool.  From there I was ready to add my frame using the stroke tool but first I had to decide what colour to use for the matte colour.  This is the frame accent colour that picks up a coulour in the photo to draw your attention to that particular colour.  To do this:

  • click on the eyedropper tool
  • select any colour of interest from the picture usually from the subject of interest; I chose a reddish brown (A3521D) from the duck's chest
  • selecting the colour will place that colour into the foreground colour box under the tools
picture with simple stroke frame
To create the frame:
  • working on the duplicate layer with the colour choice set to foreground, click on edit then stroke
  • in the pop-up, set the stroke width to 140 px making sure the foreground colour appears in the box (it should automatically), location set to center, blending normal, opacity 100% then click ok - this will apply the stroke in the eyedropper colour (don't worry as it will look a little odd until you do the next step)
  • working on the same layer change the foreground colour to black,  click on edit then stroke
  • in the pop-up, set the stroke width to 100 px making sure the foreground colour is black, location set to center, blending normal, opacity 100% then click ok
  • your frame is now complete with a narrow matte of the highlight colour
  • resize your image if desired
  • flatten you image and save as or save for web depending on your desired use.
Simple frames like this are not only very easy and quick to do they can be further customized to include bevel and embossing, textures and styles with only a few more steps.  I will go into greater detail with those over the next couple of days.

Garden Gnome
©2006-2011


Thursday, April 1, 2010

Creating a 125 x 125 Badge Using a Custom Image

As a follow-up to yesterday's post, today I will show you how to use a custom image to create a unique 125 x 125 badge. Once you have created a couple of badges you will see how easy it is. Here are the steps to make your own custom badge using Photoshop

sunset January 30, 2010Original Image

Open your original picture in your photo editing software. Go to Image/Image Size and note the size of the image. The size for the image I started with as pictured was 3456 px x 2592 px. To create a square image the smaller pixel size is going to be the limiting factor. Close Image Size. The original image will be locked so duplicate the image forming a new layer. Now go to File/New and create a new transparent image with equal size height and width according to the smallest size of the original image. This prevents any distortion problems. In this case I created a 2592 px x 2592 px transparent image. Use the move tool to drag the duplicated layer on the original to the new image. Note that it will not all fit so use the move tool to adjust the positioning of the image layer as desired.

sunset January 30, 2010 adjusted imageSquare Image

The adjusted image as pictured is now a 2592 px x 2592 px square. From this point is all about design to get the look you want. Close the original image as you will only be working on the adjusted image.

For illustrative purposes I decided to play with filters and opacity so for this step I had to create a new layer then fill with white and drag that below the layer I was applying the filter and opacity changes to. This allowed me to see what I was doing. I adjusted the opacity of that layer to 35% and renamed the layer to opacity. Then I duplicated the opacity layer and used Filter/Filter Gallery/texturizer and renamed that layer filter. Next I duplicated the original background layer and added a 100 px black stroke using Edit/Stroke then dragged that layer to the top layer position. Using the magic wand tool I clicked on the black stroke to select then Select/Inverse that selected the inside portion of the image, hit delete and named this layer frame. I applied a 20 px ring bevel to the frame level using Layer Style/Bevel and Emboss. Next I used the text tool Brush Script std, 288 px to write the text and the move tool to position as desired. I applied Layer Style/Bevel and Emboss in size 20 px and Level Style/Drop Shadow distance 5, spread 5, size 70, contour linear. For the purposes of this blog I added my copyright using a custom made brush. Finally I was ready to turn the image into a badge.

custom made 125 badgeCustom Made Badge

Before going any further I saved the work as a .psd file to preserve the layers so if I want to edit the work in the future I can do so. Then I flattened the image using Layer/Flatten followed by File/Save for Web, clicked save and named my file. Once saved I uploaded it to this blog.

The image would be of little use if an URL was not added. So I clicked the image to highlight then clicked link button on the editing toolbar in Blogger. Now if you click on the image it will take you to the home page of this blog. If you want to add an URL to an image that is not part of a published post, upload your image as normal. This gives you an image location. Add the desired URL then go to Edit Html in blogger and copy the code to use where you want. Save the post as draft so if you need to use it again you always have the code.

Garden Gnome
©2006-2010


Thursday, March 18, 2010

Selectively Texturizing Clip Art

A few days ago I showed a simple way of taking a free black and white clip art image and selectively colourizing it. This is a method to further customize clip art to your digital scrapbooking layout or you can print out the completed graphic then use a Xylon machine to turn the graphic into a custom made sticker.

colourized trash can clip artColourized

Pictured is the selectively coloured clip art I showed how to do. I started with a simple free black and white clip art found online. After downloading the image I opened it in Photoshop®. The image was in .gif format so I clicked select all the copied and pasted into a new image to colourize. This kept the original file as a .gif for later use and created the new colourized ,jpg file. The tools I used to selectively colour the image were the eyedropper to select colours from the colour palette and the magic wand to select the area I wanted to fill with the colour. It was a simple as colouring with pencil crayons except I was using a digital medium. The end result was a customized graphic suitable for on this blog and digital scrapbooking.

texturized trash can clip artTexturized

I admit to often having several images open in Photoshop at any given time. As I looked at the colourized image fully intending to close it I thought I could make this image a bit more interesting by texturizing it. I used the magic wand to highlight the area I wanted to apply a filter from the filter gallery. Essential this method is the same as colourizing except using filters rather than colour. The filter gallery contains several filters to give various effects from simple texturizing as in the pale green and darker green to shading techniques and everything in between. The best way to decide on the look you want is to open filter gallery and play with the various options. I used sketch/water paper for the box in the can, label, small grey tin and red tin, artistic/underpainting for most of the other items, and artistic/rough pastels for the pail and box outside of the pail. It's surprising how a little tweaking with texture can give a more interesting effect. This is a method you can use with any image you want to add a bit more interest to.

Garden Gnome
©2006-2010


Sunday, March 14, 2010

Selectively Colourizing Clip Art

Free clip art can be a wonderful resource for anyone needing images for online use or scrapbooking. These are images that are free for your non-profit usage. The easiest way to find such images is to do a simple Google search for 'free clip art'. Once you find the image you would like to use, right click on the image and download it. The following instructions are for using Photoshop®.

black and white trash can clip artBlack & White

In some cases the clip art is presented as simply being a black and white image in either gif or jpeg/jpg format. What is important when choosing an image that you would like to colourize is to look for strong outlines. The strong outline is what will help with the later colourization by forming clear boundaries for each colour.

The format will depend on how you proceed with the colourization. If the file is .gif, open the file then click select all to duplicate. Click create new in the same size as the original image. Use the move tool to drag the original selected image to the new image. This creates an unlocked layer you can now work on. Close the original image in case you would like to use the black and white version in the future. You are now ready to colourize your image.

colourized trash can clip artColourized

Think of selective colourization as a digital paint-by-number. You will be using two tools - the eyedropper to choose a colour and the magic wand to choose where you want that colour. Set your pallet to swatch that will show a range of various colours in neat, little squares. Clicking on any of these squares with the eyedropper will change the foreground to that colour. Once you have the colour you want, click magic wand to highlight what area you want to change. You will see the dancing ants indicating the area is selected. Go to edit/fill then click on colour. The last colour you used will show in the new pallet window. Double click your foreground colour where your new colour will appear in the top half of the small colour preview window with the old colour on the bottom. Click ok. You selection will now be filled with the colour of your choice.

Notice that each time you make a selection the strong outlines will contain where you want the selective colourization. Continue on in this manner changing colours using the eyedropper, clicking on fill then colour and double clicking your new foreground colour for the fill until you have selectively coloured your image the way you would like. Once you are happy with the results, click save or save for web depending on the intended use and name your file. You now have a great colourized piece of clip art.

Garden Gnome
©2006-2010


Sunday, June 28, 2009

Scrapbooking - Old World Map


Old World Map
June 28, 2009

There are so many free graphics and images available online that can be used for digital scrapbooking and web design. At some point especially with digital scrapbooking you will want to make your own unique images. I use Photoshop® CS as my main graphic editing software. There are many online sites dedicated to providing free Photoshop® tutorials. There are also many forums and groups for discussing Photoshop® and getting help with the various features of the program. Even with a program as powerful as Photoshop® by itself there are various add-ons, plugins, free brushes, free actions and etc that can be used to enhance the program. You can even make your own brushes as I did for my © brush. So within the program there is still more room for personal creativity. I try to work through one or two Photoshop® tutorials each week.

Pictured is my first attempt at the Old World Map tutorial from psd tuts+. This would be a cute digital scrapbooking image that can be used as an element or background or even a frame. This tutorial uses several techniques to create a fictional old world map. It was a rather easy tutorial to follow but there were a few important details left out of a couple of the steps that would make it difficult for a beginner to complete. Once I had worked through the tutorial I decided to tweak just a little. There were several layers to creating the image which is something I really like. What is nice about layers is you can easily go back and change one element of your image if you save it as a .psd file. The image is created by adding additional layers each with a technique. For example in this tutorial the landmass was created as a layer then a background layer was added and dragged below the landmass. Each time something new was added I used a new layer. To get the final ridging effect all the layers were merged then a texture filter was used. I added a page curl using AV Bros. Page Curl Pro 2.2. This is an additional filter I purchased for Photoshop® that makes customizable bends and curls on the image. That left a transparent background so I added another layer filled with white so the image would blend properly on this blog.

I like the resulting image but have a few ideas how to make it better and that's what tutorials really are all about. I'm not really happy with how the stripes turned out so would use the gradient tool instead. I definitely would keep the compass on a separate layer, turn off that layer, merge the other layers then add the texture and turn the compass layer back on. I think the map would look a bit more authentic with perhaps a burnt or ragged edging as well. There are a few suggestions in the comment section of the tutorial so I will be playing a bit more and post what I come up with!

Garden Gnome
©2006-2009


Saturday, November 29, 2008

How to Make Your Own Scrolling Blog Background

Every blogger wants his or her blog to stand out from the crowd. This means stepping away from the generic blog templates that get you started. A couple of weeks ago I was surfing blogs and noticed a few scrolling type blog designs made by The Cutest Blog on the Block. The many designs were indeed cute and placing the backgrounds on the blog involved only the of a simple script. Adding the background in this method meant you would not lose any of your sidebar information which was a real plus. However, I saw two immediate problems for me. First I wanted to create and use my own designs and second by using one of their designs the script pointed to their Photobucket Album which meant if they closed that album the background would immediately disappear. So I wanted control of where the background was. With all this in mind I set about making new backgrounds for my blogs with the exception of my cooking blog that is using one of their designs temporarily [now my own © design].

I'm always looking for ways to use Photoshop® so as soon as I saw their backgrounds, I knew I could easily make my own. Making your own scrolling background and customized headers are easily done using Photoshop®, Photoshop Elements® or Paint Shop Pro®. This technique can also be used to create custom made backgrounds and elements for digital scrapbooking. I'm going to give you the basics of what I did so you can see how easy it is along with the script needed to install the background in Blogger. Their instructions said you set your template to Minima but I got my backgrounds to work using Rounders 2.

Background

Note: This background is © Garden Gnome and is for illustration purposes only. Please do not copy.

The first thing I did was to determine the necessary sizes by opening one of their backgrounds. After that I was on my own. Note that creating the background uses layers so when saving save as .psd file for later modification and as a .jpg for using as the background.

Create a new image 1450 x 1100 pixels. This will be your main background. Fill this layer with white. Create a new layer. Fill this layer with a pattern of your choice from the pattern selector. In this case I used a basket weave pattern. Create a new layer and fill this layer with the colour of your choice. I used a red that I liked using the colour picker. When you decide on the colour you want write the colour code down so you can co-ordinate other elements on your background, header and blog. Adjust the opacity on this layer to get the effect you want. Create a new layer and click on gradient overlay. Draw the gradient from top to bottom and adjust the opacity to get the effect you like. Leave the image open and create a second image 795 x 1100 pixels. This will be the panel where your header, posts and sidebar appear. Fill this layer with the colour or pattern of your choice. In this case I chose white and adjusted the opacity to the desired effect. Save this image as a .psd file for further modification. Merge the layers then use the move tool and drag the image onto the maid background. Centre the panel. Add a drop shadow to the centre panel adjusting as desired. Using the line tool create a line 20 pixels wide spanning the entire length of the centre panel. Fill with desired colour. Bevel and emboss as desired. Duplicate this layer. Use the move tool to move the duplicated layer to the other side of the panel. At this point you can now add any further embellishments you desire using additional layers. I chose not to add any but if you check out my personal blog you can see how I added a ribbon I made and use that as a guideline for placement. Other embellishments such as flowers, buttons and etc. can be found on a lot of scrapbooking websites or you can make your own using the shape tool.

Very important: Save your file as a .psd for Photoshop® and Photoshop Elements® or as a .psp for Paint Shop Pro®. This will preserve the layers so you can later modify any layer you choose to create a new background. Save the file again as a .jpg for uploading to a photo hosting website. If using Photobucket, upload the image at the 1 meg setting.

To install your background, upload it to a photo hosting site such as Photobucket. Copy the url location. Paste the location into the following script and save. Open the layout tab of your blog in Blogger. In the top header section, click on add a gadget. Click on html/javascript. Copy and paste the script into the box. Click save then preview to see your new, custom made background then click save.

Here's the code you need to install the background on Blogger:


Header

Now that you have made a custom background you can make a custom header. This is also very easy to do. Create a new image 700 x 300 pixels. You can leave this transparent if you want to use the background colour of your blog. If left transparent, the final header should be saved as a .gif and uploaded to a photo hosting site then placed on your blog using the header tool on your layout and the url. This will preserve the transparency on Blogger. In this case I used the colour of my blog background that came from the lightest pantone of the red. To get to the pantone I put the colour code of the red into the colour selector then clicked custom to bring up pantone. The border was created using stoke with the red I wanted. Then I duplicated the layer and used the marquee tool to outline the inner section and deleted that on one layer. This created the red frame. Then I inversed the selection to work on the frame and used the bevel and emboss style to create the raised effect. To get the vellum effect I created a new layer and used the marquee tool to create a smaller rectangle. I filled that with white. Then I used a fuzzball brush to go around the edges and added a drop shadow. I used the font brush script to write the title of my blog then beveled and embossed it and added a light drop shadow. Save the file as either a .psd or .psp as well as .jpg.

To install the header: Go to layouts, page elements for your blog and click on header. Click on add picture from your computer or you can choose from url if you uploaded to a photo hosting website. Click on your header file .jpg. In a couple of seconds you should see your header. Under placement click instead of title and description then click save. Hit preview to see how your new blog header looks. The blog header background will still be present around the image. There are three ways of dealing with this. The first is the easiest by just leaving as is. The second method is to go into layout then html and expand widgets. Change the background colour as desired. The third method is to delete the header background

I hope you found this method useful for creating your own uniquely designed backgrounds and headers for your blogs. If you use this method please leave a comment with your url so I can see what you came up with.


Garden Gnome
©2006-2008


Tuesday, April 22, 2008

Personalized Greeting Cards

Personalized greeting cards, invitations or thank-you cards are so much nicer than store bought. You can customize the colours, layout, fonts and details. You can print the number you need instead of being tied into buying cards in packaged lots. Homemade greeting cards are considerably less expensive than store bought. There are several sites online for greeting card verses as well or personalize your cards further with your own message.

Due to severe weather conditions the baby shower I was hosting mid-March for our soon to be second grandbaby was cancelled at the last minute. March was such a fickle month and with the due date so close we had to wait to reschedule until after the baby was born. So I wanted a very special, custom made invitation for the welcome the baby shower. I decided to use Photoshop to create a personalized digital layout of the card using scrapbooking techniques then once printed use a corner punch to make the front a bit fancier.

Here's what I did in Photoshop CS2 (it should work similar in Paint Shop Pro):
Note: I worked on a quarter of an 8.5" x 11" sheet of paper size on the computer then put the components together so there are several steps involved.

This method makes use of layers. Each I did something on the card I worked on a new layer. Leaving the file as a .psd will allow you to modify as needed. When ready to print merge the layers into a new "save as" file in .jpg format.

Digital Card Front

Shown here is the card front without the baby's name and date of birth that I put in below the picture. Knowing the baby was a girl made my choice of colours easy.

  1. create a new transparent file size 4.25 inches x 5.5 inches
  2. open the image file you want to use on the front of the card
  3. drag the image onto the newly created transparent
  4. use Edit/Free Transform to get the resize boxes; click, hold and drag to get the image to the desired size; position as desired
  5. add a new layer then text above the image; use colour picker to pick a colour from the picture for the text
  6. repeat if adding a layer of text below the image
  7. if desired add layer effects to the text (I used drop shadow and outside glow for this effect
  8. save this file as a front.psd and a duplicate as a .jpg; when assembling the card you will be using the .jpg format.
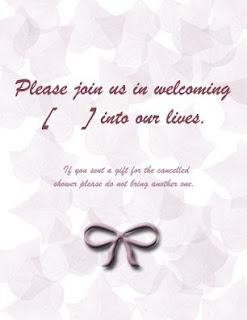
Inside Front

Some greeting cards will have a verse or message on the inside front of the card but others won't. I chose to use this space to add a message in reference to the cancelled baby shower. For privacy I have omitted the baby's name for posting on this blog on the inside front as well as all the details on the inside back but this will give you a good idea.

  1. create a new 4.25 inch by 5.5 inch transparent file
  2. create a new layer
  3. using the same font colour type in your text in the size and font design you want
  4. highlight the font
  5. go back to colour, click and choose custom then Pantone and go a shade or two darker
  6. adjust the text as desired
  7. create a new layer
  8. fill that layer with white
  9. drag the layer down between the first and second layers
  10. create a new layer
  11. drag that layer between the second and third layers
  12. choose a paint brush of your choice (I used ivy)
  13. dab the paint brush over the layer
  14. adjust the opacity to give a subtle effect (I used opacity 32%) - you now have a background
  15. create a new layer
  16. add embellishment (I used the custom shape tool to add a bow)
  17. add layer style if desired (I used beveling and drop shadow)
  18. merge the visible layers
  19. save as both a .psd file (editable) and a .jpg file (not editable)
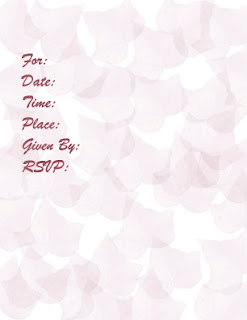
Inside Back

The inside back is made using identical steps as the inside front except you will be adding the details. This is where you would add the verse or message you want to convey. I've left off the details for this entry but this will give you a good idea of what I included on the inside back. Keep the font colour and style the same. An easy way to keep things consistent is to duplicate the inside front .psd file. On the duplicate with the text tool highlighted, click anywhere on the text. Delete this text then add the detail text you would like. Add any graphics by opening the desired graphic then clicking and dragging. Save as both a .psd and.jpg file.

When the inside back is complete you will have three .psd files and three .jpg files. The .psd files are kept for editing purposes so that the images can be changed as needed for future cards. Think of them as templates. The .jpg files have been flattened so the layers can no longer be edited. These are the files you will be working with to assemble the card.
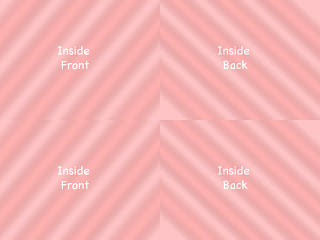
Generic Inside Layout

This is where the fun of assembling your card starts. Your card will be printed on two sides. The front picture will be print on one side, two to a sheet so you will end up with two cards per 8.5" x 11" sheet of ultra white card stock. Then you flip that printed side over and feed back through the printer to print the inside. When printed the cards, in this case two cards per sheet will be ready for cutting using a paper cutter and any extra textural embellishments.

I purposely made the inside layout pictured different from the card for illustration purposes.
  1. create a new image size 8.5" x 11"
  2. open your outside front
  3. click on the outside front image then with the move tool, drag onto the upper right of the new image
  4. repeat, dragging onto the lower left of the new image
You have now created the front of two cards. Save the image as a .jpg This will be the file you print first.

  1. create a new image size 8.5" x 11"
  2. open your inside front and back files
  3. click on the inside front .jpg then using the move tool drag a copy to the top left
  4. repeat dragging a copy to the bottom left
  5. click on the inside back .jpg and use the move tool to drag a copy to the top right then bottom right.
You have now created the inside of the two cards. It will be resemble the generic image above. Save the image as a .jpg You are now ready to print your card. Print the front on inexpensive paper with printer set to proof to conserve ink, then feed the paper back in to print the inside of the card on the reverse side. Make any adjustments necessary for printing. When you are satisfied with the way the cards print, change the print mode to quality print and proceed with printing on the final desired paper.
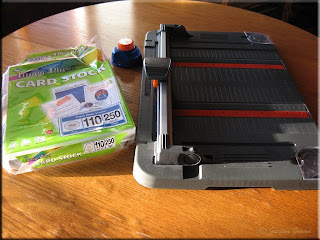
Tools Needed

The paper I recommend for printing cards is Image Plus+ Card Stock. This is 110 lb weight and a bright white that makes colours pop. It is also acid free so cards can be later put into scrapbooks. But don't limit yourself to just card stock. While card stock is the most economical there are so many great papers out there giving you endless possibilities for cardmaking.

A rotary cutting system is a must for scrapbooking and card making. I highly recommend Fiskars® 12" Home/Office Rotary Paper Trimmer. It comes with three cutting blades and a scoring blade. A scoring blade gives a nice, clean fold for making cards. The trimmer is designed to give clean, straight cuts. The grid markings help to ensure you cut the size you want.

Finally any scrapper will tell you punches are one of their most used tools. A punch can be used to create shaped cutouts. The cutouts can be used as punchies to decorate other layouts. A piece of scrap paper can be punched and used as a stencil as well so punches are quite handy. I used a 3 in 1 Corner Punch (Lace) for this project.

To score the card, lay the finished inside facing upwards, long side oriented with the long side of the trimmer. Score along the middle at 4.25 inches. This will allow the card to fold cleanly towards the inside. To cut the card, turn the inside facing upwards so the short side is facing the long side of the trimmer. Adjust to cut at the 5.5 inch mark. You now have two cards measuring 4.25" x 5.5" ready to fold and embellish with paper punching or any desired embellishment you want.
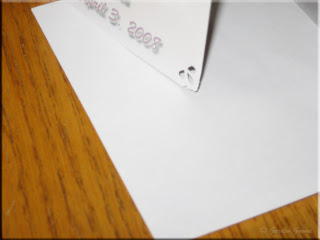
Corner Detail & Envelope

I used the punch on the two outer corners of the card. When closed the colour of the inside of the card peaks through. This is just a nice, subtle way of adding detail and making the card look expensive when in fact it wasn't.

Once the card is made you need an envelope. Here you have the choice of making your own or buying them. I used white invitation envelopes (45727) sized 4⅜" x 5¾" from Staples. There are coloured invitation envelopes in the same size available. The envelopes can be customized as well by adding a liner, using the printer for digital embellishments or using scrapbooking techniques. So have fun with the envelopes as well.

Garden Gnome
© 2007


Friday, April 13, 2007

I've had Adobe® Photoshop® on my computer for quite sometime but up until a few months ago had only used it for resizing images. Talk about not using a program to it's potential. It all started because I wanted to make a custom made blinkie. Then working with the program I quickly saw this had a lot more potential for scrapbooking than the two programs I had. I like that I can customize as I want through my eyes and how the image makes me feel, not to someone else's standard. Over the past few months I've learned a lot about Photoshop® especially through a lot of online tutorials. I would like to make a special mention for Obsidian Dawn. I'm enjoying her brushes and tutorials immensely.

Since our first grandbaby was born in late December, the pictures and video clips have been going back and forth. What I started was a digital scrapbook of her first year but I knew I wanted full control of how it came out. She along with each set of grandparents and her parents will have a printed and CD copy. I plan to make CD copies for anyone who asks. But I want the scrapbook to look like a traditional paper scrapbook when printed. This is where Photoshop
® really will be an asset. The main rule for printing these types of pages is to use a high quality, brilliant white photo paper. I find for scrapbooking that matt works nicely when printing a full layout. This will cost a bit more than regular paper but the detail and colours are crisper. The amount you will save in not having to buy embellishments like ribbon, vellum, brads, stickers and ect. will more than cover the cost for the paper.

I made the image for this post using
Photoshop®, layers and different brushes in about 10 minutes. I started with layers right off the bat while learning how to do simple animations. Then I started playing with layers using digital photographs I take. Once I got the hang of working with layers, I found there were so many things I could do. I use layers for most of the images on my blogs now. So if you have Photoshop® and haven't explored the possibilities, check out some of the online resources in the links section. You will be amazed at what this program is capable of doing!

Have a great day,

Garden Gnome
© 2007


Tuesday, February 20, 2007

Photo Enhancement

There are many reasons for enhancing your photos. I have been learning how to better use the features in Adobe Photoshop CS Version 8.0. This is a lovely program with a lot of function that I was basically using to simply resize images. Instead of taking the time to learn more about what this program could do, I simply bought a couple of scrapbooking programs when I decided to start into digital scrapbooking. This was not the frugal way to do things when I already had a program that could do all these things and so much more. For my genealogy images, I simply uploaded them to the program without any type of enhancement. Well, suffice to say I am now learning the different features thanks to a couple of very nice Yahoo groups and a lot of tutorials.

On Tap

I've been playing with animation, filters, and layers. So today I tried out a couple of ways to make picture frames. This is the result of my first attempt.

This is a photo taken at a restaurant we enjoy. I always have my camera with me when away from home and within easy reach at home. I take a lot of pictures! Digital just makes it so easy. My current digital camera is a Canon PowerShot A450, 6.0 mega pixel and 4x optical zoom. Holding the zoom control it will go up to 16x but the graininess increases. This only seems to be noticeable on certain photographs though. Back to the photo, I liked the looks of the copper beer tap so snapped a photo of it.

I did something wrong on this tutorial but am not sure what. The only thing I can figure is I merged to many layers. That's easy to do since I'm rather new at using layers. My end result was an 8" x 10" supposed to be frame with no way to remove the background leaving only the frame so I decided to improvise. I opened the photo, did a cut and past, then centred it onto the frame image, added my name then merged the layers. I thought the results weren't too bad and that the colour of the resulting frame accents the photo is rather a fluke too. The frame consists of layers with filters creating texture and beveling.

Ice on Water

Well onto the second tutorial. I used a picture taken by me a couple of days ago. We live on the water so I take a lot of water shots. This one was so much easier to follow. I added my name to the photo and merged the layers. Then I duplicated that layer and added a gaussian blur filter, layer set to multiply and adjusted the opacity. After merging the layers, I created a new layer, dragged that to the bottom and created the first matt by changing the canvas size by .2. The next layer was created the same way with canvas size at .5 and the third at .8. Each matt was filled using a colour picked from the picture using the eye dropper tool then filled with the paintbucket tool. Overall I like the effect. I think it gives a more formal look that will work nicely for enhancing my genealogy photos.

Ice on Water with Filters

This is the same picture as above but slightly cropped with no frame and more filters added. I thought it would be neat to try and get that true sparkly look of the ice. The sun was very bright when this picture was taken so I started playing to try and capture that feeling.

I added the name, merged the layers then did the gaussian adjustment. Now, the gaussian adjustment was another tutorial that works with layers. Depending on how it is used, it deepens the colours and just softly softens the edges a bit. It seems to work better on some photos than others. Once the gaussian adjustment I used a texture filter set to patchwork. That looked rather interesting but it still did not have the sparkle I wanted. An artistic filter set to plastic wrap seemed to fit best and this was the end result. I can't wait to use this in scrapbooking!

Golden Glow

This was something I was just playing around with after working with frames. The picture was taken during sunset the same day the water picture above was taken. The sky was absolutely gorgeous!

I discovered that the marquee gave other shapes than rectangular so decided to test it out. After several attempts and realizing that once it's make if you use the move tool, it moves leaving a transparent background. So I hit copy then new and then paste. Well that looked pretty good but I thought some type of frame would be nice except I didn't know how to do that so I beveled that layer instead. Then I added my name and merged. I liked the effects and think this will be perfect for both scrapbooking and genealogy.

Hopefully this gives you a few ideas of what is possible as far as photo enhancement. I am definitely in the learning stages. It is amazing some of the effects you can get. I encourage you to try some of these techniques. There are a lot of resources to help you learn them. The possibilities are endless and I can't wait to use them in my scrapbooking and genealogy projects!

Enjoy!

Garden Gnome
© 2007