What does a Garden Gnome do when she is not gardening, in the kitchen or doing genealogy? Well the answer might just surprise you so read the entries to find out more. This blog focuses on everything we do to make our house a home. There will be a strong emphasis on home energy efficiency and do-it-yourself (DIY) projects. At the same time there will also be crafts, knitting and crocheting projects along with any other little tips we do to create that down to earth, I want to be here home. Please enjoy your visit :)


Showing posts with label knitting. Show all posts

Monday, March 5, 2012

Rainbow Neck Warmer

rainbow neck warmer knitting pattern

I have been making a lot of knitted wash cloths for our new home.  I am particularly fond of the eyelet edged wash cloth, an easy to carry project for my knitting and crochet projects when visiting, traveling or sitting in waiting rooms.  I was working on one of the wash cloths while we were visiting a friend and his young daughter for the afternoon.  She was mesmerized by the knitting needles as I worked while chatting.  She commented several times how much she loved the edging so I told her I had just the yarn for her so would make her a scarf.  The pattern I came up with keeps the eyelet edge.  The neck warmer was knit in Redheart worsted weight from my stash of yarn using a 6 oz skein.  The label was gone so I don't know the colour code or even if it is made anymore.  Any worsted weight yarn will work with this pattern.

Rainbow Neck Warmer
  • 4.5 mm (US 7) knitting needles
  • 6 oz worsted weight yarn
Cast on 4 stitches.
K 2 rows
*K2 YO K to end of row
repeat from * until there are 30 stitches on the needle
**K2 YO K2tog K to end of row
repeat from ** until piece measures 30" or desired length
***K1 K2tog YO K2 tog
repeat from *** until there are 4 stitches on the needle
K 2 rows
cast off

Garden Gnome
©2006-2012


Friday, October 29, 2010

Hubby's Slippers


The main living area of our house is below grade.  As a result the floors are cooler so slippers keep our feet warm and toasty.  Pictured are a pair of slippers I recently made for my husband.  This is my favourite slipper pattern.  I make several pairs of these in various sizes each year.  They are great for gift giving.  It has a shaped heel and is knit from the back of the heel to the toe.  The original pattern includes an optional pom pom as well as an optional cuff.  I use neither, leaving the slippers plain for the guys and a crochet bow for the gals.


Garden Gnome
©2006-2010


Wednesday, May 19, 2010

Kitchener Stitch to Finish a Sock

Learning new knit stitches and stitch patterns greatly expands the items you can knit.  Video tutorials are great for learning new knit stitches because the provide a good visual of the technique.  At some point I will be making my own video tutorials but for now I'm relying on those already made.  The following video shows how to do the Kitchener stitch aka grafting.  This stitch is used to finish socks and other items where grafting is needed.   Start with about 12 inches of yarn to close the stitches using the Kitchener stitch.  When you are finished closing the stitches, pull the end through to the inside of the sock.  Weave the end through several stitches and them trim the end.


Garden Gnome
©2006-2010


Saturday, May 8, 2010

Eyelet Edged Dishcloth

Last month I gave a very easy pattern for a knitted  simple plain edged dishcloth.  These are ever so easy for even a beginner knitter that you will want to work up several for gift giving.  Knitted dishcloths do not have to be plain jane though.  Adding a simple eyelet stitch to a dishcloth can make it look fancy while still being utilitarian.  This is one of my favourite knitted dishcloths.

eyelet edged dishcloth
Pictured are a few eyelet edged dishcloths I recently made waiting for the finishing touch of weaving the ends in.  I mentioned in my previous dishcloth post that I like using varigated yarns for utilitarian projects because they add a bit of interest.  While the varigated cotton does work up nicely for this pattern I thing the eyelets are a bit more prominent using a plain colour cotton.  Either way it is a very easy pattern that many beginner knitters will be able to knit.  This pattern introduces the eyelet stitch which simply is a yarn over (YO).  To do this stitch, knit as normal then when YO take the yarn from the back of your work and place it over your needle then to the back and knit the next stitch.  This results in an increased stitch that when knit on the reverse gives an eyelet.  In most projects the YO is paired with knit 2 together (K2tog) to keep stitch number the same while forming some type of pattern with the placement of the eyelet stitches.


Eyelet Edged Dishcloth Pattern

I used Bernat® Handicrafter® cotton 4 ply worsted weight and 4.5 mm needles.

cast on 4 stitches
K 2 rows
K2, YO, K2
K2, YO, K3
*K2, YO, K to end of row*
repeat * until there are 50 stitches on your needle
**K1, K2tog, YO, K2tog, K to end of row**
repeat ** until 4 stitches on needle
K 2 rows
cast off.


Saturday, May 1, 2010

Proof Positive That Less is More

We all know that inflation has increased the price of practically everything but often we are oblivious as to how much.  As long as earnings keep up with our cost of living it is easy to overlook the rising costs of consumer products and services especially when the prices increase in small amounts each time.  For example you likely don't notice when the price of an item increases from $8.97 to $8.99 but you would notice if the same item increased to $12.99.  Another things consumers fail to notice is when the size of a product decreases slightly but they will notice if the decrease is dramatic.

I have been working from my yarn stash to work up a few dishcloths for gift giving.  A few days ago I asked my husband to pick up a skein of Bernat® Handicrafter® cotton 4 ply worsted weight yarn in no specific colour.  He brought me two in varigated colours at $8.27 per skein.  It's been a few years since I've had to buy cotton yarn but I think the last skein I paid somewhere around $6.99 for.  Pictured is the lable from the old yarn on top and the new yarn on the bottom.  Not only did is the new yarn more expensive there is 2 oz (60 gr) less of it!  To add a bit of further insult the old yarn label included 5 dishcloth patterns while the new yarn label only has 3 dishcloth patterns.  So all around I'm getting less product for more money and the labels prove it!

Garden Gnome
©2006-2010


Tuesday, April 27, 2010

Simple Plain Edge Dish Cloth

Knitted dish cloths are quite easy to make, perfect for your own use or gift giving.  They range from very simple to complex patterns but most work up quite quickly.  They are an ideal take-along project when traveling do to the size.    Today's post will give the pattern for working up a simple, plain edge dish cloth, one of my favourite patterns  

The dishcloth is worked on the bias from corner to corner in simple garter stitch.  Shaping is done via a series on increases and decreases on the edge stitches.  The resulting square has a nicely finished edge on all four sides. 

Pictured is the dishcloth in progress knit in Bernat Handicrafter® Cotton.  This is a 100% cotton perfect for dishcloths.  I like to use varigated colours when making utilitarian household items just because I like the effect so you will see varigated colours in things like slippers, afghans, and dishcloths that I make.  I started at the bottom corner then shaped to the size I wanted by increasing.  At the point where I start decreasing 2 corners are formed then continuing decreasing will form the final 2 sides of the dish cloth.  The cast off will form the fourth corner. 

Note that I use a safety pin to mark the front side of my work.  In this pattern the increases and decreases are done on the front side only.  Unless I'm working on a complicated pattern I seldom watch my work as I'm knitting.  The safety pin is a textural way of knowing which side of the piece I'm on. 

Pictured is the completed dishcloth with only the ends to be sewn in and trimmed.  On the lower left is the starting point (first corner) of the dishcloth and the fourth corner is in the upper right. The shaping give just a hit of a border.

Simple Plain Edge Dish Cloth Pattern

cast on  3 stitches
*row 1 - K into front of first stitch, K into back of first stitch (one increase completed), K to last stitch, K into front of first stitch, K into back of last stitch
row 2 - K*
repeat from * to * until there are 47 stitches on the needle
**next row - K2tog, knit to last 2 stitches, K2tog
next row - K**
repeat from ** to ** until there are 3 stitches
bind off


Garden Gnome
©2006-2010


Sunday, April 25, 2010

Knitting a Mitered Square

I've been knitting and crocheting since I was knee high to a grasshopper.  Like many who enjoy knitting I have a yarn stash that seems to just keep growing.  This happens because if I see a yarn I like I will buy enough to make something from it and there are always left-over bits and pieces of yarns, not quite enough for a large project but enough that can be worked into other projects.  Two of my favourite ways to use up left-over yarn is slippers and granny square afghans.

Mitered squares are extremely easy to knit.  If knit from cotton yarn they can be used as is for wash cloths.  However, they can be joined together to form an afghan.  The centre decrease forms a seam that can be oriented to create a pattern for the final afghan.  Here is a video of the basics.  At the end of the video there are pictures of a mitered square I made and the pattern for you.


Now that you've watched the video you have a good idea of how to proceed with this project.  The knitted mitered square is done in garter stitch using only one other stitch.  This is an excellent beginning project for someone just learning to knit.

The basic mitered square starts with a set number of stitches equal to 2 sides of the resulting square plus the 3 shaping stitches.  While it is not immediately apparent to a beginner, the piece is being knit from corner to corner in a diamond shape fashion with the 2 bottom edges of the diamond formed by the cast on stitches (1) and the 2 top edges of the diamond formed as the rows are knit.  Once a few rows are knit a peak becomes apparent (2) that when divided onto 2 needles the shape of the corner becomes clearer (3).  The final piece is square with a characteristic diagonal line from the decrease stitches (4).  I used size 4.5 mm needles and 4 ply cotton weight yar.

Mitered Square Pattern

Cast on 63 stitches.
1. K 30, S 1, K2tog, SYO, K 30
2. K
3. K 29, S1, K2tog, SYO, K 29
4. K
5. K 28, S1, K2tog, SYO, K 28
6. K
Continue in this fashion decreasing 2 stitches total on the right side (odd rows) and knitting the even rows until 3 stitches are left.
S1, K2tog, SYO, cut yarn and draw tail up though remaining stitch.

Garden Gnome
©2006-2010


Sunday, January 3, 2010

A Christmas Gift


James C. Brett
Marble
100% Acrylic

I learned to knit by hand when I was knee high to a grasshopper! It wasn't long after that I learned to crochet as well. A few years ago I bought my first knitting machine that was quickly followed by a second one. It is quite common for me to have several knitting and crocheting projects in various stages of completion on the go at any given time. Anyone who knits or crochets can attest to the large stash of various yarns they tend to accumulate. I'm no different in this respect.

What is better than buying yarn? A gift of yarn is even better as it is a thoughtful and useful gift that is sure to bring enjoyment while working with the yarn and later while wearing the garment. I was gifted with 4 skeins of James C. Brett Marble ( colour: MT9 Berries) 100% acrylic yarn that is machine washable and dryable. This gorgeous, super soft, double knitting weight yarn is made in Turkey. The yarn is a marl meaning it has two plies of different shades spun together. Unlike a normal varigated yarn, each of the plies change colour along their length, so this yarn knits into bands of colour to a very unique effect.

Each skein is 100 g, 220 m/240 yds so according this conversion chart there is approximately 75-100 yds per oz in double knit weight yarn so I have a total of about 9.6 - 12 oz of yarn to work with. According to weight I have 14 oz of yarn to work with. Using both the weight and length will help me decide what I want to make with the yarn. Now I need to find a pattern that will show off this gorgeous yarn.

To the gift givers of this beautiful yarn, thank-you so very much! I can't wait to see what it works up like :)

Garden Gnome
©2006-2009


Saturday, June 20, 2009

Feather and Fan Afghan

feather and fan afghan
A lovely way to spend a cold, blustery afternoon or evening is to snuggle up in a warm afghan with a good book. Over the years I have made several afghans in both knit and crochet. I posted earlier about a granny square afghan I made to resemble an Amish quilt (more here). As far as preferring knit over crochet or visa versa, I really don't have a preference even though the family favourite afghan requested is the crochet zig zag. Crocheted afghans work up quicker than knit ones but unlike crochet, for the most part I don't have to watch my work as I knit. Very pretty yet practical afghans can easily be made using only a few basic stitches. Pictured is the Feather and Fan afghan I made using Bernat® Soft BouclĂ© knit on circular knitting needles size 8.00 mm. Circular needles are better for large pieces like afghans than straight needles for the extra width.

The Feather and Fan stitch is formed by increasing using the basic yarn forward (yfwd) and the decrease is made by knitting two stitches together (k2tog). The other stitch used is the purl stitch. The result is a lacy pattern. There are many variations to the Feather and Fan stitch based on multiples of 18 plus 2 which forms a single stitch edging on row 3. An edging can be added by changing the 2 stitches to desired number (eg. 8) and knitting the first and last 8 or desired number stitches of the purl row. If adding a wider border knit 8 rows at the beginning and end of the afghan. The afghan I made does not have a border or either end.


Feather and Fan Stitch

Cast on any amount (divisible by 18) plus any amount for border. I used 200 stitches, tension 14½ st and 16 rows to 4 in. (10 cm) measured over pattern. Border stitches are knit on both sides all rows.

Row 1: Knit to end of row
Row 2: Purl to end of row
Row 3: K1, *[K2tog] 3 times, [yfwd, K1] 6 times, [K2tog] 3 times, K1, repeat from * to last stitch, K1
Row 4: Knit to end of row

Repeat these 4 rows for pattern until piece measures approximately 56 in (142 cm) from beginning or until desired length ending with Row 4. Cast off.


Garden Gnome
©2006-2009


Wednesday, December 17, 2008

Slippers Revisited


Slippers in Progress

Christmas is drawing near but there is still time to knit up a pair or two of slippers. Pictured are one pair ready to be sewed up and another pair just started. The pattern can be found here. These slippers are quick and inexpensive to knit. An experienced knitter will be able to do a adult pair of these in two days or less. A less experienced knitter will still have time to make at least one pair of adult slippers. Total cost for each pair of slippers should be about $3 if you are buying new yarn but this is a really good project for using up some of the yarn stash that ever knitter has.

Garden Gnome
©2006-2008


Thursday, February 28, 2008

My Knitting Machines

It may surprise some but we still are not fully unpacked from the move last year. There seems little point in unpacking some things while we are renovating. Still I've spent the past few days unpacking boxes to get rid of clutter as we came to a bit of a snag with the kitchen. What started the decluttering was looking for parts for my one knitting machine that should have been in the case but were some how packed separately. I've managed to empty several boxes in the process with a good portion donated or tossed. In hindsight it would have been nice to do this kind of clean sweep before moving but we didn't know if some of the things would be needed here. I found most of the parts for the Empisal except the clamps to hold the machine in place. Missing for the Silver Reed are two of the three clamps. However, still missing and needed before I can do any actual knitting are the yarn winder, combs, weights and spare needles.


On the bright side both machines are set up in the laundry room. I also set up my sewing machine in there too. The laundry room is quite large with two nice banks of counters (1,2) and lots of storage. (1,2,4). It lies between the family room and furnace room with a pass through looking into the family room (2) so I will be able to work on the knitting machines while enjoying the view or watching television.

The gauge of a knitting machine is important because that determines what types of yars can be used. The Empisal Knitmaster 305 Automatic Deluxe is a standard gauge (4.55 mm) manual machine that has the ability to do fancy stitches automatically based on the settings. A fingering and sports weight yarn can be used. To use a heavier yarn every other needle is used. This is the second machine I bought after I discovered integrating hand knitting with machine knitting. This machine has a 200 needle metal bed (2) and carrying case (3) that protects the machine while travelling or during storage. In the fully set-up position the machine tilts higher from the front of the bed to the back. While it is an older machine it works well. I'm still learning to use this machine because at our old house it wasn't possible to have the machine set up all the time.


The sewing machine (Brother Festival 461) has found a home on the wall adjacent to the counters. The dark door (4) leads to the family room while the other dark door (5) leads to the furnace room. The white doors are half of the four floor to ceiling storage cabinets.

This much charished flatbed sewing machine was given to me on my thirteenth birthday. Learning how to properly maintain the sewing machine was stressed right from day one. That sage advice has paid for itself over and over and has resulted in a dependable machine that is a delight to use! It is in a hinged console (4) that opens for sewing (5) and doubles as a table for the Silver Reed LK 140.

The Silver Reed is the first knitting machine I bought for a ridiculously low price at a yard sale. It is a mid-gauge (6.5 mm) machine with a 140 needle plastic bed capable of knitting sport weight, 4 ply and worsted weight yarns. The bed needs firm support when in use due to the possibility of slight flexing. There is no case so I cover the machine with a towel to keep dust out when not in use. In comparison to the Knitmaster the Silver Reed looks like it would not perform as well but trust me, it does a lovely job of knitting.


I have to admit to being a knitter and have been one since being knee high to a grasshopper. A few years ago I bought a knitting machine at a yard sale and decided to teach myself machine knitting. There has been a long learning curve but I'm making progress. True to form, I jumped in with both feet.

After making several swatches to get the feel of the machine it was time to try something more challenging. My first project (9) was a short sleeved sweater with eyelet ribbing. The pattern was converted from a hand knit pattern for the body and sleeves. The eyelet ribbing was my idea of adding detail. The ribbing for the sweater was done by hand then transferred to the Silver Reed to knit the body. The sweater was knit in Red Heart TLC Baby 3 ply. It has held up to multiple washings over the past few years. A second sweater (not shown) but long sleeve with extra wide ribbing done in Red Heart worsted 4 ply also converted from a hand knit pattern was the next project. A work-in-progress started just before we found out we were moving is a similar sweater a different colour (7,8) of the same yarn.

Watch for more hand and machine knit projects in future entries.

Garden Gnome
© 2007


Monday, December 11, 2006

Family Slippers


Girl's Slippers

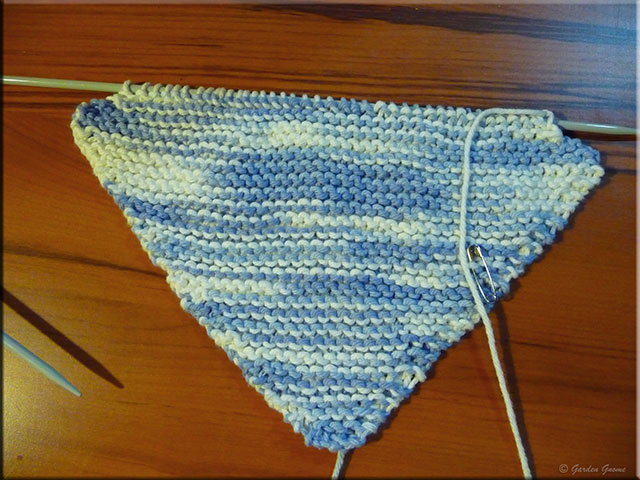
Homemade slippers always are a treat and the perfect way to share your love! This quick to knit slipper is my family's favourite and in our Christmas tradition every member of our immediate family gets a new pair under the tree. I use Red Heart® Super Saver worsted weight yarn. The slipper is knit from the heel to the toe using two strands of yarn. I love the effect of using a varigated yarn combined with a plain yarn. While the original pattern below gives instructions for finishing with pom poms or cuffs, I don't. For the girls, I crochet a lace about 12" long using the two strands of yarn leaving the ends unfinished. One end is threaded into a large eyed needle then pulled through the top of the front seam. The ends are worked in and the lace is tied into a bow. For the guys, I usually leave them plain unless I know someone likes the cuffs.

Enjoy!

Garden Gnome
__________

Family Slippers
Source: unknown but more than likely on a yarn wrapper at one time years ago

Materials:
Such quick and easy knitting produces gifts of real please when you are sure to use Canadianda Suprewash Wool or Canadiana Sayelle for these slippers designed in three sizes. You will nee:- 4(50 g) balls for men's, 3 balls for ladies' and children's size. Small quantity Contrasting Clour if desired. Two No.7 (41/2 mm), (U.S. 7) knitting needles.

The instructions are written for Men's size (M). Any changes necessary for Ladies' (L) and 'Children's (C) sizes are written in brackets thus: ( ).

With double wool and beginning at back of heel, cast on 2 sts.
lst: row: Knit.
2nd. row: Inc. 1. st. in 1st. st. K1.
**3rd and 4th rows: Knit.
5th row: Inc.1. st. in 1st. st. Knit to end ofrow.**
Repeat from ** to ** to 8 sts. on needle, noting that, as there are 2 rows even between increase rows, the increased sts. will alternate D'om one side to the other 0f the triangle thus formed. Continue repeating from ** to ** to 14 sts. on needle. (L- 12 sts.) (C-10 sts.).
Next row: Cast on 13 sts. (L-ll sts.) (C-9 sts.) for side of slipper. Knit these side sts. PI. Knit to last st. PI. Cast on 13 sts. (L-11 sts) (C-9 sts.) for other side. 40 sts. on needle. (L-34 sts.) (C-28 sts.)

Proceed:-
1st row: Knit
2nd row: K13. PI. K12. PI. K13.(L-K11. PI. K10. PI. K11) (C-K9. PI. K8. PI. K9).
Repeat these 2 rows about 20 times (L-17 times) ( C-14 times) more, or until work will stretch from back of heel forward on foot to joint of big toe, ending with 2nd row.
Next row: K2. (PI. K1.) 6 times. K13. (PI. K1.) 6 times K1. (L-K2. (PI. K1.) 5 times. K11. (P1.K1.) 5 times. K1.) (C-K2. (PI. KL) 4 times. K9. (PI. K1.) 4 times. K1.)
Next row: (K1. PI.) 7 times. K12. (PI. K1.) 7 times (L-(K1. PI.) 6 times. K10. (PI. K1.) 6 times.) (C-(K1. PI.) 5 times. K8. (PI. K1.) 5 times.)
Repeat these 2 rows 9 times (L-7 times) (C-5 times) more. Next row: K2tog. across row. Purl 1 row.
Next row: K2tog. across row. Break wool. Thread end through remaining sts. Draw up and fasten securely.

To make cuff: With single wool and working along one side of slipper, pick up and knit about 32 sts. (L-28 sts.) (C-24 sts.) by picking up and knitting 3 sts. for every 4 rows (2 ridges). Work 9 rows (L-8 rows) (C-7 rows) in (K1. PI.) ribbing. Cast offloosely in ribbing. Work ribbed border on other side to correspond.

Pompom Style: Omit ribbed cuffs and make a large size pompom. Sew to front.

To make-up: Sew side edges of back triangle to cast-on sts. of sides and then edges of cuff. Sew ribbing at toe of slipper then edges of cuff. Turn cuff over and tack down at front and bac.k