What does a Garden Gnome do when she is not gardening, in the kitchen or doing genealogy? Well the answer might just surprise you so read the entries to find out more. This blog focuses on everything we do to make our house a home. There will be a strong emphasis on home energy efficiency and do-it-yourself (DIY) projects. At the same time there will also be crafts, knitting and crocheting projects along with any other little tips we do to create that down to earth, I want to be here home. Please enjoy your visit :)


Showing posts with label major appliances. Show all posts

Sunday, July 18, 2010

The Dishwasher Fallacy

I recently reported on a newly purchased piece of Nami coated bakeware that really looks promising.  It was a spur of the moment purchase so I did not do any research on this silicone based coated software. When I did the only complaint I found was the bakeware was not dishwasher safe.  I honestly don't understand this kind of complaint.  The bakeware is designed to be non-stick so by default should take minimal washing to clean-up.  It doesn't need to be washed in the dishwasher!  In fact in my test runs with this particular bakeware it doesn't even need soaking but rather just a simple wash that would take less than 2 minutes.  I have all kinds of non-stick bakeware, non-coated bakeware, pot and pans, baking utensils and a wide range of entertainment and kitchen ware that never sees the inside of a dishwasher.  My prep knives are always hand washed as well.  So the only complaint agaists a piece of non-stict bakeware is it isn't dishwasher safe?

Let's think about this.  I've had a dishwasher since the kids were quite small and now they are adults with kids of their own.  I still have a dishwasher.  Over the years I have heard of people using their dishwasher for washing ball caps and even cooking food.  I recently posted how  jar labels can gunk up your dishwasher and yet everyone has this misplaced fallacy that everything must be dishwasher safe.  I'm sorry but I don't buy that.  Certain kitchen items are simply meant to be hand washed.  It takes very little effort to load the dishwasher then wash up the remaining items that should not go into the dishwasher.  Don't fall into the dishwasher fallacy that everything thas to be dishwasher safe.  It doesn't and despite that the item can function quite nicely in the kitchen. 

Garden Gnome
©2006-2010


Saturday, July 10, 2010

Blocked Dryer Vent

blocked dryer vent
Blocked Dryer Vent
July 3, 2010

Well before Hydro One announced they were moving to a Time of Use (TOU) pricing for electricity rates my preferred time to do laundry was in the evening or on the weekends.  This just worked into our schedules nicely and especially when the kids were younger ensured all the dirty clothes from the day ended up in the wash when I was doing it.  Even with my high energy efficient washer and dryer I still prefer to do laundry in the evening.  It's convenient because I can fold clothes curing commercials.  To go along with our HE washer and dryer we installed a Braun Eco-Vent in November of 2008.  Up until this point we have had no problems with the vent.

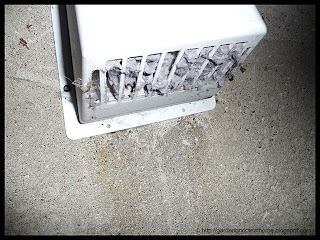
A few nights ago I ran a load of laundry as normal but noticed that the clothes failed to dry in the required amount of time.  Upon further investigation I discovered the outside portion of the vent was clogged.  This is the first time the vent has clogged on us.  I'm very careful to make sure that the dryer lint trap is cleaned after every use so this has become quite the mystery.  The only thing I can think of is we had quite a wet spring and recently experienced a week long heat wave with high humidity levels.  Combined with hot, wet air coming from the vent itself this resulted in a prolonged wet surface for lint to become clogged.  It's the only thing I can think of that would have caused a problem given that after 19 months the vent suddenly became clogged yet we had experienced no problems prior to that.

Despite being after 11 PM and needing a flashlight I quickly unclogged the vent which given the design is not quite as easy as it sounds.  I ended up using a serrated steak knife to pull the lint from the vent cover as the grate does not come off.  One tug was all it took to feel hot air blowing from the vent and that only cleared one opening.  I continued clearing all of the openings and checked the ball valve to be sure it was operating properly.  Once this was done the clothes were dried within minutes.  Now I know this is a potential problem since a blocked vent especially for a gas dryer can cause carbon monoxide to get into the house as well as creating a fire hazard, I will be checking the vent on a more regular basis.  To be on the safe side my husband removed the hose to be sure there was no lint build-up.  Thankfully the problem seems to have been vent related only but it certainly is something to keep an eye on. 

Garden Gnome
©2006-2010


Monday, July 5, 2010

Cleaning a Dishwasher

The average home cook will run the dishwasher at least 5 times per week.  If you think about it most dishwashers use water, detergent and rinse agent so why would they need to be cleaned?  Most dishwashers have some type of filtering system.  These filters need to be cleaned from time to time.  Water deposits can build up in dishwashers reducing their cleaning potential.  This is especially problematic for those with hard water.  If the inside of the dishwasher is not stainless steel there may be staining from some foods as well.  All in all the inside of the dishwasher does require regular cleaning.  What is the best way to clean the inside of a dishwasher?

  • filters - Remove all filters and clean them under a spray nozzle or running water until they are clean.  Check where the filters go to be sure the area is clean before replacing the filters.
  • blockages -  Certain things like labels on jars will gum up and blog the holes of the dishwasher sprayer arms.  Manually remove any blockages.  In future do not put any jars with labels still on them into the dishwasher.  Don't put thing in your dishwasher that don't belong there and that includes things like ball caps and aluminum foil products as fiber from cloth as well as aluminum breaking down can cause blockages and/or discolourations. 
  • deposits - Hard water deposits can clog water lines, sprayer arms and leave spotting in the dishwasher.  Clear the deposits by using a package of lemon Kool-Aid or 2 tbsp citric acid or 1 c white vinegar in the dishwasher then run a full cycle to clean out the deposits.  If your water is hard and you don't have a water softener then do this cleaning at least once a month.
  • stains - Certain foods especially tomato based foods will stain the interior of plastic lined dishwashers.  The immediate reaction is to use bleach to get rid of the stains.  Do not use chlorine bleach in your dishwasher!  Bleach will damage rubber valves in the dishwasher causing more problems and repairs.  Bleach can cause the gasket around the door that prevents water from leaking out to deteriorate.  Stains can be removed using citric acid and they will naturally diminish over a few dishwasher cycles so just leave them alone.  A Mr. Clean Magic eraser will help manually remove stains from the dishwasher as well.
Garden Gnome
©2006-2010


Sunday, July 4, 2010

The Dishwasher Detergent Dilemna

Shortly after moving here we installed a Bosch dishwasher.  The drying action of this dishwasher demands a rinse agent so for awhile that had me scrambling to find a low cost rinse agent but I finally found one.  Finding a good dishwasher detergent has been a horse of another colour.  We live in a an area where high humidity is common during the summer months.  Powdered detergent has the problem of clumping under humid conditions.  The dishwasher tabs have the ecological problem of being the highest in phosphate concentration and while they do an excellent job of cleaning the dishes, they leave a stringy plastic residue in the dishwasher.  The eco-friendly dishwasher tabs did not clean the dishes as well and they still left that residue.  The off brand gel dishwasher detergent was cheaper but ended up leaving some of the dishes dirty on a fairly regular basis.  So I'm back to looking for a dishwasher detergent that works.

Finish dishwasher detergent
I decided to pick up a bottle of Finish® dishwasher detergent when doing our recent grocery shopping.  A 1.6L bottle cost $3.49 so as dishwasher detergent goes the price was quite good.  What I did not notice when I bought this dishwasher detergent is it is phosphate free!  Now this is excellent and how I missed that little detail is beyond me because that is the kind of thing I always look for.  So here is a product that is not only inexpensive but also eco-friendly.  This dishwasher detergent is alco recommended by the leading dishwasher brands including Bosch.  I've used it twice now and so far I really like the performance but I've learned from past experience that a dishwasher detergent can perform nicely for a few washes then for some reason fails to perform properly.  I'm not sure why this happens only that it does happen.  At any rate so far this dishwasher detergent does look promising so I am keeping my fingers crossed.  Once I've gone through the entire bottle I'll report back as to the overall performance.

Garden Gnome
©2006-2010


Sunday, August 16, 2009

Hooking Up the Down Draft

We moved here in the spring of 2007. I have a down draft Jenn-Air® slide-in range with down draft system (more here). Hooking up the down draft in our previous house was as simple as attaching the down draft to the floor the going through the outside vinyl sided wall. It took minimal effort and about an hours worth of time. Here it was a different story. The house is earth bermed with the lower, main living level mainly below ground. That meant the vent had to go through a cement foundation wall that was about 12" thick and on the only on ground level. So the vent would span from the lowest level exiting on the ground level. This past weekend we decided to hook-up the down draft after securing the necessary equipment to do so. It was a DIY project.

down draft 1 to 4Our first step was work in the walk-in pantry that is below the only room on the ground level which is a large entrance. We marked out the area in the pantry where the vent would be going through then carefully dug around to make sure there were no wires (1). Next we used a 4" cement drill bit (2) and marked on the outside (3) where we would be drilling. We decided drilling from the outside in would be a lot less mess indoors and it would keep the noise for the most part out of the house.

The drill bit was attached (4) to the heavy duty drill then we started drilling. I'm telling you drilling through cement is very loud, dusty work and slow going work. You definitely need ear plugs and don't push the drill. Let the drill do the work for you without forcing it.

down draft 5 to 8The drill went through the cement foundation wall (5) in about 4 inch segments. This actually took a lot more time than expected as you just can't rush the drill. Once the drill hit that mark my husband wacked out the plug (7) with a hammer and huge screwdriver. We ended up with 3 full sections of plugs plus a small one. They looked like the big beads the Flinstones might have worn! Then he drilled further until he finally broke through (6). Breaking through really meant we were able to free the hole of any debris and not actually drilling completely through. Had we drilled completely through we would have had quite the mess in the pantry! At the end of Thursday night we were left with a nice hole in our foundation that spanned from the outside into the pantry. We stuffed the hole with an old towel and called it a night. My husband was sore and achy from running the drill and it was getting hot an humid out so we figured on finishing the hook-up over the weekend.

down draft 9 to 11We had all the materials ready for the hook-up that included rigid ducting, flexible ducting, elbows, a reducer, eco-friendly vent cover and metal duct tape (9). The first step was to install the eco-friendly vent cover on the exteriour (10) in the duct lined hole (11). This is a special Canadian made vent cover that is heavily insulated and saves energy (more here). I should mention when doing this type of DIY project go as energy efficient and eco-friendly as possible even if it costs a bit more. The vent cover is not only heavily insulated but during insulation a heavy application of caulking is applied assuring no air leaks later. The insulation and automatic valve closure via a specialized floating ball means there will be no transfer of cold air into the interiour of the house during the cold weather. The automatic valve also ensures that rodents and insects even if they somehow got through the vent grate system would not be able to get into the vent pipe itself.

down draft 12 to 15The down draft system of a Jenn-Air® is an extremely powerful venting system. The main blower that moves the air to the outdoors is attached to the floor (12) which means moving these types of stoves is not quite all that easy. The back of the down draft (13) is the main area of interest. A short flexible metal hose runs from the air intake to the down draft exhaust (not shown but basically in line with the plug in 12). A rigid duct pipe runs from the outside vent (14) to the down draft exhaust (15). Each bend is carefully sealed with metal duct tape to keep the velocity in the duct.

The actual opening of the Jenn-Air® down draft (13) is 5" but we used an adaptor to reduce that to 4" for two reasons. First we wanted to us the high efficiency vent cover by Braun which in our climate saves a lot of money and second by reducing the duct size we increased the velocity of air being expelled so increased the efficiency. Unlike a dryer vent there is no concern over lint build-up either so the ducting should stay relatively clean.

Once everything was hooked up we gave the down draft a test run. Oh my, it was wonderful! Surprisingly it was a lot quieter than the last installation and in fact is barely noticeable when turned on. The stove is now 100% fully functional. I am a very happy camper!

Garden Gnome
©2006-2009


Tuesday, July 24, 2007

Dishwasher Installation

Over the past eighteen months, we have replaced all of our major appliances. Energy efficiency and function have been the top deciding factors. In an earlier entry on Shopping for a Dishwasher I indicated we had narrowed down our choices for the new dishwasher. After considerable reseach we decided on the Bosch SHE44C02UC instead of the SHE44Co5UC. The installation was a planned DIY project with the help of our son-in-law who recently installed model SHE33C in their home.

Bosch SHE44C02UC

We chose the Bosch SHE44C02UC based on energy efficiency, features and lack of features. This is a tall tub model with stainless steel interior and nylon coated racks. A flow-through heater heats the water temperature to 161ºF. One of the first questions we have been asked is does the additional cost of a Bosch warrant it? We think so.

The dishwasher is reported to be one of the quietest in North America. Our kitchen opens onto the family room so noise level was a consideration. We were impressed with the condensation drying freature that hygienically dries the dishes without a heating element making it very energy efficiency. If using a gas hot water heater this model uses 315 kWh/year. We pay 5.5¢ per kWh but with the service charges the total price per kWh is about 11¢. This dishwasher will cost us approximately $25.58 per year to operate based on the Energy Star rating based on average usage without factoring in the cost of dishwashing detergent.

There were certain features we were not interested in. Similar dishwashers had a delay start and china setting. We had both of these features on the dishwasher at our old home and never used them.

The manufacturer's instructions indicate that a rinse agent must be used even if you use a detergent with a rinse agent included. They also specify using powdered detergent but tabs can be used if desired. Powdered detergent has less packaging so environmentally is friendlier plus it generally is more economical. This dishwasher uses less water as well so you need less detergent. The recommended amount is 1 tbsp (15 ml) for most loads to a mizimum of 3 tbsp (45 ml) if you have hard water. Liquid, gel or using too much detergent can damage dishware and cause etching in glassware.

The Old

The old dishwasher was an ancient KitchenAid with a rusted through tub (1). The dishwasher is in this condition due to neglect by the former owner of our home even though when it was installed it was a higher end unit. We had considerable debate where to install the dishwasher. We had the existing location (1) and the location where the built-in oven (2) was. Finally we decided to install in the existing location. In order to install the new dishwasher the old dishwasher had to be removed. We removed the built-in oven at the same time.

Removing the old dishwasher proved to be a bit more difficult that the built-in oven. My husband and son-in-law spent a good couple of hours removing this beast. It was heavy as well. The electricity to both areas had to be turned off. The electricity to the dishwasher needed to be hardwired while the electricity to the old oven was disconnected at the panel then removed. Once both appliances were removed, it was time for the cabinet prep.

Cabinet Prep

The dishwasher connections can be seen in the existing cabinet (1). The cabinet from the built-in oven (2) is being turned into either shelving or drawers but the drawer idea is winning out. We have a cabinet maker who will make matching fronts. There was a little sealing work to do but not a lot in the existing cabinet.

A closer look around the window and patio door areas show the depth and the paint colour. The wall area by the microwave is the only real wall in the kitchen to be painted. The new countertop is scheduled to be installed hopefully before Aug 6. The backsplash is being tiled with an aqua glass tile as soon as the countertop is installed. I feel like I'm on one of those shows with a time limit for renovations!

Installed

The dishwasher installed (1) looks wonderful! The guys ran into a problem with drainage since the old dishwasher drainage was practically blocked. That had to be removed and replaced. The almost 1 foot deep windowsill and patio door trim (3) has been painted with Behr Tide Pools to create a shadow effect to the walls painted Country Mist.

I would like to address the much advertised quietness of this machine. It is quite quiet but there is still some noise so don't expect not to hear anything. Still it is very, very quiet. All in all, we are very happy with our decision of buying this dishwasher and installing it ourselves.

Garden Gnome
© 2007


Wednesday, July 11, 2007

Kitchen Reno Phase 1 - Installing the Stove

Tomorrow will be the second week mark since we officially moved into this house. There are so many things we have done, some minor and some a little more work. I want to share all of them with you as we turn this house into our home. Today I'm going to focus on the work it took to get our JennAir slide-in stove installed.

Installing the stove was a DIY project that involved removing an existing range hood, built-in stovetop and cabinet. This project involved capping off existing wiring and running a new line from the main. If you are not familiar with electrical wiring how-tos, hire an electrician!

1. The ancient and likely never cleaned range hood was the first to go. It was hard wired so we shut the breaker off, removed the hood then taped off the wires using wire connectors on each wire then covering well with electrical tape. The covered wire remains showing because we haven't decided whether we want a light over the stove or not. If so, it can be wired here. If not, we will pull the wire through and disconnect it from the electric panel.

2. The built-in stove was direct wired as well so had to be disconnected before being removed. This thing was grotty to the max! At one time it was a higher end appliance but because of neglect became a cesspool for bacteria and grease. As you can see, the sink is very close to the stovetop making me question whether the contractors who obviously installed this expensive kitchen actually knew what they were doing! Talk about a poor kitchen design.

3. Removing the stovetop took a little more work than anticipated. We had hoped to save the lower cabinet for another location. That ended up being impossible due to the way the cabinet had been installed. These were obviously expensive cabinets that had been professionally installed. We salvaged the two drawer covers and doors but the cabinet unit and frame was damaged beyond salvaging. The countertop had to be cut as well. We were not concerned about precise cutting as the countertop will be replaced as soon as the sink is moved

4. With the cabinet removed it was time to secure the new stove receptacle. The new wire (220 volts) goes to the main with the box secured to the wall behind the stove. Older electric stove plugs didn't have the nice cover like we bought for this wiring job. We like the idea of the cover plate even though it is behind the stove.


Here you can see the new plug in a little more detail. Before putting the stove in place, the downdraft system had to be installed. It will not be connected to the stove or to the outside until after the new countertop is installed but it was essential to be in it's proper place for the stove installation. This allows for the stove to be slid out easily for the counter installation. To vent to the outside we have to drill through a thick cement wall. We also had to add wood shims to raise where the stove would sit on the old flooring to the level of the ceramic tile.

We ended up removing the backsplash from the countertop for the stove installation. We had hoped the main backsplash covering the walls extended lower so we wouldn't have to remove it but that wasn't to be. As you can see, the cuttings a the counter level are rough but that is fine as this countertop is being removed as is the matching back walls. I hung a Strippa from IKEA for my hotsauces to see if I liked the look. I do but am not sure if it will match what we intend to do for the walls so it is likely only temporary. At any rate the stove is now operational and ready to use.

The only painted wall in the kitchen is where the patio door is. The other two walls are covered with flat laminate the same as the countertops. The painted wall runs without any barriers into the family room. It is wood tongue and groove real wood paneling with the top half originally wallpapered. We removed the wallpaper and are painting with Behr 480E-1 Country Mist. We found a wonderful glass tile that would match this colour at Home Depot for the other two walls. We've tiled before but only a small area and not using glass tiles so this should be interesting!

Stay tuned,

Garden Gnome
© 2007


Saturday, June 23, 2007

Dishwashers


Dishwashers are great time savers but they can be problematic as well. As I mentioned in my previous post, the payback period for most dishwashers will exceed the lifespan of the machine. So a dishwasher shouldn't be bought with the idea that a newer model will save money in terms of operational costs. There are measures you can take to reduce operational costs that I will discuss later in this post. The two key factors when buying a dishwasher tend to be does it clean and how quiet is it but the key question should be what is the environmental impact.

A dishwasher impacts the environment during its manufacture, its useful lifetime and at the time of disposal. You have no control over how your perspective dishwasher was manufactured but you can do the research and choose a manufacturer based on its environmental track record. If you come across a manufacturer where you like their product but not the way they manufacturer it, write them to explain why you are not buying their product. The energy efficiency of a dishwasher is critical regardless of the payback period. Choose a dishwasher with the environmental impact of disposal in mind. The stainless steel interiors are wonderful during the useful lifespan but not so wonderful when disposing of a dishwasher.

Dishwashers use energy not only to operate but water has to be heated. So those are two areas where you can save a bit. The hot water heater should be set to 140ºF for dishwashers however since most dishwashers pre-heat the water it could be set to 130ºF, the safe temperature to prevent bacterial growth in the tank. Be sure the pre-heating function for the dishwasher is turned on. When it comes to loading, follow your manufacturer's guidelines. Improper loading leads to frustration when dishes are not cleaned as expected and wastes electricity. My rule of thumb is to never run less than a full load if possible. The only exception is during the heavy canning season where I may end running the dishwasher two to three times a day on water miser mode mainly for preparing jars.

Since we have been in this house, I have been using Electrosol 2 in 1 Gel. This detergent often goes on sale for about $2 per bottle so we stock up. Unfortunately stocking up is not always beneficial as we saw when we had an abundance of laundry soap that cannot be used in the front loading washer. This time it is not as bad as I only have 2 1/2 bottles of the liquid dishwasher detergent. Every sales person we have talked to has said to use powdered dishwasher detergent only along with the rinse agent. I don't really mind changing back to powdered as quite often it is less expensive. My only reason for using liquid was humidity both natural and kitchen generated causes the powdered detergents to clump. Some on the various frugal groups are using washing soda (Mule Team Borax) instead of detergent in their dishwashers. While this may not save money it is a more environmentally friendly choice and it is unscented to avoid polluting your indoor air. Finally on the topic of detergents, many on the frugal groups have also indicated using less than the manufacturer's recommended amount of dishwasher detergent. This may be false frugality if the dishes do not come clean and you end up washing them again so you may have to experiment to get the right amount.

One thing I do monthly to keep the dishwasher running smoothly is to run a short cycle using white vinegar. The clears any water deposits build-up without damaging the valves or seals like bleach will. In fact bleach should not be used in a dishwasher because of this problem. Vinegar is an inexpensive way to keep your dishwasher cleaning to its potential.

The final way to save is soon to be available here and already available in other location is called the Smart Meter. This meter replaces your normal electric meter then determines the time of day you are using electricity. The electric company rewards you by giving lower kWh rates for using electricity outside of the peak daily times of electricity consumption as determined by the electric company. An added bonus for rural residents is the smart meters will eliminate estimated billing as well. Now by running your dishwasher during the lower kWh times you will save on the operational costs. It's a win win situation in terms of energy usage.

Garden Gnome
© 2007


Wednesday, June 20, 2007


Despite our best laid plans we found out the day our purchase was signed that the existing dishwasher wasn't working. The real estate agent wasn't very pleased but I wasn't concerned. While it would have been nice to have a working dishwasher in the new house, I had been struggling for quite some time with the dishwasher in our old house so buying a dishwasher was pretty much a given. I've been married a long time, raised kids, do a lot of cooking and canning and a fair amount of entertaining so I knew what I wanted in a dishwasher.

My wants and needs are fairly simple. I want a dishwasher that cleans the dishes, period. I want simple, easy to use controls. Sorry guys 14 dishwashing cycles does not impress me! Here's what I want to see: wash, dry, done. Simple, right? I wanted a stainless steel interior. Those white vinyl interiors stain to high heavens. I really don't want another dishwasher with a vinyl interior. I've heard all the hype about super quiet dishwashers and even though the new kitchen opens into the family room, this is not a real high priority. The reason being is quite often we run the dishwasher when we go to bed not while we are entertaining or watching television. I want/need an energy efficient dishwasher. During heavy canning sessions the dishwasher will be run two to three times in the day. I need that energy efficiency! The canning sessions have also dictated that I need a tall tub unit. Price is a factor as well. I want the best value for my buck, thank-you very much.

Thank goodness for online shopping! I narrowed it down to the Bosch SHE44CO5UC, Whirlpool GU2700XTS and Maytag MDBH975AWW. All are EnergyStar® qualified and all are reported very quiet. All are tall tub modes and they are in the approximate same price range. I really liked a lot of the features on the Whirlpool and because I'm a happy consumer of their other products that started swaying me a bit. Now this is a nice dishwasher but there were two things I found potentially problematic. First the inside finish was something called slate. I've dealt with vinyl interiors that turn orange as soon as anything tomato goes through the dishwasher. The slate to me just seemed to be a darker colour to mask this problem. This dishwasher also had an Anywhere silverware rack meant to be in the door. My husband didn't like this idea at all. Still the Whirlpool was in the running. The Maytag had a stainless steel interior and was in close running. Perhaps we would have considered it further if their website was just a little more user friendly. In the same price range, the Maytag offered a delay function not available on the Whirlpool. The Bosch offered everything we really wanted. It has the energy efficiency by using condensation drying so there is no heater. Why pay for a heater you won't - I never put my dishwasher drying cycle on! Then they eliminate both electricity and noise by using filters instead of a disposal. So all of a sudden I'm really liking the Bosch but my husband doesn't like the idea of no food grinder. Well after much discussion, the Bosch is going to be delivered just after we move in. It is the most frugal choice for our needs.

Dishwashers fall almost into a grey area as far as energy efficiency so you really need to shop wisely. They aren't like going to a front loading washer where you can do three loads in one wash. They aren't like a hot water tank where you can turn the temperature down. But they do use electricity to operate and electricity or gas or heat the water along with the cost of water itself. The problem is going to higher end models that promise savings may not warrant the cost in terms of pay back. Unlike other appliances with quicker pay backs, a dishwasher will maybe go from operational costs of $30 per year to $20 in electricity. Unless the newer model uses less water you will save nothing. Most dishwashers have a heating function to bring the water up to temperature so you are paying to heat the water regardless. The bottom line is a new dishwasher is likely going to save you at the most $15 per year total. At $800 that's 60 years and I doubt the dishwasher is still going to be working. So my advice is to buy as energy efficient as possible for that sake alone but only if you really have to.

Garden Gnome
© 2007


Thursday, March 1, 2007

Dishwashers


Kenmore
Model#15522000

We live in a modern age with a lot of nice appliances to take the work load off of us. Unfortunately, some of these appliances fail pre-maturely simply because they are not cared for properly. In most cases 5 or 10 minutes of simple routine cleaning and/or maintenance can save us so many headaches and a heck of a lot of money in appliance repair bills or replacement. So it is with dishwashers.

This is our dishwasher, a Kenmore Ultra Wash with Quiet Guard, model# 15522000. It is about eight years old and came with the house when we bought it. The previous owner had it installed with the intentions of moving into the house himself then for some reason decided to rent the house out instead. We bought the house sight unseen inside based on location and potential. This dishwasher is not one we would have bought ourselves based on durability and quality. We know how much was paid and honestly that was way too much money for the poor quality of this machine! Cleanliness obviously was not a high priority for the last tenant and this dishwasher was only one of several horrid messes we had to clean. Now in all honesty, I would like to replace the dishwasher and have my eye on a nice Bosch with stainless steel interior. However, it is too new to do so. Besides, the year of major appliance replacements has already been expensive enough!

Aside of the obvious dirt and grunge, the dishwasher had likely not been used by the last tenant, more likely the one before. It had obviously been left open at some point for cats to get into! The bottom rack had one piece of a plate pin missing and there were several cut marks suspected to be from cats chewing on a few of the pins. I cleaned every nook and cranny I could find. Now this is something that should be done with any dishwasher regardless of the age or condition. Open the door and at the bottom of the door spray with a heavy duty solution (1:1) of Simple Green®. This is a non-toxic, biodegradable concentrated solution that you make into varying concentrations based on usage. If this area of the dishwasher hasn't been cleaned recently expect to see huge chunks of gunk! Remove all of this and make sure this area is squeaky clean and keep it that way by doing a weekly wipe down. Another place gunk will build is around the hinges to pay close attention to cleaning there. From there it is simply cleaning around the door, checking the door seals and wiping down that area.

Then my husband removed and cleaned the filters. Most dishwashers will have two filters. The vent to one can been seen in the photo as 5 black squares in the upper left hand corner. This is where the steam comes out after the dishes are cleaned so you would think it would always be clean. Wrong! This can get small food particles and gunk it it as well. Cleaning this filter is as simple as popping the lid off and wiping it out well. The other filter in our model is under the bottom arm on the floor of the dishwasher. The screws have to be removed but this is very easy to do, takes little time and improves the cleaning ability of the dishwasher. It should be done every other month. Once the filters were clean I ran an empty load with 1 cup of 5% white vinegar. This is an inexpensive way to keep your dishwasher running top notch. It removes soap and water build-ups as well as help get rid of any small food particles. This treatment should be used once a month. There are commercial products available that will do the same thing but the vinegar is just as effective and considerably less expensive.

After cleaning the dishwasher the major concern was the seals failing. Unlike some appliances, dishwashers must be used to keep their seals functioning properly. Thank goodness it passed the first test run and has not had any leaks since we've been here. The inside of this dishwasher is white plastic that does turn an orangy pink for a day or two after something with tomato based anything is washed in it. The first inclination for most people would be to put some bleach in the dishwasher to remove the stains. This is one of the worst things you can do as bleach will cause the pre-mature break-down of your dishwasher's seals and valves.

Dishwasher repair is a relatively easy DIY project. After the third plate pin fell of the bottom rack last week and there are several spots of rusting inside the coating of the rack making it look like there is some kind of cancerous growth, I called Sears on Monday and ordered a new rack. It was $27 so the price wasn't bad at all. Then when I was doing the weekly cleaning, I noticed the door gasket is looking a little worn especially at the bottom corners. Since I don't relish the idea of having my floor washed for me at some inconvenient time, I headed over to RepairClinic.com to get a price on a replacement gasket. That $12.49 is looking pretty good in lieu of a late night floor washing! I've already ordered that part so it should be here shortly. I will give a very blatant plug to these folks. I've dealt with them before for other appliance parts. Other than being a happy customer, I have no affiliation. Their customer service is top notch, shipping is very reasonable and extremely fast. In order to find parts from them you will need your model number.

Look after your dishwasher and replace those key little things before there is a problem. With any luck, your dishwasher will give you years and years of service. So much for my Bosch!



Garden Gnome
© 2007