What does a Garden Gnome do when she is not gardening, in the kitchen or doing genealogy? Well the answer might just surprise you so read the entries to find out more. This blog focuses on everything we do to make our house a home. There will be a strong emphasis on home energy efficiency and do-it-yourself (DIY) projects. At the same time there will also be crafts, knitting and crocheting projects along with any other little tips we do to create that down to earth, I want to be here home. Please enjoy your visit :)


Showing posts with label sewing. Show all posts

Friday, November 4, 2011

Seamstress Rotary Treadle Sewing Machine in Working Condition

About a year before selling our first house, I found this wonderful treadle sewing machine in need of restoration that would be perfect for my then country decorating style.  I am no stranger to sewing having learned on an old portable Singer machine from an aunt who was a seamstress with Hudson's.  By thirteen I was an accomplished enough seamstress to make a lot of my own clothes so my Mom gifted me with my much beloved Brother Festival 461.  This beautiful shocking pink sewing machine is still in regular use.  I reasoned that I knew enough about the care and maintenance of a sewing machine that I could get the treadle machine to work.  The treadle machine is a Seamstress Rotary sewing machine manufactured by the National Sewing Machine Co. in Belvidere, Illinois.  It was distribute by the T. Eaton Co in Canada according to the information I found.

Seamstress Rotary refinished cabinet
The Seamstress Rotary machine sits in a beautiful oak cabinet.  It was a bit on the rough side but cleaned up nicely.  The six drawers have ornate trim.  The two top drawers on each side lock and I have the original key.  There was matching trim on the bottom edge of the swing door covering the machine when not in use.  Unfortunately all but about an inch of this trim was missing when I got the machine.  I have always hoped to get lucky and find the decorative trim in an antique store.  Also missing is the side cabinet trim that would cover the gears when closed.  I'm on the look-out for that as well. 

The iron legs, gears and treadle are in excellent condition.  I cleaned them good and painted them.  The only downside is the treadle and fancy legs tend to be a bit of dust collectors.  One problem with restoring a treadle sewing machine is finding the parts especially for the cabinets.  The legs tended to outlast the cabinet so frugal folks have been using the legs as a base for end tables, desks and even dismantling them to make shelving and garden decorations.  Small pieces like decorative trim tends to get tossed out if they break

the Seamstress Rotary in perfect working condition
The Seamstress Rotary sewing machine was in rather good condition.  The machine is attached to a wood base that automatically rises when the lid is opened.  That's even a bit more advanced than the cabinet I have my Brother in as I have to lift the machine up manually.  The seamstress had obviously been well used as the decals are worn away in spots.  I found a leather belt for the gears, oiled the machine then threaded it for a test run.  The machine sews quite nicely!

Of interest, when I bought the machine for $25 I did not realize how nicely it would clean up.  There was an instruction book for the Expert B T electric sewing machine so that's likely what the owner replaced this one with.  One of these days when I get a bit of time, I will go through some of the T. Eaton & Company catalogues at Archives Ontario. 

Garden Gnome
©2006-2011


Tuesday, March 22, 2011

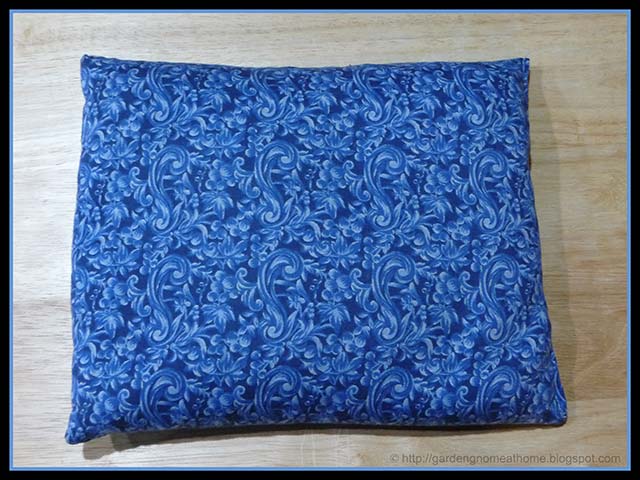
Grain Packs for Pain Relief

grain pack for pain relief
Grain Pack for Pain Relief

When it comes to pain relief, quite often icing is used to reduce swelling and inflammation for the first 72 hours following an injury.  Once this period has passed, icing may be continued as required to control any inflammation as well as heat applied to help with muscle relaxation and pain control.  Heat is also used to alleviate the pain of arthritis, rheumatism, transient or chronic joint and muscle pain. 

Electric heating pads have long been the choice for applying heat to relive pain and sooth sore muscles.  However, an electric heating pad is a very poor choice for several reasons.  First and foremost, electric heating pads produce a dry heat.  When applied to sore muscles it draws moisture from the muscle creating a rebound pain after the heat is removed.  This sets up a cycle of pain relief followed by rebound pain so the electric heating pad really ends up making things worse.  Second there is the potential for being burnt if the heat is turned too high or you fall asleep on the heating pad.  As with any electrical appliance there is the potential for shorting or malfunction that could cause a fire.  Finally, electric heating pads use electricity and with rising electricity costs this is not the ideal solution.   There is another way to get pain relief that is safer, more effective and uses minimal electricity.

Heated grain packs are highly recommended for pain relief.  The grain pack is placed heated for 1 minute on each side in the microwave oven on high.  The pack will then release a moist heat providing relief for 30 minutes or longer.  Grain packs bend easily so can wrap around sore muscles.  In addition to heating, a grain pack can be kept in the freezer to be used as an ice pack when necessary.  I have a special designed one to provide pain relief from my sinuses that fits over both eyes and has soothing essential oils to help with sinus drainage.  This one can also be used cold or hot depending on the symptoms.

Grain packs are very easy and inexpensive to make with basic straight sewing.  The filler can be inexpensive long grain white rice, flax seed, barley or corn.  Make up several in various sizes.  You can make an optional removable cover if desired for easy cleaning similar to a small pillow case.½

Materials
4 - 5 cups of filler
2 squares of heavy fabric 11" x 11"

Place the right sides of the fabric together.  Sew around three sides of the squares leaving a ½-inch seam allowance.  Trim seams and turn to right side.  Smooth the two sewn corners with a ruler.  Fill as desired but not too full.  You want a bit of movement in the filling so it can be wrapped so leave about 1 - 2 inch headspace.  Tuck in  ½-inch along the top edge.  Sew across to form the final seam.  The grain pack is now ready to use.

Garden Gnome
©2006-2011


Wednesday, April 11, 2007

Dishcloth Pajamas

Presenting ordinary, practical items in different ways can be a challenge for gift giving. Dishcloths are one thing that no new homemaker or even a long time homemaker would ever say no to. They fall under the category of there's no such thing as too many!

Dishcloth Pajamas

I discovered a novel way give dishcloths from a vendor at a farmer's market. It was immediately apparent that these would make a really cute housewarming present. So I bought a set simply to take them apart to see how they were made. Besides, I can always use more dishcloths!

Pictured here are dishcloth pajamas that are just perfect for a novel housewarming gift. They are quite inexpensive and easy to make using simple folds and tacking them together with thread.

Folded

Materials Needed:

  • 3 dish cloths
  • 2 buttons
  • thread
  • needle
  • glue (optional)
  • cutsey verse (see below)
Fold the wash cloths to form the pieces:

sleeves: Fold one wash cloth in half to form a rectangle. Fold in half again.
pants: Fold 1 inch of an edge on one wash cloth. Turn so the folded edge in down on the table. Fold one edge to the centre and repeat with the other edge. Tack the cuff edges together using needle and tread.
top: Fold one wash cloth in half to form a rectangle. Fold each short end in to the centre of the rectangle. Turn down the top corners to form the collar. Tack into place with needle and thread. The original pajamas I worked from had the buttons glued on but I prefer to sew them on. Punch a small hole in the printed verse and attach when adding one button. On top of the pants as pictured and tack into place.

To assemble:

Place the sleeves long end facing you. Place the pants on top in the centre of the sleeves, cuff end facing you. Tack these pieces together with needle and thread. Place the top
Verse:

We look like pajamas
but really we're not
We are three little dishcloths
You'll like us a lot

For washing the dishes or
chasing the dirt
Just take us apart
It really won't hurt


Enjoy!

Garden Gnome
© 2007