What does a Garden Gnome do when she is not gardening, in the kitchen or doing genealogy? Well the answer might just surprise you so read the entries to find out more. This blog focuses on everything we do to make our house a home. There will be a strong emphasis on home energy efficiency and do-it-yourself (DIY) projects. At the same time there will also be crafts, knitting and crocheting projects along with any other little tips we do to create that down to earth, I want to be here home. Please enjoy your visit :)


Friday, April 30, 2010

Flameless Candles

Burning candles add a warm, soothing ambiance to any room with their flickering glow.  I make my own beeswax and soy candles for regular use in our home.  As much as I love burning candles there are times where the ambiance of a burning candle would be lovely but without the associated safety concerns or heating the room.  A while ago I discovered flameless candles.

flameless candles
Flameless candles are battery operated to can be placed anywhere.  The 3V lithium batteries are not rechargeable so this is something to consider when using them to ensure the batteries are disposed of properly.   Each battery will give last about 100 hours of flameless candle operation.    Apparently now there are rechargeable versions available so that may also be an option.

Flameless candles now come in a wide range of sizes and some even have colour changing flames for a festive touch.  I have 8 flameless candles in the tealight style.  They don't get a lot of use so I'm still on my first batteries for each of them.  They really are nice for adding ambiance when the grandbabies are home without worrying about a candle being accidently knocked over.  I also turn a couple of them on when showing the house for a nice touch yet I don't have to worry about them accidently being left on.  In the warm weather months I can have a few on without heating the house.

lit flameless candles
The flickering flame of the flameless candle is quite realistic.  Mine have a flickering yellow/orange flame close to that of beeswax candles when they are lit but a bit darker.  The light given off is a bit less than a burning candle similar more to some of the energy efficient LED night lights.

I use the flameless candles most around the Christma holiday season season where I can scatter them about to get the ambiance.  They are small enough to set on a narrow windowsill for that homey feel inside and out.   I honestly wouldn't buy a lot of these candles simply because you have to turn each one on individually but in perspective it is no different than going around to light candles individually. 


Garden Gnome
©2006-2010


Thursday, April 29, 2010

Updated Technology Can Save You Money and Be Eco-Friendly


Pictured is our new PVR satellite receiver from Bell that was installed on Monday.  This is a 9242 that we bought rather than pay rental and thanks to a great deal from a friend who was switching to another television satellite provider, we were able to replace 4 additional rental receivers effectively eliminating the $26 monthly rental fees ($312 annually).  The PVR cost us $500 less a 25% discount for a total of $375.  So how does upgrading to new technology save money?
  • PVR - A PVR receiver is a personal recording device that works even when the unit is turned unlike a VCR.  This immediately saves on electricity use but it also saves on buying VCR tapes, DVDs and prevents these items from later ending up in the landfill.  The PVR model we bought can actually power 2 televisions, one on high definition and the other on standard definition.  This effectively eliminates one receiver further saving the electricity used for that receiver.  The payback period for our PVR considering only the rental cost is 18 months.
  • CFLs - Compact fluorescent lights are the norm when it comes to energy efficiency.  Incandescent bulbs are no longer being manufactured in North America.  CFL bulbs use a third or less electricity than incandescent bulbs.  The main downside to CFL is they do contain mercury so they need to be taken to centres that will recycle them without releasing mercury into the environment.  
  • telephones - I posted recently about changing out our old phone sets for a new phone system that not only reduces electric consumption by 59% but also is saved us $30 per month for 3 months then $24.95 there after by eliminating services we had through Bell.  They are even EnergyStar® rated!
  • EnergyStar® rated appliances - In today's world EnergyStar® rated large household appliances are a must as well as replacing any small appliances possible with those EnergyStar® rated.  Always look for the lowest energy consumption possible.  
  • electronics - Have you noticed that all electronics keep getting smaller and smaller?  That ultimately means that electrical usage for these smaller electronics decreases.
  • GPS - At one time I can recall buying a new Rand-McNally North American road map each year as well as picking up or buying various road maps along the way.  On average since we have been married at $50 per year for maps we have spent well over $1,000 but in terms of trees used for the paper for these maps we have spent much more.  A few years ago we went computerized using a program called Streets & Maps and then Google Maps both of which we could print out directions but then we borrowed Lucy, our nic name for one of our kid's GPS.  There is no paper involved and the directions got us from point A to B with no problems.  After borrowing Lucy several times we finally broke down and bought our own Lucy at a grand cost of $169 that eliminates buying any software or paper maps.  Thanks to Lucy we should never have to buy another road map again!
  • e-billing, email, e-flyers - All of these options greatly reduce the amount of paper used per household.  While there is no monetary savings, they are eco-friendly by saving paper used.
  • digital cameras - Oh my gosh, our digital cameras have to be one of the biggest money and paper savers possible.  I like average somewhere around taking 30 pictures on any given day but that dramatically increases for vacations and other special events.  Using a digital camera allows me to share pictures without printing, print those pictures I really want to while saving paper and the chemicals used for processing photos.  It's a win, win all the way around that for our use paid for itself likely in the firs 3 months of owning a digital camera.
Garden Gnome
©2006-2010


Wednesday, April 28, 2010

Five Mistakes That Will Cost You When Selling a House

Selling a house is a little more complicated that it appears.  In most cases the realtor will advise of various things the home owner can do to increase the possibility of a quick sale.  If you are selling privately using these tips will help you sell quicker and closer to the price you want.  Either way when selling a house there are a few mistakes you can make that will cost you both in terms of length of time to sell the house and they can influence the final selling price.  Here are five of these mistakes that will cost you:

  •  cigarette smoke - The presence of cigarette smoke lingering in a house is a complete turn off for many people and some are sensitive enough that it can cause asthma attacks.   In addition to that cigarette smoke leaves a yellowish residue that you may not be aware of but potential buyers will spot immediately.  If you smoke it in your best interests to hire a firm that specializes in cleaning and deodorizing the signs of smoking prior to listing your house.  While your house is listed do not smoke in the house.  Remove any clothes you were wearing while smoking and wash immediately to keep any smell out of the house.
  • any strong smell - This includes: air fresherners, cleansers, scented candles, litter boxes, cooking odours and any other odours that would fit into this category.  Again more and more people are becoming very sensitive to chemical scents that can trigger asthma for some.  If a potential buyer has an asthma flare-up or attack while viewing your house due to a strong odour the chances of them buying it decreases dramatically.  The second problem with strong odours is in the potential buyer's mind the question becomes what is that smell trying to hide?  and chances are they immediatly think it is hiding a problem.
  • too many house plants - Too many house plants can cause humidity problems which in turn lead to mould problems.  Moulds can cause significant health problems so any hint of mould including that from house plants should be eliminated.  
  • clutter - Clutter can be one of the biggest mistakes that will really cost you when selling your house.  Get the clutter out of your house to make it feel more open and spacious.  Without the clutter potential buyers can focus on the rooms and your house where it should be rather than all of your stuff.
  • ignoring eco-friendly living trends - Many potential home purchasers are interested in eco-friendly living so if your house is not up to snuff they may pass it by just on that basis.  Eco-friendly home buyers are looking for energy efficiency (hydro, water, gas) especially when it comes to home heating.  That means storm doors and updated windows make a difference.  The lower your home heating bill the better.  If appliances are included in the purchase it is imparative that they are EnergyStar® qualified.  Potential home buyers do not want the prospect of replacing appliances as soon as moving in.  If your appliances are old write them out of the deal unless a buyer specifically asks for them.  Carpeting is not on the eco-friendly list unless it is a special eco-friendly carpet which might be a selling feature but not likely.  Hard flooring is a high priority for those wanting eco-friendly homes.  If you have a carpeting in a room that needs replacing choose hard flooring rather than carpeting.  Pay attention to plantings around your house especially evergreen trees that may lessen solar gain in the winter months.  Solar tubes and solar powered roof vents aare also a big selling feature as are any type of solar water heating or electric generating solar panels.  If you have a vegetable garden which is a selling feature for eco-friendly home buyer be sure you have some type of rain collection system and a compost bin that are written in to remain with the house.
Garden Gnome
©2006-2010


Tuesday, April 27, 2010

Simple Plain Edge Dish Cloth

Knitted dish cloths are quite easy to make, perfect for your own use or gift giving.  They range from very simple to complex patterns but most work up quite quickly.  They are an ideal take-along project when traveling do to the size.    Today's post will give the pattern for working up a simple, plain edge dish cloth, one of my favourite patterns  

The dishcloth is worked on the bias from corner to corner in simple garter stitch.  Shaping is done via a series on increases and decreases on the edge stitches.  The resulting square has a nicely finished edge on all four sides. 

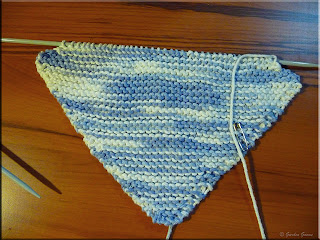
Pictured is the dishcloth in progress knit in Bernat Handicrafter® Cotton.  This is a 100% cotton perfect for dishcloths.  I like to use varigated colours when making utilitarian household items just because I like the effect so you will see varigated colours in things like slippers, afghans, and dishcloths that I make.  I started at the bottom corner then shaped to the size I wanted by increasing.  At the point where I start decreasing 2 corners are formed then continuing decreasing will form the final 2 sides of the dish cloth.  The cast off will form the fourth corner. 

Note that I use a safety pin to mark the front side of my work.  In this pattern the increases and decreases are done on the front side only.  Unless I'm working on a complicated pattern I seldom watch my work as I'm knitting.  The safety pin is a textural way of knowing which side of the piece I'm on. 

Pictured is the completed dishcloth with only the ends to be sewn in and trimmed.  On the lower left is the starting point (first corner) of the dishcloth and the fourth corner is in the upper right. The shaping give just a hit of a border.

Simple Plain Edge Dish Cloth Pattern

cast on  3 stitches
*row 1 - K into front of first stitch, K into back of first stitch (one increase completed), K to last stitch, K into front of first stitch, K into back of last stitch
row 2 - K*
repeat from * to * until there are 47 stitches on the needle
**next row - K2tog, knit to last 2 stitches, K2tog
next row - K**
repeat from ** to ** until there are 3 stitches
bind off


Garden Gnome
©2006-2010


Monday, April 26, 2010

Frugal Living

We live a fairly frugal lifestyle revolving around family and friends.  Most of our meals are homemade from scratch.  I garden as well as freeze and can the bounty of the harvest.  We watch every kWh trying to get our hydro consumption as low as possible with a goal of getting completely off the grid.  We buy what we need while avoiding conspicuous consumption.  Don't get me wrong as we do buy things we want but those things tend to be utilitarian to help us in our goal towards a frugal lifestyle.  Even then our philosophy has been used is better than new. 

This time of year I tend to go through all of our utility and those types of bills to see what can be cut.  I fail to see the logic of paying for something we aren't using or seldom use.  What often happens with television, internet, and cell phone service is new packages become available that may be cheaper than your old package so it pays to check this out from time to time.  At the same time this is a good time to reconsider other expenses.  Here's how we faired out from this year's reassessment with net savings for this year in green:

  • lawn service - We have been paying $650 per year for lawn service, cutting and raking only.  It is extremely convenient when we are away alot yet our lawn always looks well kept.  This year my husband decided to buy a lawnmower to go back to DIY.  We have enough family in the area that will stop by to cut the lawn if we are away so we aren't giving up anything that way.  The lawnmower cost a total of $310.37 which will give a payback period of 3 months and a net savings of $339.63 for this year.  Next year will be a savings of $650 and each year there after since the lawnmower paid for itself the first year.
  • satellite television - In rural Canada if you want television you basically have to sign up satellite television.  When you do this the equipment can be rental or purchased.  The benefits to renting is not having to put out a large initial outlay of cash but the negative is you pay rent on that equipment each month.  We have been paying rent on 5 satellite receivers at a cots of $26 per month.  We just purchased used receivers to replace 4 of them and bought an additional PVR receiver for the main television with a 25% discount.  The net savings is $26 ($312 per year) with a pay back period of 18 months.  We did not change any of our programming.
  • cell phones - We each have a cell phone something that is quite important when we are both on the road.  However I'm home a lot so seldom use my cell phone but don't want to terminate it as it is good for emergency back-up and when I am on the road.  We were paying about $132 per month for the two cell phones including additional charges.  With a bit of juggling we managed to get the charges down to $73 per month by switching my phone to vacation use ($15 + taxes, 40 minutes per month) for a net savings of $59 per month or $708 per year.

Garden Gnome
©2006-2010


Sunday, April 25, 2010

Knitting a Mitered Square

I've been knitting and crocheting since I was knee high to a grasshopper.  Like many who enjoy knitting I have a yarn stash that seems to just keep growing.  This happens because if I see a yarn I like I will buy enough to make something from it and there are always left-over bits and pieces of yarns, not quite enough for a large project but enough that can be worked into other projects.  Two of my favourite ways to use up left-over yarn is slippers and granny square afghans.

Mitered squares are extremely easy to knit.  If knit from cotton yarn they can be used as is for wash cloths.  However, they can be joined together to form an afghan.  The centre decrease forms a seam that can be oriented to create a pattern for the final afghan.  Here is a video of the basics.  At the end of the video there are pictures of a mitered square I made and the pattern for you.


Now that you've watched the video you have a good idea of how to proceed with this project.  The knitted mitered square is done in garter stitch using only one other stitch.  This is an excellent beginning project for someone just learning to knit.

The basic mitered square starts with a set number of stitches equal to 2 sides of the resulting square plus the 3 shaping stitches.  While it is not immediately apparent to a beginner, the piece is being knit from corner to corner in a diamond shape fashion with the 2 bottom edges of the diamond formed by the cast on stitches (1) and the 2 top edges of the diamond formed as the rows are knit.  Once a few rows are knit a peak becomes apparent (2) that when divided onto 2 needles the shape of the corner becomes clearer (3).  The final piece is square with a characteristic diagonal line from the decrease stitches (4).  I used size 4.5 mm needles and 4 ply cotton weight yar.

Mitered Square Pattern

Cast on 63 stitches.
1. K 30, S 1, K2tog, SYO, K 30
2. K
3. K 29, S1, K2tog, SYO, K 29
4. K
5. K 28, S1, K2tog, SYO, K 28
6. K
Continue in this fashion decreasing 2 stitches total on the right side (odd rows) and knitting the even rows until 3 stitches are left.
S1, K2tog, SYO, cut yarn and draw tail up though remaining stitch.

Garden Gnome
©2006-2010


Saturday, April 24, 2010

Dollar Stores are the New Five and Dime

When I was growing up we had Ross's Five & Dime that outlasted the old Metropolitan Store (aka The Met) which was also a five and dime store.  Ross's had squeaky wood floors all on one level with just about everything laid on sided tables, no racks or hangers.  The Met was absolutely fascinating to a me as a child.  It had squeaky wood floors that had a wonderful woodsy smell when it rained.  The main floor had a host of all kinds of things a kid could buy for their cherished 25¢.  Then there was the bargain basement.  The stairs creaked and groaned as I wandered down to see how what goodies my frugal little hands could find.  Even back then I was a very frugal shopper.  I would look through all the bargains finally settling on something like hair ties but quite often I would walk out without spending a penny.

Ross's and The Met are long gone, residing only in the recesses of my childhood memories.  Several years ago I discovered dollar stores.  While these stores don't have all the character of the old five & dimes they really are the modern day equivalent.  I love dollar stores!  There are a lot of good deals to be had at the dollar stores for in most cases $1 per item.  Like all shopping you really do need to know not only regular but sale prices because surprisingly dollar store items are not always cheaper.  Fast forward to 2010 and the 25¢ has been replaced with a $20 bill but I am just as frugal when I'm shopping, dollar store or otherwise.

In general the craft section is always a bargain in dollar stores.  Other bargains I've found are: canning jar lids, dishwasher rinse agent, colouring books, small gardening items, gift bags, party supplies, glassware, hair clips, specialty cookware like mise en place bowls, silicone pinch bowls/scoopulas and decorative garden items.  When it comes to those little extras like fancy glass serving One of the complaints I've heard is a lot of the dollar store items are from China but for the things I'm buying the countries of origin are Canada, USA, Brazil, and other countries including China.  I like that I can buy Canadian made products in Canadian dollar stores and I like I can still get a bargain for those little things I want or need.

Garden Gnome
©2006-2010

Friday, April 23, 2010

Emergency Preparedness

My goodness over the last few years we have seen a rather dramatic increase in violent weather that is reeking havoc world wide.  Haiti is still recovering from a devastating earthquake,  China is still doing search and rescue from a recent earthquake, now the volcano eruption in Iceland is creating even more problems due to the ash cloud.  On the home side the spring season has yet to become violent with severe thunderstorms and/or tornados.  Just on the basis of weather it is extremely important that Canadians help themselves. 

The Canadian Red Cross recommends recommend all Canadians have and maintain a 72-hour emergency kit that include food, water, clothing, candles and other emergency supplies.  The kit should have enough to cover the needs of all family members and should include any necessary medications or special needs items.  The kit should be kept close to an exit to take with you should the need arise. This allows the Canadian Red Cross to focus those most in need first.  We take emergency preparedness a bit further.  At one time we had a large, self contained travel trailer that had all the amenities of home so when the hydro was out for 4 days we simply used all hydro related and some cooking needs out of the trailer.  Anyone with this option can easily last about 10 days for electricity and heat but drinkable water will be needed after about 3 days.

Essentially if we had to go an extended period of time in and around our house without being able to get out for food or other resources we could do so for well over a 6 month period.  If we had to vacate our house for a safer area we have enough for a good 1 month period along with whatever else we could hurriedly toss into the vehicles.  We have also made provisions to help our neighbours if needed.  Here is our emergency preparedness plan:
  •  well stocked emergency first aid kit - Actually we have 4 well stocked emergency first aid kits, one for the house, one for the boat and one for each vehicle.  These are checked every 6 months to be sure any medications and salves are not expired.
  • a six month emergency food stock in addition to to our normal 18 -24 month food stock - Emergency food items include those not normally used for day to day cooking.  Each list will differ depending on the family.  Our emergency food items include: powdered milks, powdered cheeses, powdered butter, dried fruits and vegetables, dried meats, water purification tablets, 20 L filled water bottles, instant and rice noodles, additional beans for sprouting, yeast, dried sour dough starter and that type of thing.  In addition to the food I also keep a good stock of items such as mason jars, canning jar lids, and that type of thing.
  • a 6 month supply of personal hygiene items - This includes the basics of soap, shampoo, toothpaste, toilet paper.
  • emergency equipment - This includes: candles, lamp oil, replacement wick, rechargeable batteries,  solar battery chargers, solar lights, wind-up/solar radio, butane flame lighter with extra cartridges, filled gerry cans of gasoline, back-up heat source.  While we do not have a generator we have access to generators on each side of us and we are considering buying our own.
  • survival equipment - This includes: fishing equipment, cloth bags/equipment necessary for any edible plant foraging, and seeds to re-establish a garden. Food preservation equipment is necessary to replenish used food supplies.
  • emergency escape routes planned - It is important to have more than one route of escape from your dwelling but also from your location if necessary.  A GPS is ideal however having paper road maps is a good back-up in case the GPS system is knocked out.
  • alternate phones and communication - It is important to keep a rotary dial phone to replace cordless ones that will not work during power outages.  It is also important to have at least one working cell phone but realize that you will need solar powered charging capabilities for longer term outages.  It is also advisable to have 2-way radios for each family member in the event they get separated from other family members.   A CB radio located in your home is also a good idea if you need emergency help and the phone lines or cell phone transmission lines are down.
  • good neighbours - I honestly cannot stress the importance of good neighbours in time of an emergency.  Get to know your immediate neighbours and foster a good relationship with them.  Do what it takes to nourish a good neighbour relationsip.  In times of emergency or disaster your neighbours are your biggest assets when it comes to preparedness!

Garden Gnome
©2006-2010


Thursday, April 22, 2010

Today is Earth Day

earth day banner

Today we celebrate Earth Day 2010 with activities that are eco-friendly as a reminder that Mother Earth needs our help and to bring an awareness to good earth stewardship practices.  We usually don't do any special activities for Earth Day because we try to take the principles surrounding Earth Day to use daily year round.  Here's a few little extras I will do today:
  • spend a little time with my trusty caulk gun - More sealing means less air leakage which translates into less energy usage.
  • make up a few cleaning solutions - I'm getting low on cleaners so today will be a good day to replenish my non-toxic, eco-friendly cleaning solutions.
  • depending on the weather - I will take a walk around the gardens looking for things that need to be done while taking a lot of pictures.  I may even take a walk over to a near-by pond for more pictures.  Here's hoping the weather is nice.
  • make plant starter pots - I will be making more plant starter posts from toilet paper and paper towel rolls. 
  • today is recycle day - I will go through the recycle bin to be sure I don't have an alternative use for any of the items before setting them to the road.  My husband will drop off clothes and miscellaneous small items we no longer use to a local charity that helps those in need.  
  • dinner - Tonight's dinner will be much the same as most of our meals, home cooked from scratch.  On tonight's menu grilled wild salmon, wild rice melody, fiddleheads and dandelion greens salad.
  • evening - If the weather holds we will take in the evening sunset, play a game or two of cribbage then call it an early night.

Garden Gnome
©2006-2010


Wednesday, April 21, 2010

Etsy How-To: Fuse Plastic Bags!

Tomorrow millions world wide will celebrate Earth Day 2010 so continuing on the theme of re-using common household items.  I have read a lot about making fused plastic material from shopping bags and have see a lot of completed projects using the resulting material.  Today's video shows how to make fused plastic material from shopping bags.  Once the material is made it can be cut as desired and sewn together to create other items such as heavy duty shopping bags or wallets.


Note:  I have not made fused plastic material although I plan on trying it when I can set the ironing board outdoors and actually have a couple of bags.  My concern is any fumes created may be toxic so I don't want the fumes in the house.  Once the plastic is fused and cooled there would not be a problem with toxicity however I would not recommend using the material where it will come in direct contact with food.

Garden Gnome
©2006-2010


Tuesday, April 20, 2010

Moving Towards Solar Powered Electricity (3)

sun

Passive solar is a must when considering active solar powered electricity because the first consideration for solar electricity is reducing the amount you have to generate.  Essentially for active solar powered electricity, solar panels are used to generate the electricity that is stored in deep cycle batteries.  That electricity then goes through an inverter to make the electricity usable for your household appliances and lighting.  By default a household system is limited by the number of panels that can generate the electricity.  Reducing your electricity usage prior to installing any active solar powered electricity system ultimately reduces the number of solar panels and batteries you need so in short the initial solar system set-up is less expensive.  This makes a whole house solar system more affordable with a lower payback period.

I needed to know the average kWh of electricity used per day.  This amount is on the hydro bill or to get an average it is available online by logging into your account.  The amount of energy used determines the size and number of photovoltaic solar panels needed to go fully solar.  However, going solar can be done in stages if using an expandable solar panel where another panel can be attached.  As I gather the research and get a better direction of where we are going with the active solar system I will share here.  As it stands right now this will be a done in stages project starting with one or more solar panels, inverter, controller and batteries to get a few electrical devices off the grid then adding to the system as we can until everything is off the grid.   Now it may be that we never reach the goal of being completely off the grid but I firmly believe if others have done it we can too.

Here's my current plan in stages:
  • phase 1 - The first goal will be to get all lights off the grid.  While they draw the least amount of electricity they will be a good indicator as to how the initial part of the solar system is working.  At the same time the pump and furnace fan will be connected to solar.  Heat generating small appliances like the toaster, countertop oven roaster and slow cooker will be diverted to generator power that is at current rates cheaper than electricity.
  • phase 2 - The second phase will focus on getting televisions and supporting equipment like satellite boxes off the grid. Small household appliances like battery chargers, clocks, and those types of things of which we have very few.
  • phase 3 - The third phase will focus on computer equipment and supporting equipment.
  • phase 4 - The forth phase will focus on providing solar generated electricity to major appliances like the stove, refrigerator, washer and electrical components of the natural gas dryer.
  • phase 5 - This will be the tweaking stage prior to eliminating Hydro One entirely.  It may be we do not reach this stage although from preliminary research there is no reason we could not.
My current projections are this entire project from start to finish including the passive solar measures will take 5 years or less. That is with us doing all of the work for installing panels and connecting the system.  The components will be bought on sale and in some cases online as we need them.  So stay tuned as to how our goal for getting off the grid progresses.

Garden Gnome
©2006-2010


Monday, April 19, 2010

Moving Towards Solar Powered Electricity (2)

sun

Solar energy involves a combination of passive and active solar power.  We want to decrease or eliminate our dependence on the grid.  In this case the grid is electricity supplied via Hydro One.  As you may have read we currently have our house for sale with a conditional offer on another house BUT there is a possibility we may remove our house from the market and stay here.   Now this presents a couple of problems when talking of going solar.  Obviously we are not going to be installing solar panels on a house that we might sell.  At the same time one of the factors influencing the offer on the other house was it's green potential.  As it is, all of the passive solar lighting ideas on the following list will work for both houses although the new house has a slightly better solar advantage.  Most in the passive list are designed to reduce electricity usage.  This is a key concern because reducing electrical usage during the mid-peak and high-peak hours under TOS rates is a key concern.  I'm currently doing the research on active solar that will actually generate electricity.  Since both houses are similar in size the information will only have to be adjusted slightly. 

Passive solar ideas:
  • light reflecting colours - Lighter paint and floor colours reflect light making the space brighter and appear larger.  We've used this property in all of our houses going as light as possible for walls, ceilings and flooring.
  • mirrors - Mirrors are an age old, eco-friendly way to amplify naturaal and artificial light but they have gone beyond just hanging on the wall.  A couple of houses ago I came across an interesting idea for using mirrors on top of coffee and end tables to brighten a room.  I had mirrors specially cut and absolutely loved the results.  That idea would not fit well for this house but what would work well is lining the family room foot wide window bank with mirror effectively bringing in more light and making the room appear a lot larger. It would also work well in the deep patio door recess.  The beauty of mirrors is even when custom cut they are quite inexpensive and it is an easy DIY project.  Any window with a bit of a depth can be lined with mirror.  In addition to these simple mirror applications there is a great way to provide a view for basement windows that I saw on HGTV using mirrors in a specially designed window well retrofit.  It too is an easy DIY project that will work well at either house.  We have a pass through at this house that really is rather useless so I'm thinking of hanging a framed mirror that will reflect natural light into the family room and laundry room while getting rid of the dated shutters.  This would recycle one of the end table mirrors costing only a frame, chain and hooks.
  • solar tubes - I have been wanting solar tubes ever since I saw them.  These skylight tubes provide amplified natural lighting to the inside of the home eliminating the need for electrical lights.  The new house is actually better designed to take advantage of using solar tubes but this house can be retrofitted to use at least one if not two solar tubes.
  • install storm doors - This house does not have storm doors so there is no way to let in additional light during the nice weather.  If we stay here that is on our priority list of to do projects.  Storm doors will add additional insulative value for the winter months but allow extra natural light in during the warmer months, only needing to be closed if the AC is on.  
  • solar cooker - I have plans to build a solar cooker which is a realitively easy DIY project along with a hot box, an even easier project.  A solar cooker cooks raw foods while a hot box continues cooking partially cooked foods.  Both of these projects are more of an experiment to see how well they work.  At best in our climate they would work during the late spring to early fall months.  During the winter neither would be feasible for regular cooking. 
Watch for tommorrow's post on our active solar energy plans.  So watch for part 3.

Garden Gnome
©2006-2010


Sunday, April 18, 2010

Moving Towards Solar Powered Electricity (1)

sun

Hydro One, the hydro provider in Ontario, Canada, has announced a delivery rate increase that will amount to about $4 per month for the average household.  This will add an additional $48 per month to the overall electricity costs.  This charge is over and above the new TOU pricing that will be going into effect shortly.  In addition to that the HST will add an additional 8% on the hydro bill effective July 1, 2010 that will add a good $10 per month to the average household electric bill.  On May 1 the hydro rate will increase to 6.5¢ per kWh up to 600 kWh then 7.5¢ per kWh for kWh over the threshold.  This rate will be in effect until October 31, 2010.  The average household uses 1,000 kWh per month.  Our average use over the last 12 months was 623.25 kWh per month.  So we are just slightly over the 600 kWh threshold but the time period between May 1 and October 31 is the time running the AC is most likely to occur meaning for 2 months we will be paying the 7.5¢ rate at some point.  We are at the point that short of not using electricity getting our usage below our average rate is as simple as cutting all power to our house for a day.  Since that is doable but not the best solution, the push to move to more solar power is on.  Before I discuss that, here is what we have done so far to lower our electricity use.
  • turn off anything that is not being used - Off is better than on as off uses no kWh.
  • CFL - we have 4 fixtures that do not have CFL bulbs in them.  One of these is an outdoor mercury vapour light that sees on average a half hour of use per month if that.  Again lights are off whenever possible.
  • EnergyStar® qualified appliance - All of our major appliances are EnergyStar® qualified meaning they are energy efficient and we chose our appliances so they were on the higher end of the EnergyStar® rating.  Each time we replace a small appliance we look for the EnergyStar® qualification.  While some small kitchen appliances do not have this rating others like televisions, computers, telephones as well as other electronics do have this rating. 
  • appliance usage - We tend to be quite conservative when using appliances so that we get the maximum output while running the appliance the least amount of time.  That means the dishwasher and washer are run only when full.
  • cooking - We tend to consolidate cooking to take advantage of the energy being used to cook one meal to cook more than one meal.  We also use smaller dedicated appliances like the countertop oven roaster rather than using the big oven when possible.  In addition to using eco-friendly cooking methods we use the natural gas grill for cooking during the summer months as it is about a third of the price of electricity  and we often eat raw during the summer requiring no energy usage.
  • dryer - We have a high efficiency gas dryer since line drying is not an option for us.  It is used to maximum efficiency. 
  • energy conservation - Anywhere we can save a watt we do.  We had electronic pest controllers that worked quite nicely to help until we got pest management in place.  Unplugging those and the nightlights saves 52.56 kWh per year ($6.31) which isn't a lot but it is kWh not being used and every kW counts.
Tomorrow I will discuss some of our solar plans.  Watch for part 2.
    Garden Gnome
    ©2006-2010


    Saturday, April 17, 2010

    Plastic Bag Crochet

    Earth Day 2010 is fast approaching so I thought a recycling post would be rather fitting.  Plastic shopping bags are not environmentally friendly.  In the past several years many have been turning to re-usable cloth shopping bags or baskets.  Some municipalities such as the Greater Toronto Area in an attempt to reduce the number of shopping bags used have passed bylaws that stores must charge the customer 5¢ for each plastic shopping bags.  This concept is not a new one as some grocery stores have been charging for plastic grocery bags for quite some time. 

    Enterprising crafters have turned to recycling plastic shopping bags into useful items.  The plastic bags can be cut into strips.  The strips are then joined together to form a long chain of yarn.  Crotchet is a popular way to turn the plastic yarn.  Here is a good video showing the joining technique and a few items you can make. 


    Garden Gnome
    ©2006-2010


    Friday, April 16, 2010

    Best Improvements When Selling a House

    If you have been following this blog you will know that earlier this spring we decided to sell our house.  As a bit of an update, our house is still listed and we put in an extension request for the house we are interested in buying.  However, there is a possibility we may remove our house from the market so things are still very much up in the air.  When we decided to sell the house we set about decluttering and doing a few small finishing touches.  For the most part our biggest expense was finishing up a renovation project started just before deciding to list the house.  We continue to do a bit each day just to keep the house ready for showing. 

    Now that we may take the house off the market we are going through with the middle yard make-over but the rest of the rip-out will take less than a day as we are hiring that out.  Spreading the top soil for seeding will take little time as will seeding or installing new raised garden beds.  In total the project will be completed with the exception of planting the beds and a couple of new trees in the period of a weekend at a cost of under $700.  If the house stays on the market we expect that this improvement will pay for itself because it falls under cleaning-up (removing delapidated beds) and getting rid of junk (tree stumps).  It will definitely make the house show better.  If we take the house off the market we will be able to enjoy thisDeciding what projects to do when selling a house can be a real issue. 

    Some will immediately set about doing a renovation job in the hopes of making the house more salable.  According to Forbes in most cases you should not start any new renovation projects when getting your house ready for sale as in most cases you will not realize a good return on the investment.  They indicate the best investment is cleaning-up your act so decluttering, getting rid of junk and giving your house a good cleaning from top to bottom then keeping the house tidy until it is sold.  Forbes does recommend painting to cover up blemishes or bright and/or outdated colours.  According to several of the home and garden shows on HGTV a fresh coat of paint can really help sell a house.  Painting is a low cost way to spruce up a house that can be done in under a weekend.  Simply painting the front entrance door can be extremely effective and the colour most often recommended is red!

    Garden Gnome
    ©2006-2010


    Thursday, April 15, 2010

    An Update on Canada's Do Not Call List


    I know everyone has their job to do but I seriously detest telemarketers.  First they are invading our  space using the services we are paying for.  In essence they are stealing our services.  Having a phone line does not entitle telemarkets to call your number.  Second they call at obscene times quite often disrupting dinner or sleep.  So I declared war on them.  I posted about Canada's National Do Not Call Registry in my personal blog back in early February of 2009.  This was after adding our phone number to the registry.  Instead of having the effect we wanted the telemarketing phone calls actually increased!  Later in Novemeber of 2009 I posted about our new phone system with a lot of built-in features that would not only save us money on our Bell telephone services but also give us the peace of mind of immediately blocking telemarketer calls.  All non-identified calls (no number, private number, and etc) can be collectively blocked with one push of a button while those identifying the number can be Googled to confirm it is a telemarketer then blocked.

    One great site for finding information on a phone number call you is Who Calls Me but there are others.  If the phone number calling you is a telemarketer, scammer  or in at least one case a prank caller who must have had excellent long distance service, it will show up on this site.  Included on this site are comments from others who have received calls from that number and in many cases the company or agency will at some point be identified as well.  At this point you can now make an informed decision as to whether this is someone you want calling your house.  If you don't then call block them and/or report them

    I stumbled upon information today that adding your phone number to the National Do Not Call Registry is not a good idea.  Many have reported that telemarketing calls increased after they added their number much the same result we saw.  The reason for this is the National Do Not Call Registry provides their list of numbers to telemarketers under the premise that the telemarketer is to remove these numbers from their call list.  Unfortunately some telemarketers are now using these lists to their advantage by selling them to off shore telemarketers meaning you will get bombarded with telemarketing calls from outside of Canada.  In light of this new information:

    If you have not added your phone number to the National Do Not Call Registry:
    1. Do not add it!
    2. Subscribe to caller ID from your phone service provider.
    3. Don't answer any phone number you don't recognize.
    4. Check that phone number on a site such as Who Calls Me.
    5. If the phone number is a telemarketer and you don't want them calling, block the number.
    6. Report your experiences to online forums such as Who Calls Me.
    If you have added your phone number to the National Do Not Call Registry:
    1. Follow steps 1 through 6 above.  It is pointless reporting to the government link above although you can try.  One more report against them won't hurt.
    2. Turn your answering machine or voice mail off.  In most cases unless you are away you don't need it on and if you are away those needing to contact you will already have your contact information.   Telemarketers quickly realize they are wasting their time calling your number so it will get bumped off their list.
    3. If this is a problem telemarketer that gets around your phone defenses.  If you are using your own phone system to block their calls this should not be a problem.  If it is a problem, go online!  This type of thing is perfect for disclosing on forums, newsgroups, blogs and Twitter.

    Garden Gnome
    ©2006-2010


    Tuesday, April 13, 2010

    Dealing With Ants

    Ants can be a problem regardless of where you live.  The most common area you will find ants in the home in the kitchen so that in itself is problematic.  Luckily I have not had to deal with ants a lot although at this house we do have the big black carpenter ants.  As with any pest I look to the root of the problem then deal with it from there.  Ants are looking for a great location close to a food source to build their colony.  If you remove their habitat and food source they will like any other pest move on.  The first step is identifying the ant.  The second step is keeping things in and around the home meticulously clean. 
    •  remove all food sources - All food should be put into ant proof containers.  Think heavy plastic or better yet glass jars.  
    • ant trails - Ants leave a scent trail for other ants to follow.  It is very important to wash away any signs of this trail.  Observation will show you where the trail is then wash where the trail is good with Pinesol or Simple Green.
    • vaccuum - A single crumb is enough to feed an ant colony for days so vacuum, vacuum, vacuum.  Use a hand held vacuum but get any food crumbs up and out of the house.  If you spot any ants they are fair game for the vacuum cleaner as well.
    • problem solve - Find the point of entry and correct the problem.  Use spray insulating foam to seal around outlets and put plastic caps in the outlets to prevent any entry.  Caulk and seal every possible source of entry.  If you have carpenter ants you need to find the source of the wood rot (moisture) that is attracting them.  Destroy the nest and correct the moisture problem.  Any remaining ants will move on.  
    • ant bait/sprays - You may need to set out a few ant baits but they should be out of the kitchen area and where children can play with them.  Seriously though ant bait is not an effective way of dealing with ants.  It is a temporary solution at best.  You need to correct the problem then destroy the nest.  Rather than use poisonous to humans bait use the sweetener packaged in the blue packets.  It is a neurotoxin that will kill off ants.  Another effective method is boiling water but only do this for ant hills very close to your house that are causing problems.  Ants are actually very beneficial critters so it is good to keep them outside while preventing them from coming indoors. 
    • natural treatments - Bayleaves, cinnamon and mint oil are all rumoured to be effective treatments for ants when placed along their trails.  Cornmeal is said to be effective by some but other report it just attracts ants.

    Garden Gnome
    ©2006-2010


    Monday, April 12, 2010

    A Brief House Sale Update

    Since the house has been listed the real estate agent(s) have shown it twice.  That really isn't good news and they would like us to drop the price but be decided against that.  We run the risk of losing the house we have the offer in on if the owner doesn't want to extend the terms.  My husband and I talked it over and first of the owner would be foolish not to extend since he has had no offers at all.  Ours was the first and only offer since he listed it last August.  We have also come to the conclusion we really aren't all that interested in selling ourselves.  We love the location and our neighbours are some of the best you could possibly ever have.  The vacation home has all gone through, signed sealed and delivered so we are now the owners of two homes.  The situation has changed in our local area that warrants keeping our price up there so the bottom line is we are carrying on as normal.  Essentially things are up in the air and there are a lot of ifs.

    • If the owner of the house we have the offer in on agrees to an extension we may still get that house.
    • If someone comes close to the price we want for our house we may sell. 
    • If we don't get an offer close to the price we want we have decided to sit tight and not sell.
    All this sounds a bit confusing but as it stands right now we have two house both of which we can afford but we would like to sell our primary residence to reduce a few costs and traveling.  In hind sight we both agree we should have taken one step at a time and make sure we got the vacation house prior to listing our house.  But you live and learn.  

    Garden Gnome
    ©2006-2010


    Sunday, April 11, 2010

    Birds Can Be A Problem

    Morning Dove Nesting
    April 29, 2009

    Birds can cause a multitude of problems around your house and garden.  I watched our neighbour putting up steamers to stop birds from nesting over the awnings of his patio door.  I had to snicker a little while remembering all the problems birds have caused us over the years.  In retrospect the bird problems have been minor but at the time not so minor. 

    I love feeding the birds.  So one year I tossed out the left over Christmas nuts for the Blue Jays and of course they always got their daily peanuts.  One of the downspouts of our gutters wasn't working but we couldn't figure out why until my husband took it apart to find the downspout practically filled with nuts and peanut shells.  One house we owned had a mulberry tree.  Now that was lovely cleaning the purple stains off of the light colour siding!  We've had birds down our chimney when heating with wood, birds hitting windows  and birds building nests where we don't particularily want them.  A couple of houses ago I was elated to see a Sharp Shinned Hawk (Sharpie)  hanging around and I did manage to get some awesome video.  My husband, on the other hand, was not impressed picking up the carcasses the Sharpie left behind.  We have had swallows at this house and our previous house that will seriously come right at your head missing by mere inches. 

    When it comes to birds' nests we take the stance of leaving them alone if at all possible.  Pictured is the morning dove who made a nest in the eavestroph just abouve the downspout.  So apparently birds are not all that smart.  Anyway this nest was just above our main entrance and despite being build in a location where you would think water would be a problem the nest survived.  What was rather interesting is my husband or I  could go in and out that door without a problem.  Anyone else met the rath of a testy morning dove defending the nest. 

    Birds can be a problem but for the most part should be encouraged as part of a healthy balance in your yard.  Sometimes they present a bit of a bigger problem but for the most part they provide a benefit to your yard and gardens.  I encourage birds via bird feeders, water sources and plants that will provide a natural habitat for them.  In return I get some rather nice pictures of our feathered visitors :)

    Garden Gnome
    ©2006-2010


    Friday, April 9, 2010

    Household Uses for a Digital Camera

    I.  A couple of days ago I wrote about fixing one of our digital cameras.  Once I discovered digital imagery there was no turning back.  Within days the camera was attached at the hip.  I'm serious that a digital camera is always within easy reach basically 24 hours a day, 7 days as week!  I quickly realized that a digital camera is so much more than a tool simply to take pictures of family, friends and events.  f you have been following any of my blogs you will know that five of the six usually have digital images included in each post.  These are images I have either taken or created myself.

    camera equipment
    It dawned on me shortly after getting my first digital camera that this could be an extremely useful tool to document the contents of our house.  This is an ideal way to prove household contents in the event a claim is ever needed.

    To document household contents I use: digital camera, recordable discs, 2 memory sticks and a Sharpie. 

    How to document household contents:  Set the camera to the best setting for what you are photographing along with date stamping.  Go from room to room snapping pictures of all views as stills.  Set to movie then go back and do a walk through on movie setting.  In each case make sure you get good views of all insurable items.  Upload your images and movie to your computer.  Save these files in a folder of your choice on your computer.  Burn both the images and movie to disc and to both memory sticks.  You now have 4 copies of the images and movie.  It is imperative that one disc and one memory stick be stored off site preferably in a safety deposit box.  Store the other memory stick in your home safe or in another safe location.  Keep the images on your computer as an additional back-up.  Make sure you do an update every 6 months.

    ways to use a digital camera
    In addition to simply documenting household contents, I use the digital camera for so much more.  When it comes to insurance purposes something like the condition of our juke box (1) is documented but so are things like my Dionne Quintruplets original newspaper clippings scrapbook (2) that could not be replaced.  I do a lot of textile projects so one of the easiest ways to show someone who is learning to knit is to send them a picture of what the pattern should look like (3). 

    I do a lot of genealogy research.  Photocopying if available ranges anywhere from 25¢ to $1 per copy.  I have found that I can get very clear images from the digital camera from microfilm (4), books, newspapers and so much more.  The best thing is it takes me seconds to snap the picture saving me a lot of time in addition to the money savings.  Digital images are perfect for recording appliance label (5) and parts (6) details.  I routinely take pictures of small household repair problems (7) that need to be repaired.  I do like the colours in our family room so took a picture of both the border and paint (8) that is fairly close to the actual colours.  I also would like to match a set of cappuccino cups I got for Christmas (9).   Then I uploaded these images to the iPod Touch so I have it available when shopping so I have an instant comparison for colours and packaging.  This is easier than carrying around photos and fabric swatches.

    Garden Gnome
    ©2006-2010


    Thursday, April 8, 2010

    Store Flyers Are Not Eco-Friendly

    Store flyers have been a pet peeve of mine for years way back into the early 1980's when recycling programs were just starting.  Back then the amount of flyers were nowhere what they are now but even then there were many jumping on the green bandwagon to say no to both flyers and junk mail.  There were many battles fought with some residents winning but not often.  Over the years those steadfast in their commitment to reduce paper have continued by protesting in one way or another, including hanging signs to indicate they do not want junk mail or flyers.  Unfortunately this is not an effective approach as a result of how flyers and junk mail are paid for to be distributed.  Once in the hands of the delivery or mail person it is their responsibility to deliver it whether you want it or not.

    excessive store flyers
    We live between two communities that in a bit of a cost savings measure combine one newspaper inside of the other.  This is the free, weekly newspaper delivered to everyone whether you want it or not.  Inside of the two papers is and I kid you not a duplicate set of flyers because the advertiser is paying to have distributed by both paper with no regard to overlapping homes.  This really annoys me!

    What are we supposed to do with a duplicate set of flyers?  What are any of our neighbours supposed to do with a duplicate set of flyers?  I should point out that some of these flyers are for stores a good 40 minute drive from us if not more so what is the likelihood of us driving that distance to save $1 off of cheese?  Honestly, these corporations need to become a bit more environmentally conscious.  

    weight of excessive store flyers
    I actually weight out an average week's worth of flyers.  By average that means no extra holiday flyers as that is considerably heavier than average for most of the 6 weeks prior to Christmas.  The average week's flyers come in at 1.5 lb or 78 lb per year or about half of one pine tree.  This is just for the flyers, not the newspapers or any additional inserts.  This is for one household!  Our street alone the flyers add up to about 14 pine trees in one year.  What am I missing here?

    The internet was supposed to reduce the paper we use.  Every single one of these weekly flyers can be found online.  In fact you can sign-up to have them delivered right to your inbox.  You can even sign-up for them to email you in store specials or other specials you might be interested in.  Not only is it cheaper for them to do this it is also more effective because they are already sending to a customer they know will buy.  And a happy customer spreads free advertising through word of mouth.  So it is a win:win paperless way of achieving good sales without the flyers. 

    On a personal note I am fighting the flyer issue.  Hopefully at some point those sending out the flyers will see that their actions are not environmentally friendly.  At this point any eco-friendly changes we can make will have some type of benefit in the long run.  I can only hope they will listen...

    Garden Gnome
    ©2006-2010


    Wednesday, April 7, 2010

    Repairing a Digital Camera

    I have been fascinated by digital cameras ever since I picked up a very inexpensive, no flash or memory card digital camera.  I could only take 10 images then had to upload them to the computer but that didn't discourage me!  It quickly became apparent that as much as I loved using a digital camera I was actually quite abusive to them.  My first digital camera ended up with all kinds of paint spots on it, the second digital camera ended up with a multitude of scratches and the third (Canon PowerShot A530) was dropped while the lens was out rendering an experiment in taking a digital camera apart and selling it for parts.

    camera digital repair in progress
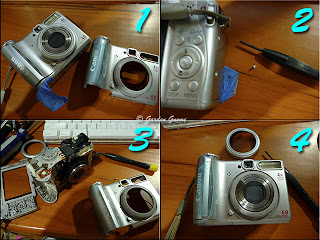
    Pictured is my fourth digital camera, a Canon PowerShot A540.  It too suffered a fall that broke the holding clasp for the battery and memory card chamber.  So I used a bit of tape to hold the chamber shut (1).  When it seemed that this was causing the batteries to die quicker I bought a Panasonic DMC-TZ5 as a replacement.  Then it occurred to me that perhaps the camera could be fix which would give a back-up camera.  I found the necessary front case online for $20 and ordered it. 

    Care is needed when taking apart a digital camera as there is an internal battery that can give a nice shock!  There are also a lot of very tiny screws that have to be taken out using a small jeweler's screwdriver (2).  Once I got the front and back cases separated, I put the new front on (4) then re-assembled the camera.

    repaired digital camera
    With the camera re-assembled as pictured it was ready to test it out.  The camera worked like a charm!  It still seems to be a bit of a heavier drawer on batteries but perhaps it always was and I just happen to notice it more.  This camera uses 2 - AA batteries so the is not as efficient as the battery packs that came with my new camera. 

    I discovered that there are replacement parts available for many digital cameras.  Since the price has come down so low on these cameras they are viewed almost as a toss-away item that doesn't fit well with my eco-friendly views.  It's nice knowing that I can repair either if necessary in the future.

    Garden Gnome
    ©2006-2010


    Tuesday, April 6, 2010

    How to Make a Simple Picture Mosaic for Scrapbooking

    simple picture mosaic
    Mosaics and collages are two popular techniques for both paper and digital scrapbooking. I used Photoshop to create this simple picture mosaic. It could be used in digital form as is or could be added as a page element or it could be printed and trimmed to use as an element as desired. I think it would also be a lovely front for a homemade greeting card. Here are the steps I used to create the mosaic.

    1. Open desired number of images to a maximum of 9 for this layout. I chose to use 7.
    2. Create a new image 640 px x 480 px.
    3. For each image, duplicate the layer then make any colour adjustments on the duplicated layer.
    4. Add a stroke in colour of your choice. I used a 100 px stroke in black.
    5. Go to the new image and duplicate the layer. Fill the duplicate with the same colour as your stroke colour. Click on the eye so the filled layer does not show. This is easier for the next steps.
    6. Go to each individual image then Layer/Flatten Image.
    7. Resize each image as desired. In this case I wanted a 3 x 3 mosaic layout so divided one of my new dimensions by three to get the value. This worked out to a width of 213 px. For each image go to Image/Image Size. Be sure Constrain Proportions is turned on then change the width to desired size. In this case it was 213 px which automatically changed the height to 160 px.
    8. Using the move tool click on the resized image and drag it over to the new image. This will create a new layer. Position as desired. I started at the top right hand corner for the position of the first image added to the new image.
    9. Repeat step 8 until all images have been added. Note that each image added creates a new layer. In total there were 9 layers for the image I created before moving on - 2 background layers, 7 flower layers.
    10. If you are adding text, click on the text tool then on the image where you want the text. Write the desired text in desired font and size. Use move tool to position text if necessary. Here I used 2 image spaces left blank for text. Text is Brush Stroke std with Yellow Glass style applied.
    11. Turn on the black filled layer and the transparent layer.
    12. Go to Layer/Flatten Image. This will flatten the image to one locked layer.
    13. Duplicate the layer. Working on the duplicate layer go to Edit/Stroke and add a stroke in the same colour as the previous background and strokes in the desired size. I used 15 px in black.
    14. If desired for web use, add a new layer and your copyright notice.
    15. Go to Layer/Flatten Image to flatten all layers.
    16. Go to File/Save As for scrapbooking purposes or File/Save For Web for web use.

    Garden Gnome
    ©2006-2010


    Sunday, April 4, 2010

    Happy Easter

    Happy Easter 2010

    Garden Gnome
    ©2006-2010


    Friday, April 2, 2010

    Importance of Decluttering When Selling a House


    Decluttering is a basic home maintenance strategy that prevents unused or unwanted items from accumulation to the point for some it can become a huge issue. When this happens it usually is termed as hoarding, falling under one or more psychiatric disorders. That is entirely a different issue. In this post I want to address some of the reasons why decluttering is so important when it comes to getting your house ready for sale and a couple of tips for easy decluttering.

    Importance of decluttering when house before and while is on the market:

    • Decluttering makes your house look more spacious and that is what potential buyers want to see!
    • Decluttering means a potential can easily open any cabinet without worrying about being hit in the head with something falling out.
    • Decluttering now and consistently while your house is listed means less stuff you have to move later.
    A few easy decluttering tips:
    • I use the 3 box method - keep, toss, donate. This is especially good for large scale decluttering.
    • 27 Fling Boogie - This is a decluttering term coined by the Flylady. I was quite involved with this site several years ago and this is one technique I have kept. The idea is quite simple and is quite effective. Take a plastic grocery bag and as quickly as possible go through one or more rooms of your house collecting 27 tossable items. Close the bag and toss. I take this a step further in that I collect 27 items with as many as possible going into the recycle or donate boxes still the items are out and gone. In the intitial stages of getting the house ready to show and while showing do this daily. It is surprising how much clutter can be eliminated this way.
    • Reduce packaging - If you have two packages of the same thing and you can fit the contents into one package then do it. This includes but is not limited to: laundry soap, fabric softener, shampoo, conditioner, liquid soaps, bandaids and anything else that can be consolidated into one container or packaging. At the same time do not bring anything into the house that is not absolutely necessary. I mean nothing! Use what you have on hand setting aside the replacement cost then replace after you move.
    • Be ruthless - The ultimate rule here to help you make your space appear more spacious and to end up moving less stuff is to be ruthless. Get rid of it!
    • Food - Many when they are moving don't consider their pantry or freezer stores. This can amount to a considerable amount of food to move. Instead focus on using up foods from the pantry and freezer which means less to use and a great way to revolve pantry stores as well easy eating. Put what you have spent on groceries without eating from the pantry money into an envelope during the time your house is listed then use that money to restock your pantry at your new house.

    Garden Gnome
    ©2006-2010


    Thursday, April 1, 2010

    Creating a 125 x 125 Badge Using a Custom Image

    As a follow-up to yesterday's post, today I will show you how to use a custom image to create a unique 125 x 125 badge. Once you have created a couple of badges you will see how easy it is. Here are the steps to make your own custom badge using Photoshop

    sunset January 30, 2010Original Image

    Open your original picture in your photo editing software. Go to Image/Image Size and note the size of the image. The size for the image I started with as pictured was 3456 px x 2592 px. To create a square image the smaller pixel size is going to be the limiting factor. Close Image Size. The original image will be locked so duplicate the image forming a new layer. Now go to File/New and create a new transparent image with equal size height and width according to the smallest size of the original image. This prevents any distortion problems. In this case I created a 2592 px x 2592 px transparent image. Use the move tool to drag the duplicated layer on the original to the new image. Note that it will not all fit so use the move tool to adjust the positioning of the image layer as desired.

    sunset January 30, 2010 adjusted imageSquare Image

    The adjusted image as pictured is now a 2592 px x 2592 px square. From this point is all about design to get the look you want. Close the original image as you will only be working on the adjusted image.

    For illustrative purposes I decided to play with filters and opacity so for this step I had to create a new layer then fill with white and drag that below the layer I was applying the filter and opacity changes to. This allowed me to see what I was doing. I adjusted the opacity of that layer to 35% and renamed the layer to opacity. Then I duplicated the opacity layer and used Filter/Filter Gallery/texturizer and renamed that layer filter. Next I duplicated the original background layer and added a 100 px black stroke using Edit/Stroke then dragged that layer to the top layer position. Using the magic wand tool I clicked on the black stroke to select then Select/Inverse that selected the inside portion of the image, hit delete and named this layer frame. I applied a 20 px ring bevel to the frame level using Layer Style/Bevel and Emboss. Next I used the text tool Brush Script std, 288 px to write the text and the move tool to position as desired. I applied Layer Style/Bevel and Emboss in size 20 px and Level Style/Drop Shadow distance 5, spread 5, size 70, contour linear. For the purposes of this blog I added my copyright using a custom made brush. Finally I was ready to turn the image into a badge.

    custom made 125 badgeCustom Made Badge

    Before going any further I saved the work as a .psd file to preserve the layers so if I want to edit the work in the future I can do so. Then I flattened the image using Layer/Flatten followed by File/Save for Web, clicked save and named my file. Once saved I uploaded it to this blog.

    The image would be of little use if an URL was not added. So I clicked the image to highlight then clicked link button on the editing toolbar in Blogger. Now if you click on the image it will take you to the home page of this blog. If you want to add an URL to an image that is not part of a published post, upload your image as normal. This gives you an image location. Add the desired URL then go to Edit Html in blogger and copy the code to use where you want. Save the post as draft so if you need to use it again you always have the code.

    Garden Gnome
    ©2006-2010