What does a Garden Gnome do when she is not gardening, in the kitchen or doing genealogy? Well the answer might just surprise you so read the entries to find out more. This blog focuses on everything we do to make our house a home. There will be a strong emphasis on home energy efficiency and do-it-yourself (DIY) projects. At the same time there will also be crafts, knitting and crocheting projects along with any other little tips we do to create that down to earth, I want to be here home. Please enjoy your visit :)
When it comes to eco-friendly cleansers the top of the list cited are: baking soda, ammonia, soap, hydrogen peroxide and vinegar. However, rubbing alcohol has played a role in cleaning laboratories for years. In labs the alcohol of choice is 95% ethanol but that isn't available to the general public and if it was it would be more expensive than isopropanol or rubbing alcohol. Isopropanyl alcohol is not ingestible so does not present a health risk so is available over the counter at most pharmacies and department stores.
 Rubbing Alcohol
Isopropyl alcohol (isopropanol) serves two purposes when used for cleaning. First it will wipe out most biologicals like bacteria and virii on surfaces so it is a very effective disinfectant. Rubbing alcohol is the perfect shiner for mirrors, glass, windows, and your faucets. Not only that if you want your faucets or stainless steel to sparkle wipe them down with rubbing alcohol. It is one of the best cleaners for eyeglasses as well. Disinfect door knobs, counters, sinks and handles with a wipe of rubbing alcohol. if you have shiny ceramic tile floors a quick wipe down with a cloth dampened with rubbing alcohol will keep them shiny. It doesn't take a lot either unlike a lot of cleaners.
Isopropanol is flammable in liquid form so should not be used around an open flame. It dries very quickly which leaves no residue or fire hazard. I keep rubbing alcohol in a spray bottle in the kitchen for keeping my counters and faucets clean and spot free but it gets used on a lot of kitchen surfaces because it is one of the quick cleaners I reach for first. Rubbing alcohol is readily available in the dollar stores and because a little goes a long way it is a more than affordable but extremely effective eco-friendly cleanser.
Garden Gnome
©2006-2009

When we were newlyweds there really wasn't a lot of choice in phones other than colours. They were corded units with no extra functions. Over the years as times changes with a busier lifestyle stand alone answering machines became quite popular. These devices used micro-cassettes but they served the purpose. The down side answering machines was of course power outages. Well Bell Canada saw they could be making more money off of customers by offering their own answering service (voice mail) and they sweetened the deal by allowing you to call into your voice mail from another location so you could hear your messages. This was an attractive feature for those traveling a lot but really was meant for the business people. At the same time telemarketers saw residential homes as the perfect market. Bell quickly started adding new features with one of the most useful being caller id that is a somewhat effective way of dealing with telemarketer.
The last phone system we bought had a built-in answering machine. We saw this as a way to eliminate voice mail from our phone service. If I recall correctly the system consisting of the base and two addition hand sets cost $79.99. It worked well for us for about 8 years but over the last couple of months it was apparent the system was dying. None of the handsets would hold a charge longer than about 5 minutes and two of the handsets lost partial parts of the display. It was time to go shopping for an eco-friendly solution.
 Panasonic KX-TG6473 Phone System
Pictured is the Panasonic KX-TG6473PK eco-friendly cordless expandable phone system we purchased at Sam's Club for $59.99. This is the first phone system I've seen with the EnergyStar logo! It is also RoHS specified no chemicals used which includes lead, mercury, hexavalent chomium, and specified brominated flame retardants (PBB and PBDE).
The standby power consumption has been reduced by 59% over their previous model which means we use 10.52 kWh verses 25.83 kWh annually on standby. In terms of electricity savings that is $1.63 so nothing to get really excited about. However, calculation of our previous system that used 2 - 6.5 W and 1 - 18 W adapter the cost for that phone system worked out to be $28.54. The new system will cost $11.07 annual to operate at our current electricity rates. Again, an $11 annual savings doesn't seem like much but it gets better!
The phone system has a built-in answer, call block, call screen, call waiting, 4-way conferencing and ringer id all features that cost extra if using Bell Canada's services. The call block is not limited to just phone numbers either as this system allows the blocking of calls without phone number such as out of area, private caller, or long distance with no phone number identified. What this really means is that the only additional service we need from Bell Canada is caller id. That's it! This should give a maximum savings of almost $30 per month for 3 months then $24.95 for a total savings of $290.60 the first year then $275.20 annually depending on the plan we replace our current home complete plan (most expensive) with. So now that really is a savings but if we consider the new phone system also acts as an alarm clock we save an addition $6.31 in electricity. In short we stand to save $307.98 the first year the $292.58 each year after that making this purchase very frugal with a payback period of 2.3 months! In terms of combining frugality with being eco-friendly this ended up being an excellent purchase.
Garden Gnome
©2006-2009
Electrical outlets can result a considerable source of air leakage and infiltration. A couple of posts ago I discussed sealing and insulating electrical switches on outside walls. This is necessary to eliminate as much air infiltration as possible thus reducing drafts. If you take a good look at the actual metal or plastic box though it is quickly apparent that caulking around electrical box and adding insulating foam will only solve part of the problem. That is because electrical boxes have several holes in which you can choose where to run wires through. Ideally spraying expandable spray foam around the outside of the electrical box would seal around the box to the point that all drafts would be stopped. However, do not be tempted to use expandable spray foam insulation to seal electrical outlets. The expandable spray foam is flammable until cured and at some point that outlet may require work on it which the cured expandable spray foam would make almost impossible. There is a way to deal with any minor air filtration that comes through the plug holes though.
 Safety Plugs
All outer wall pugs must have something plugged into them to prevent air infiltration during the colder months. Now the natural choice for something to plug in is an electrical appliance but that is not always convenient. Onto the scene comes a nice product that cuts any air infiltration through the outlet holes yet it is usually sold as a safety device to prevent children from electrocuting themselves playing with electrical outlets. These safety plug protectors come in clear, white, ivory and brown. A pack of 10 will cost $1 at the dollar stores or you can pay a bit extra at the discount stores. They all work the same. I like the larger clear ones pictured as the tabs on the white ones pictured tend to break off after repeated removal. The main downside to these inexpensive safety plug protectors is removing them for using the plug. Once you get the knack of it you can pop them out anytime you need to use the plug.
 Installed
No special tools are required for installation. Installation is as simple as plugging the plastic safety guard into each outlet. Unless you have small children and you are installing these safety guards for energy conservation then the only outlets you need to be concerned about are on your outside walls. For the most part aside of not having any drafts and the occasional having to remove them to use the outlet you won't even notice they are there. There is no need to remove the safety guards during nicer weather either unless you are using the outlet.
Garden Gnome
©2006-2009
My childhood home was definitely not energy efficient! It was a small 2-story home with dirt floor walk-out basement. The gas hot water tank was in the basement. My Mom kept bushels of apples, potatoes and home canned foods down in the basement aka dungeon. The main level was heated by 2 natural gas space heaters and I can still remember my Mom's excitement when one of the space heaters was replaced with a new model with a blower. A very steep, narrow staircase led to the upstairs with 2 bedrooms separated by the staircase landing. Cut into the landing there was an opening with a metal grate to let heat up from the main floor. On the narrow end of the landing there was a deep spot where my Mom kept a huge cedar chest to store out of season clothes and behind that was an entrance to one attic. Over top of the stairwell was the entrance to the other attic that we got into by spanning a 2" x 12" plank between the opening and landing then crawling across the stairwell. During the cold winter months the windows were usually covered with beautiful frost created by Jack Frost and large icicles hung from the roof. Many a morning I scorched my backside sitting or leaning on the space heater near the stairwell door!
I honestly think people have become very spoiled with keeping their homes so warm they have forgotten how to dress for winter. When I was growing up September 1 meant no more bare feet and as soon as snow hit boots and winter outdoor clothing were the rule. My Mom also insisted on us wearing under shirts combined with leotards aka tights or one piece thermal underwear aka long johns under our clothes. She also insisted we wore sweaters, slippers and bed socks. At one time nightcaps were always worn but my Mom didn't insist we wear one which was a good thing because I can't stand anything on my head! Now all of that is considered a bit old fashioned! Instead of dressing warmly in the house it is easier to turn the thermostat higher. The problem with turning the thermostat higher is the environmental and financial costs! In my quest to become more eco-friendly I refuse to turn the thermostat any higher than 20ºC (68ºF) during the day and 17ºC (63ºF) at night.
 Slippers
I'm a big fan of slippers! I make several pairs of slippers each year using my favourite slipper pattern. Hand knit slippers keep your feet warm and toasty while allowing your feet to breath. They wash beautifully as well. During the winter months I pair the slippers with thick socks usually funky fluffy socks or on really cold days wool socks. You can't beat wool socks for warmth!
When sleeping I still wear bed socks (not pictured) to keep my feet warm. I prefer white, all cotton anklets for bed socks because while providing warmth they allow air circulation. It is important to get good air circulation to your feet to keep the dry and healthy because foot moisture encourages fungal growth.
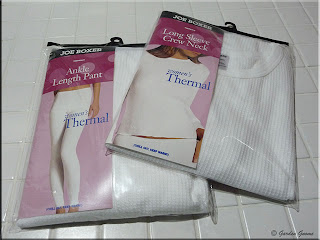 Thermals
Thermal knit underwear is an ideal energy saver! They are a favourite for those working outdoors during the cold winter months, outdoorsmen and those enjoying winter sports. At the same time they make a great basis for indoor layering. Despite being light weight they really do help keep you warm. They are also quite inexpensive. I paid $5.99 each for the pants and top. As a child long johns doubled as pajamas on warmer winter nights and were worn under flannel pajamas on the bitter cold winter nights. I love using the two piece thermal knit underwear as pajamas because they are downright comfortable! The thermal top can double as a long sleeve shirt for day use paired with a polar fleece zippered vest (one of my favourite cold busters) or T-shirt then topped with a sweater or polar fleece buttoned shirt. On extremely cold winter days the pants can provide an extra layer that will keep you warm without being seen.
Dressing for winter even when lounging around the house will reward you with lower heating bills. Extra clothes do not need to be restrictive either. The trick really is layering as you can always take off a layer if you become too warm. You will be pleased with the lower heating costs too!
Garden Gnome
©2006-2009
Despite the fact that we are constantly on the outlook for any air leaks year round I tend to go into serious overdrive just after the busiest canning season. This will be our third winter here. I honestly do think it takes a full three years to seal up a house after just moving in. That is because you are still discovering problems that were overlooked or incorrectly repaired by the former owners. Quite often the larger more demanding repairs take precedence over the smaller, minor ones as well.
 When we moved in we immediately started replace the electrical outlets. There were a few issues with the older plugs and we really like the look of the European style outlets. Our main level bathroom while smaller but most used is slated for a complete renovation that will include ripping everything out and making it bigger. In order to do this we have to replace the furnace and hot water tank to free up room for the expansion. That means we did a quick paint job to make the bathroom presentable and changed out the outlets.
We installed a timed switch for the bathroom fan. It was one of the dial styles. Last winter it suddenly stopped working. It would turn on but the timer function simply stopped working (the problem). The other day we were doing a bit of home improvement shopping expecting to pick up the tankless hot water tank for the kitchen but apparently Home Depot® don't keep those eco-friendly devices in stock! However they were offering green coupons for other eco-friendly products. We found a great push button style, hard wire timer replacement for $24.95 with $6 off so it ended up costing us $18.95. Installing the timer was as simple as turning of the breaker, checking for no live electricity then removing the old timer and wiring in the new one. Problem solved.
 One of our outdoor outlets was missing part the weatherproofing cover. Now this outlet is controlled by an indoor switch that is always off unless the outlet is being used. Still this was a problem in terms of safety when the outlet was switched on. Not only that it just didn't look nice. The box itself was still fine so we picked up a replacement cover for $3.58. It took a bit of chiseling to remove some of the surrounding mortar but it really was a fairly easy repair.
It's amazing how doing one or two low cost minor repairs each weekend can make such a difference in your home. These two repairs cost under $25 and took less than a half hour total to complete for both of them. This approach really helps to keep small repairs from becoming major ones. At the same time spending a half hour or so on your house each week just feels good. This is what home maintenance is all about.
Garden Gnome
©2006-2009
Sometimes winterizing involves closing up a house or cottage for the winter months and this is typically the time for doing that winterizing. When it comes to dealing with winterizing there really are two options available. The first is to leave some type of heat source on or use a pipe heater and hope there is no power failure. This option has the downside of costing money while the house or cottage is not being used as well as the possibility of frozen pipes that could lead to considerable damage if they burst. We had our pipes freeze at one our previous houses and I will tell you that definitely was not a lot of fun. The second option is to shut off the water and blow out the lines with pressurized air. The former owner of this house chose to put in a multi-shutoff water system so the house could be shut down for the winter months.
 Multi-Shutoff Water System
Pictured is our multi-shutoff system. The green arrow is the in house water meter. When we moved in there was an outdoor sensor for reading it but they have since changed that out for an indoor sensor that they can read from the main road! This system looks a bit more complicated than it is. Basically each faucet in the house has both a hot and cold water shutoff as does the washer. Each toilet has a shutoff as does the outside water taps. Some are knows while others are levers. The top main with the red knobs is hot while the bottom with blue knobs is cold. Some of the knobs are hooked to nothing so the system can be expanded.
We are not currently using the multi-shutoff system for winterizing purposes. A huge benefit to this type of system is when we are working on anything water related we can simply turn the water off to that faucet using the centralized system. There's no need to turn off the supply to the entire house something that many do not appreciate until they have done plumbing in your home or had a plumbing problem. Basically the water is shut off to only the pipes you are working one with this system. The downside of this system and this is specific to this house is the hot water has to travel about 70 feet to get to the kitchen. Our work around for this is we are planning to install an under the counter electric tankless water heater in the kitchen to service the sink and dishwasher. This will eliminate the long run decreasing energy wastage. The water heater tank that services the rest of the house will be changed out for a natural gas tankless water heater. The tankless water heaters will end up be eco-friendly while letting us enjoy a bit more energy efficiency.
Garden Gnome
©2006-2009
It is extremely important with the ever increasing cost of home heating to continuously be on guard for any points of air leakage or infiltration. Sealing these cracks and crevices achieves a few goals. First it keeps cold air out and heated air inside. Eliminating the drafts make your home feel more comfortable as well. At the same time sealing these cracks can cut off a port of entry for insects and other critters.
 The Problem
Electrical boxes on outer walls are often the source of drafts especially in older homes. It is also one of the easiest to remedy for very little cost and minimal DIY skills.
Materials Needed:
- flat head screwdriver
- latex caulk
- caulk gun
- switchplate and electric out foam weatherstrip
- wash cloth
- dry cloth
- soapy water
Before starting this project turn the breaker off to the electrical outlet and test to be sure the outlet is not live. Unscrew the plate cover and remove. This is a good time to wash up the plate cover while you have it off. The area of interest for sealing is the gap around the electrical box indicated the red arrow in the left side of the picture. Brush away any loose debris then wipe the surrounding area with soapy water. Dry thoroughly. Load the caulk into the caulk gun. Seal around the entire perimeter of the electrical box (right side). Do not seal inside the electrical box. Smooth the caulk. Allow the caulk to cure according to the caulk instructions (about 12 hrs).
 Winterized
These outlet weatherstrips are to be used in dry locations only and cannot be used with dimmer switches. Once the caulk is cured, punch out the die cut areas of a switchplate or electric outlet weatherstrip. Place it over the outlet. Place the switch cover on the outlet and secure with the screws. Turn the power to the outlet back on.
From outer appearances you won't notice any changes. If you check the outlet when the wind is hitting that wall you will notice the outlet is no longer drafty. If you are diligent and seal every outlet on an outside wall throughout your house you will notice this winterizing by a more comfortable house and lower home heating costs. The weatherstrip comes in a package of 10 for about $1.99. A tube of latex caulk will cost about $2 but you likely won't go through the whole tube for this project. At under $4 this project has a pay back period of under one heating season. Once completed this project will continue to provide energy savings without having to replace for a number of years depending on the lifespan of caulk you use. For example if you use a 20 year durability latex caulk as we do, you can expect this winterizing project to last for that period of time.
Garden Gnome
©2006-2009



 Rubbing Alcohol
 Panasonic KX-TG6473 Phone System
 Safety Plugs
 Installed
 Slippers
 Thermals

 Multi-Shutoff Water System
 The Problem
 Winterized





