What does a Garden Gnome do when she is not gardening, in the kitchen or doing genealogy? Well the answer might just surprise you so read the entries to find out more. This blog focuses on everything we do to make our house a home. There will be a strong emphasis on home energy efficiency and do-it-yourself (DIY) projects. At the same time there will also be crafts, knitting and crocheting projects along with any other little tips we do to create that down to earth, I want to be here home. Please enjoy your visit :)


Friday, April 5, 2013

Starting Our Master Bedroom Make-over

This year, my husband and I will celebrate our 36th wedding anniversary.  During that time we have made seventeen moves, raised a larger family and owned our last six houses as well as buying a vacation home.  Our bedroom has traditionally always been the last room in the house to have anything done to it.  We were more concerned about kids' bedrooms and creating comfortable family living space than we were about turning our bedroom into a show room.  As long as our bedroom was clean and tidy, we were happy.  Occasionally, I would splurge on a matching set of bedsheets but quite frankly even matching sheets were not a high priority.

We bought our first bedroom furniture in 1979.  It consisted of a queen size mattress, box springs, headboard, triple dresser, highboy and one night stand.  The queen size mattress and box spring never made the trip out west with us.  Instead we bought a king size waterbed.  I can't remember if we left the headboard out west or not but somewhere in all the moves it went missing.  When we moved back to Ontario, we bought a queen size waterbed that we had up until about 5 years ago.   The mattress sprung a leak just after we got into bed to get a couple of hours of sleep before heading out in the wee hours of the morning for Las Vegas.  Needless to say, we got no sleep! Both waterbeds had wood shelves that sat on the waterbed frame to be used as small bedside tables.  They were large enough for a water bottle and a couple of small items but not large enough to have a small lamp.

We just bought a new king size mattress, a Vaughan-Basset sleigh bed with under bed storage, matching triple dresser with mirror and two night stands from our favourite Mom & Pop local furniture shop.  We have dealt with them for years!  Looking back we have bought dining room table set, kitchen bar set, HE washer & dryer, mattress & box springs, gas range, chest freezer, two dishwashers, a side-by-side refrigerator and now our new bedroom furniture from them so that says something about our loyalty in dealing with local folk who really have become friends over the years.  Unlike larger box furniture stores that have a fair amount of warehouse space, this small shop tends to have rather limited warehouse space.  We decided on what we wanted from the floor display then they ordered it in for us with an expected delivery date of 3 weeks from our purchase date.  The arrival date is quickly approaching!  They deliver and set up the furniture free of charge which is rather nice.   

master bedroom as seen from doorway
Our new house (built in 1994, purchased by us in 2011) is a large, five bedroom bi-level in a delightful established estate subdivision.  Of the five bedrooms, the master bedroom on the upper level is the only one being used as a regular bedroom.  The north facing smaller bedroom is being used as a guest room and the smaller west facing bedroom is now our home office.  The two lower level bedrooms are being used as a dart room/den and a pantry, respectively. 

The master bedroom is 15' x 12'3", with the north facing window on the north short wall and the head of the bed on the west long wall.  Out of camera range beside the sewing machine cabinet (lower left) there is a large floor to ceiling double bi-fold door closet (7'6"W x 8'H x 29" D). Unfortunately, the closet is stuffed so we need to do a bit of purging!  The room is painted an olive green (actually two tone) that we like so will be leaving it that colour only putting a new coat of paint to freshen the room. We have a queen size mattress and box springs on a frame that will be moving into the guestroom.  The two IKEA wicker chairs are going south to our vacation home.  We don't know whether the trunk will stay in our bedroom or not depending on how the new furniture fits.  The floor like the rest of the upper level is laminate with the exception of the kitchen that is marble tile and the bathroom that is ceramic tile. 

We knew immediately we wanted to keep the green.  A couple of weeks ago, we stopped at a fabric store that is going out of business.  They had drapery panels on sale for up to 70% off.  My husband spotted the Saratoga leaf design drapery panels and just had to have them because they reminded him of Florida.  These grommet panels are actually outdoor drapery that is fade and water resistant as well as anti mildew.  They match the room perfectly except we have to move the rod down so the panels just clear the floor.  Well, he liked that pattern so much after he saw them up, we went back for four more panels to change out the living-room burgundy drapes and V-shape valances at our vacation home, but that is another story.

outdated master bedroom furnitureDespite the many moves, what is left of our bedroom furniture is in rather good all be it dated condition.  This was a very popular design when we bought it.  There were several variations around the same design, some plainer than others.  The little shelves on each side of the mirror that were so appealing when we bought the furniture are now viewed as dust collectors.  The top of the mirror is also a dust collector.  I normally had a couple of straw hats on top but I'm in the process of tearing the room apart.  All of the drawers have to be emptied as one of our kids is taking both pieces hopefully before our new furniture arrives.

master bedroom lighting
We did not install the halogen lighting fixture in the master bedroom.  It definitely is not a good design for any bedroom if you ask me.  The light is harsh and glaring creating odd shadows aside of not being very energy efficient.  We are replacing the lighting fixture but I'm not sure with what yet.  I have been looking since we bought the furniture but so far have not found something I like.  I am leaning towards a ceiling fan with light fixture similar to what we have in our vacation home.

I put the saying decal on the wall over the bed in lieu of a headboard shortly after we moved here knowing we were buying new furniture for the master bedroom.  This is a rather slick decal that is on a backing paper.  You position the backing paper and wording where you want it then slowly rub across each letter.  Once the letters have all been firmly rubbed, you slowly peel off the backing leaving the individual letters.  Unlike some decals, there is no clear sticker material around the letters so it looks quite nice.  The letters can be easily removed without marring the paint finish.  

master bedroom makeshift night stands
After about our fourth year of marriage, until we bought our vacation home in 2010, we had always had a television in our bedroom.  We did not put a television in down there and don't intend to.  We had planned on putting a television in our master bedroom here, hence the satellite box on the floor.  However, even though our bedroom television is sitting in the dart room/den on the lower level not being used, and won't be used, we have no plans to put it back into the bedroom.  We are finding that we are enjoying a higher quality of sleep without the television.  If I can't sleep, I get up and make a cup of chamomile tea blend that has rosehips, valerian root, anise seed, fennel seed, caraway seed, peppermint, passion flower, lemon balm and calendula petal.  I bring it back to bed with me and sip on it while playing a hidden objects game on the iPad before drifting back to sleep.  I have found this routine works well before bedtimes so I usually sleep through the night.  At any rate, we will be removing the satellite box.

We are currently using two IKEA storage baskets turned upside down as makeshift night stands.  Originally we were going to do our bedroom first but we spent six weeks of the fall of 2011 in Florida, then almost a full 3 months spread over 3 trips in Florida in 2012.  Instead we worked on the upper level bathroom, did a lot of work in the kitchen and repainted the guest room before running out of steam in 2012.  I spent the first two months of 2013 quite sick so it was only mid-March before I started having much of an interest in the house decor aside of keeping things neat and tidy which honestly some days was all I could muster!  The weather is starting to turn so I'd like to get the master bedroom and guest room finished before we start our outside work of landscaping and decking.  There are still a few projects to do in the kitchen.

We aren't fancy people as far as wanting a showroom bedroom.  We have our colours and furniture decided so I'm working on ways to make our bedroom comfortable, inviting and co-ordinated.  In the top picture you can see a few accessories I have bought for the make-over.  I'll post more that later.  I'm planning on making crochet blanks for both the master bedroom and guestroom.  I am ready to start the guest room blanket but still need one more colour (I think) for the master bedroom blanket.  I am still shopping for bedside lamps.  The only place we have ever had bedside lamps is at our vacation home but we really enjoy them so I need to find some that match nicely for the master bedroom.  I finally took the cross-stitch wedding sampler I worked so long on to the frame it shop so that will go in the master bedroom.  I also have one of the original paintings that we collect for the master bedroom as well.  Let the make-overs begin!


Tuesday, March 26, 2013

Homemade Orange Cleaner

Earlier in the month, I bought a Bella High Power juice extractor.  Most fruits and vegetables being juiced do not need to be peeled but citrus fruit does.  That leaves the peels to either candy or dehydrate, or discard.  I did a bit of searching for something else to do with the peels and came across making homemade orange cleaner.  Anytime I can replace a store bought, toxic cleaner with a non-toxic, homemade cleaner I will so I decided to make a batch the next time I juiced oranges.

ingredients for orange cleaner
I recently made a orange pineapple juice (in mason jar) which left me with the peels from 7 navel oranges and the top of the pineapple.  I saved the seeds and pineapple top to grow.  I've had good luck with lemon seeds growing and now have three little lemon trees about 6 - inches tall. Pineapple tops will also root to grow into a lovely houseplant so I saved that as well. I set the orange peels aside to make the orange cleaner.  

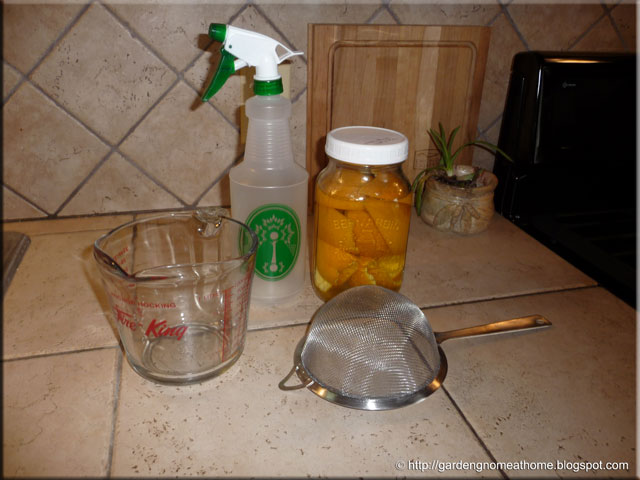
Materials needed for orange cleaner: large mason jar or similar with lid, white vinegar; later you will need a large measuring cup, fine mesh strainer, funnel and spray bottle.

orange cleaner set up
Setting up the orange cleaner is very easy.  Simply put the orange peels into the jar then cover with the white vinegar.  I used a 1.5 L mason jar and a reusable storage lid. I also used all natural vinegar because I was out of the cheap white vinegar but next time will use the cheap one.  Label the jar with the date then set aside and let sit for at least two weeks.  That's it.  The sitting time is the time consuming part so you will want to start another batch before running out of the orange cleaner you are using.  

The orange peels in vinegar looked rather pretty so I was anxious to test the results.  Once the sitting time was finished, it was time to move to the next step of making my non-toxic orange cleaner.

orange cleaner ready to strain
I make a lot of homemade cleaners and have found the spray bottles from the dollar store work well for liquid cleaners I want to use as a spray.  As you can see, after sitting for two weeks, the orange peel had absorbed some of the vinegar.  This really wasn't a problem.  I was more concerned about the amount of cleaner I would get as well as how well the orange cleaner cleaned.  

I strained the orange cleaner into the measuring cup.  At that point the orange peels themselves were of no further use so were put down the food disposal.  I ended up with 24 oz (750 ml) of homemade orange cleaning solution.

orange cleaner ready to use
Vinegar itself is a good household cleaner that kills germs, cuts grease and leaves a sparkly finish.  Orange peel contains oils that give the characteristic orange scent.  I tested the homemade orange cleaner on the counter.  It cleaned well with no residue yet had a pleasant smell.  I was quite impressed!

As is, the cleaner does a nice job cleaning.  If a sudsing orange cleaner was needed, a couple of drops of liquid dish detergent could be added but for most cleaning purposes this really isn't necessary.  The total cost of the 24 oz of homemade orange cleaning solution using the natural vinegar which is more expensive worked out to 56¢.  If using the cheaper, store brand white vinegar the price is reduced to 37¢ at our current prices. 

I am very pleased with the results.  It is nice to be able to add one more homemade, non-toxic cleaner to cleaning supplies.  The nice thing is, this cleaner is made from orange peels that many simply discard to begin with.  It is low cost and effective, making it an eco-friendly cleaning product.  Do give it a try the next time you have a few orange peels.  You will be pleasantly surprised!


Monday, March 25, 2013

LED Lighting

LED Christmas and nightlights quickly took over more energy inefficient versions and they cost pennies to operate.  Solar LED lights have become very popular because not only do you get the effect you want they only cost the price of the light itself with no further operating costs.  Over the past several years we have seen a move away from energy inefficient incandescent light bulbs CFLs and now LEDs for daily household use.  A 60W incandescent light bulb can be replaced with a 13W CFL bulb effectively saving 47W of power or an 11W LED bulb saving 49W of power.  Unlike CFLs, there is no mercury in LED bulbs and their lifespan is considerably longer (more than double) than CFL bulbs so they really are environmentally friendly.  Currently, the main deterrent to switching to LED bulbs is price at $19 to $24 for incandescent style bulbs and $26 for the prong type to replace halogen bulbs.

Sylvania Utra High Performance Series LED bulb
I bought a Sylvania Ultra High Performance Series LED light bulb to use in our new range hood.  This 8W bulb is the equivalent to an 11W CFL bulb or a 40W incandescent bulb.  It is dimmable, compatible with dimmers.   The bulb lasts 25,000 hours or 23 years based on 3 hours operation per day.  At a cost of 11¢ per kWh the bulb will cost 96¢ per year based on 3 hours operation per day.  If the bulb were left on 24 hours per day, it would last 1,041 days or 2.9 years at a total cost of $22.27 (96¢ x 8 x 2.9) or $7.68 per year making it a frugal if you have a location where a light needs to be on 24 hours a day, 7 days a week.  Under most household applications, an average of 3 hours per day is a reasonable estimate.  I paid $24.99 for the bulb so if the bulb lasts 23 years, it cost just over $1 per year plus the hydro use so in reality about $2 per year.

The new LED bulbs have a few features I really like.  The bulb contains no mercury which is a real plus over CFL bulbs.  Another plus is the base which does not have a transformer so it will fit any standard light fixture just as an incandescent bulb would.  The nice thing is there is no warm up period like there is with a CFL when first turned on.  There is no notation that LED bulbs are best in locations where they won't be turned on and off all the time as there is with CFL.  LED bulbs contain no toxic substances, they can be disposed in normal household waste but since they last so long, even that is of little concern. 

I can't wait for the price to come down on the LED bulbs!  I remember when the CFL first came out.  The transformer base was big and bulky so the bulbs could only be used in certain fixtures, mainly lamps or to replace a bare ceiling bulb.  I think I paid somewhere around $20 for the first CFL.  Now, we can buy an 8 pk of 13W CFL for $9 at Sam's Club.  As the LED bulbs become more popular, the price will go down.  There are less expensive ones already on eBay so I may order a couple of different styles just to try them. 

The LED lights have a lot of potential.  They can be used indoors or outdoors, in damp locations and at temperatures ranging between -20°C and 40°C (-4°F and 104°F).  The energy savings switching from CFL  to LED is not the huge difference it is when switching from incandescent to LED but it is still an energy savings.  Every watt saved reduces our energy usage as well as our hydro bill so the LED lights do look very promising.


Sunday, March 24, 2013

Replacing Our Kitchen Range Hood

We bought this house in September 2011.  Within the first two weeks installed a new natural gas range and replaced the dishwasher.  Then we left for our vacation home in Florida for three weeks, home long enough to do some unpacking and organizing as well as a bit of home canning then we were back to Florida for most of December.  When we returned home, I turned my attention to choosing colours for our new home and repainting a couple of rooms.  Although I had plans to repaint all the rooms before spring, that didn't happen but I did get three finished, the guest bedroom, upper level bathroom and kitchen.

The kitchen was painted a cool taupe when we bought the house.  A friend of ours is a cabinet maker and finisher so he is doing a lot of custom woodworking for us.  He make a shelf for over the sink just to the far left but visible in the last picture.  We custom matched the paint for the walls to our dinnerware thanks to our friends at Home Hardware.  Once the walls were finished, our friend built in the bulkhead and added trim around the ceiling.  We had panel curtains hung.  My husband installed a food waste disposal just in time for the busiest part of the canning year.  I home can year round but mid-May through mid-October is very busy.  The kitchen sat that way through the busy canning season and three trips to our vacation home.  I was sick most of January and February so got little done as far as painting and decorating.  That changed with March when I was once again on my feet ready to tackle a few new projects. 

old disgusting white range hood
The existing range hood was about as disgusting as you could get!  I took household ammonia to it and still could not get the thing clean.  Not only that, when the northerly winds blew there was enough draft coming in the range hood to move the panel curtains.  I removed the vent screen, covered it with tin foil then put it back into place just to keep the cold air out.  So, I went to Rona Building Centre for a replacement, identical to it except black for $49.99 that was in their flyer to find that it had been discontinued.  The search was on.

In fairness, I seldom use a range hood.  I had no range hood in our first two houses, a range hood in the third house, no range hood in the fourth but then installed the down draft system on the Jenn-Air range that was also moved to our fifth house.  I prefer the down draft system over a range hood but we bought a natural gas range for this house that doesn't have a down draft system.  Replacing the range hood, in my mind, was more a matter of aesthetics.

We were restricted as far as size both width from the cabinet width and height due to the way the ceramic tile had been installed.  We could not go to a range hood wider than 30 - inches or deeper than 6 - inches.  I saw a nice thin line model I really liked but then we would be left with a gap between the tile and the hood.  I finally decided on the Broan-NuTone HDN64 Series 30 - inch, 180 CFM 7.5 Sones range hood in black for $79.99.  Sones is the measurement of the sound level the unit produces.  At 7.5 Sones this model is considerably louder than some higher end models that produce only 0.9 Sones.  This model has two fan speeds and two settings for the light brightness controlled by rocker switches.  It does have a nice, basic design (black with platinum lettering) that I thought would match well with the kitchen range and blend nicely with the rest of the room. 

baffle on new range hood
The new range hood could be installed ducted to the outdoors or non-ducted.  It has a damper (included) to prevent cold air from entering when installed ducted.  If installed non-ducted, the hood requires an additional charcoal filter sold separately.

The damper was very easy to install on the top of the range hood.  My husband removed the knock-out on the top of the range hood then screwed the damper into position with the provided self tapping screws.  The baffle plate was slid into place behind the grille on the front of the range hood.  The slot where the baffle plate went is just visible to the right side at the top just behind the logo on the front of the range hood.

space where old range hood was removed
In order to install the new range hood, my husband turned the power off.  Then he removed the old range hood.  I washed the area well.  I then painted the smaller wall just to make sure there would be no wall showing that didn't match the main wall colour.  It took two coats but dried quite quickly.  I likely could have skipped this step but just wanted to be sure.   As you can see, rather than cut the tile as it should have been, the previous owners didn't.  That in itself would have presented a problem had we decided to use a range hood that wasn't as deep, not that it could not have been solved, just it would have been more work to install. 

old and new range hoods together
If you look closely you can see how dirty and stained the old range hood was.  More importantly the actual baffle was missing on the damper (top of old range hood to the left).  This explains why the cold air was pouring in when the wind blew.  Under normal use, there is no way the baffle would just go missing so it must have broke off when they removed the range hood to install the tile.  Why on earth they replaced the range hood without the baffle on the damper is a mystery but then why they would have reinstalled a range hood in such poor condition is beyond me.  It should have been replaced when they did the tiling.

Once the paint was dry to the touch, it was time to install the range hood.  My husband carefully placed the range hood in place and made the necessary connections.  Then he secured the unit temporarily to test the connections by turning on the power.  All was well so he turned off the power, finished securing the range hood and turned the power back on. 

new range hood installed
The new range hood really looks nice!  I used a Sylvania 8W LED bulb (450 lumens) instead of the GE 13W CFL (825 lumens).  Essentially, it was like replacing a 60W incandescent bulb with a 50W bulb.   We were already saving 47W by using a CFL rather than a 60W incandescent but now we will will be saving another 5W.  In this day and age of energy conservation, that is a good savings.  I am rather pleased with the light output as well.  The range hood light is mainly used as task and occasionally evening  lighting.

So, we are one step closer to finishing the kitchen.  When our friend installed the bulkhead enclosure, it was more of a taupe tone than golden oak.  He is going to redo the cabinets to match.  He is also going to cut the extra marble tile we found in the garage to fill the gap under the new dishwasher.  That leaves us with replacing the microwave oven, the sink and faucet.  With any luck our kitchen will be completely finished in the next month or so.


Monday, March 18, 2013

Our House is a Mess!

I would love to say our house is always neat, tidy and ready for unexpected company at any given moment.  The reality is, it isn't.  That's because I am a chronic multi-tasker with many, many projects on the go (knitting, crocheting, home decorating, home food preservation).  I'm a high volume canner which by definition creates a multitude of messes.  We are also working on the house so there are a lot of DIY projects that create a bit of chaos and mess. 

This past couple of weeks, my husband hung new drapes in two rooms and replaced the range hood, both of which I will go into further detail.  Then, I finally had enough of how our dining room table was looking so decided it was a good time to refinish it (more details to come).  While that project is moving along nicely, I'm getting little done in the way of housework and gearing towards my annual spring cleaning.  So today, I took action and got out my trusty timer to go back onto my 15 minute routine.  I'm focusing mainly on the morning hours (9 AM to noon) to do this, freeing up the afternoons for blogging, knitting/crocheting and cooking.  I'm up a lot earlier than that but unless under a crunch usually don't do much housework other than laundry before 9 AM.

The 15 minute routine is my modification of the 15 minute declutter from my Flylady days.  Her idea was to set the timer and do whatever you could in your zone in 15 minutes.  The month was divided into zones so for the first week of the month you only focused on zone 1 which I think was the entrance.  That never worked for me but mind you she was/is giving advice to individuals with severe clutter problems bordering on hoarder issues.  So while the zone thing never worked for me, the modified 15 minute routine did as did the 27 Fling Boogie.  For that, you grab a garbage bag then as fast as you can toss 27 pieces of trash into the bag, then toss the bag.  Once it is in the bag it can't come out.  I modified that a bit as well to meet my needs. 

I take the timer to any room and it doesn't matter which one, set it and do as much as I can in 15 minutes.  When the timer goes off, I have a 15 minute timed break which is much needed due to health.  Then I repeat the process.  So far today, I've hit the utility room, pantry, kitchen, master bedroom and living room.  I can't believe what a difference just 15 minutes can make in any room.  It is not a perfect system and the house will take two or three days to get back to normal but it is a system that is working well for me.  I'm looking forward to getting order restored in our house!


Monday, March 11, 2013

Dealing With Mice

I read where if you see a mouse at night, set a trap but if you see a mouse during the day you have an infestation so likely need an exterminator.  Now we have owned six houses not counting our vacation home.  Our last three homes have had in common a very proximity to farmland.  What this really means is when the crops come off the mice come in.  It was common to see mice and voles in the garden and around the yards at our last two houses yet here I haven't seen a mouse other than what we trapped.  Vole live with proximity to river banks.  They seldom get into houses as they don't climb like mice but they can be problematic in the garden.  It is common to see voles scurry across yards or patios to get to the river bank.  In general, you won't see a mouse in the house, only evidence of a mouse in the house.

Our experience was we set a few traps and only catch a mouse or two then no further signs of mice activity more, then it was safe to seal the house well.  Chances are your problem is solved although you still need to keep a watchful eye.  This house was a bit different even though it is a newer house but had sat semi-empty for over six months.  The field came off and the mice came in.  We trapped four mice within one week!  Then I noticed the tell tale tracks of mice on the deck after a snowfall so did not hesitate to call in the exterminator.  He set up six bait stations, 5 indoors and 1 where we saw the mouse run.  Once the bait stations stayed clear of activity for a couple of months he told us to seal the hole the mice were getting into the house.  We haven't had a problem since nor have we seen any signs of activity in or around the house. 

You don't need to see a mouse to know you have problems.  All you need to see is the tell tale signs of a mouse.  If you see droppings, take action immediately.  This is not something you want to ignore.  Set traps and/or bait an exterminator.  Once you are sure there are no mice in the house, seal any problem areas where they are getting in.  Keep the traps and /or baiting going for at least 3 months after sealing the house.  If you see any signs of activity, outside, increase the traps and/or bait stations.  If you see any signs of activity in the house, set more traps then monitor the situation.


Tuesday, February 26, 2013

The Cell Phone Verses Landline Delimna

There is the question as to whether to give up a landline (aka phone service) in favour of cell phones only.  Some of our kids have totally eliminated their landlines and a couple after using only cell phones for a couple of years went back to adding a basic landline.  We have Bell for our landline, Roger's for my husband's cell phone and I put my cell phone of a pay as you go plan through Telus because I seldom use it. 

Here's the problem in Ontario.  We have Bell so pay $54.85 for a very stripped down service that includes caller ID and 500 minutes of long distance for North America.  They were none to pleased when we cut over $30 worth of extras about three years ago after buying a home telephone system offering call waiting, call blocking and all those nice features on board so all we need is call display.  The only feature on our landline that can be reduced is long distance but that won't save us much.  I pay $100 per year for my cell phone pay as you go plan with the only problem being it is only good in the US but I can unlock the phone, buy a sim card and plan in the US which would be good at our vacation home.  I very seldom travel in the US by myself so really don't need a cell phone there.  My husband pays $86 per month for his cell phone which has a data plan.

We looked at getting a new cell phone for me and eliminating our home landline.  A new cell iPhone was $199 special and adding a family plan was $50 plus $16 for caller ID and shared data ($66 total).  We would be up to $152 per month BUT if my husband changes his current cell phone plan that is no longer available he would also have to pay $16 for caller ID which brings the total to $168 per month.  We are currently paying a total of $151.43 for both cell phones and landline so giving up the landline would actually cost us more money for less.  Plus, we have internet and television with Bell so get a bundle discount of $21 per month that we would lose if we eliminated the landline.  After doing the math, we quickly realized giving up our landline in favour of cell phone only would not save us any money but rather cost us more while getting less.  Now technically, we could without changing out my phone, adding US coverage with no data but it would still cost us more monthly. 

I personally would rather go to cell phones only.  It really is a lot more convenient and quite frankly the younger generation has embraced cell phones, choosing to eliminate landlines.  There are a lot of benefits going to cell phones only as you have instant communication pretty much everywhere.   So far, the problem of telemarketers is very low as you aren't listed in a directory so the calls for the most part that you get are for you. 

The downside is cell phone numbers like landline numbers are recycled which means you can have a high volume of calls from debt collectors from the previous owner of that number but the cost of those calls can cost you in addition to your actual cell phone plan.  We dealt with this problem with both our landline phone number and my cell phone number since moving here in September of 2011.  They can be very nasty as well as threatening and if you are on a pay as you go plan can really eat up your minutes AND they will not remove the number from their database even if you request it contrary to the rules set out by the CRTC.  The problem is, you cannot block these calls on a cell phone the way you can with a landline.  The best advice I have after having this cell phone number for 18 months is to not answer the call, find out who they are via a service like Who Calls Me then report them to the CRTC.