Years ago when we did a lot of camping our favourite way to economically get around the various National and Provincial parks was by bicycle. Many a weekend we were able to camp quite comfortable without ever moving the vehicle. When we lived in an small urban setting our bicycles were still our preferred mode of transportation for making a quick trip to the grocery store. Unfortunately we are restricted to vehicle transportation for getting any necessities where our permanent home is due to its rural location. We have considered buying a scooter for quick trips into the nearest village but put that on hold when the house was listed so that may still be a possibility. However finding alternative, low cost and economical transportation while on vacation is always a priority. One one trip we rented scooters to get around the area we were staying. We rented a canoe at one campground and the guys travel into two via small fishing boat when at hunt camp.
The preferred mode of transportation where our vacation home is by golf cart. In fact if we go through the park to rent our home out when we aren't here we must provide a golf cart for the tenants. If we don't the park will rent a golf cart to the tenants and deduct $100 per month off of the rent collected. The golf cart is such an important mode of transportation within the community that many households here have two. So we were in the market for a golf cart.
My husband put the word out that we were looking for a golf cart. Now the one he really would like to have costs about $3,000 new so he decided to look for one that tenants could use first. The major requirements were good condition, reasonably priced, good batteries and within the community so we did not have to worry about transporting.
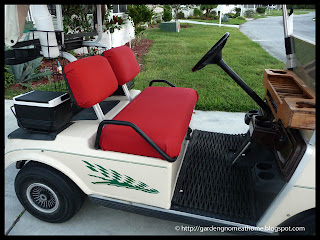
He found just what we needed! The asking price was $1.000 OBO with batteries only 2 years old. He offered the gentleman $850 who said sold. Pictured is our new to us golf cart. It is not the fastest golf cart around but it is torqued to climb inclines nicely. The only thing my husband wasn't happy with was the seat coverings but that proved to be an extremely easy DIY fix.
My husband bought an outdoor fabric meant for things like hammocks or outdoor cushions. It cost $18.50 at Wal-Mart. Then we set about recovering the seats and back rests. We have done this type of thing before learning on our RV that we completely redid from cushions and curtains to valances and wallpaper. Doesn't the fabric change make the golf cart look entirely different?
Materials needed for this DIY project:
- 2 yards outdoor fabric
- staple gun with staples
- star screwdriver
- scissors
- utility knife
There are a few tricks to doing this type of spruce up yourself but again it isn't difficult at all:
- remove the part to be recovered if at all possible - In this case the seat and back rests were unscrewed from the golf cart. Then the hand rail was unscrewed from the seat and metal portion unscrewed from the back rests.
- use the existing cover as your pattern - Carefully remove any existing cover to use as a pattern to cut material for the new cover.
- corners - If you are covering something like the seat and back rests shown corners can easily be formed by tacking sides and end in a couple of spots so they don't move. Then bring one long end piece and one short end piece tightly together for form a flag. Tack the fabric on each side mitre of the flag piece. Pull the flag up and over forming a man's tie shape. Secure into place and trim the pointed portion from the tie shape. This sounds complicated but it isn't. The end result is a nice corner.
- take your time - While this type of DIY project is not difficult, taking your time and paying attention to detail will give a much nicer result.
Garden Gnome
©2006-2010


0 comments:
Post a Comment