What does a Garden Gnome do when she is not gardening, in the kitchen or doing genealogy? Well the answer might just surprise you so read the entries to find out more. This blog focuses on everything we do to make our house a home. There will be a strong emphasis on home energy efficiency and do-it-yourself (DIY) projects. At the same time there will also be crafts, knitting and crocheting projects along with any other little tips we do to create that down to earth, I want to be here home. Please enjoy your visit :)


Wednesday, September 29, 2010

The Kitchen Towel

According to a recent study conducted by the Hygiene Council, a group of international experts in microbiology, virology, infectious diseases, immunology and public health, the dirtiest item in Canadian homes is the kitchen towel.  In fairness though they only examined 20 Canadian homes as well as 20 homes in 8 other countries.  I doubt that this small of a sampling is indicative of homes across their respective countries.  Still their findings are something to consider especially since some of the towels were highly contaminated with Escherichia coli, a bacteria that is responsible for causing food borne illness.  Apparently one of the causes for the contamination is washing kitchen towels in cold water.  They recommend towels be washed in water hotter than 60°C to kill E. coli.

E. coli contamination can come from meats especially ground beef but it can also come from improperly washed hands and contaminated salad greens.  All of these sources can contaminate cutting boards, kitchen knives and kitchen towels as well as other kitchen surfaces.  When it comes to kitchen towels, I use cotton bar towels bought from Sam's Club.  One of the things I insist on is changing out the towel after each use to help prevent contamination.  It is not uncommon for me to go through several kitchen towels during heavy cooking or canning sessions so I have a small laundry basket in the kitchen where I toss used towels to be removed from the kitchen during the final kitchen clean-up.  I also wash my kitchen towels in hot water with no fabric softener.  Kitchen (and bath towels) can kept free of contamination by:

  • changing out the towel after each use
  • hang towels outside of the kitchen area to dry until laundry day as damp towels will encourage bacteria to multiply as well as mildew to develop
  • bleach or a couple of drops of tea tree oil can be added to the wash water or vinegar can be added to the rinse to kill off any bacteria that may be present
  • white towels can be hung outdoors in the sun after washing to whiten and kill any bacteria that may be present

Garden Gnome
©2006-2010


Wednesday, September 22, 2010

Our Vacation Home Transportation

Years ago when we did a lot of camping our favourite way to economically get around the various National and Provincial parks was by bicycle.  Many a weekend we were able to camp quite comfortable without ever moving the vehicle.  When we lived in an small urban setting our bicycles were still our preferred mode of transportation for making a quick trip to the grocery store.  Unfortunately we are restricted to vehicle transportation for getting any necessities where our permanent home is due to its rural location.  We have considered buying a scooter for quick trips into the nearest village but put that on hold when the house was listed so that may still be a possibility.  However finding alternative, low cost and economical transportation while on vacation is always a priority.  One one trip we rented scooters to get around the area we were staying.  We rented a canoe at one campground and the guys travel into two via small fishing boat when at hunt camp.


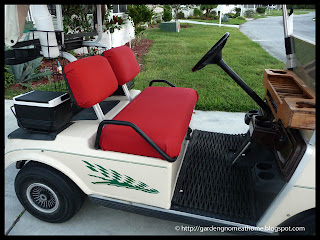
golf cart as purchased
The preferred mode of transportation where our vacation home is by golf cart.  In fact if we go through the park to rent our home out when we aren't here we must provide a golf cart for the tenants.  If we don't the park will rent a golf cart to the tenants and deduct $100 per month off of the rent collected.  The golf cart is such an important mode of transportation within the community that many households here have two.  So we were in the market for a golf cart.

My husband put the word out that we were looking for a golf cart.  Now the one he really would like to have costs about $3,000 new so he decided to look for one that tenants could use first.  The major requirements were good condition, reasonably priced, good batteries and within the community so we did not have to worry about transporting.

He found just what we needed!  The asking price was $1.000 OBO with batteries only 2 years old.  He offered the gentleman $850 who said sold.  Pictured is our new to us golf cart.  It is not the fastest golf cart around but it is torqued to climb inclines nicely.  The only thing my husband wasn't happy with was the seat coverings but that proved to be an extremely easy DIY fix.

golf cart with seats reupholstered
My husband bought an outdoor fabric meant for things like hammocks or outdoor cushions.  It cost $18.50 at Wal-Mart.  Then we set about recovering the seats and back rests.  We have done this type of thing before learning on our RV that we completely redid from cushions and curtains to valances and wallpaper.  Doesn't the fabric change make the golf cart look entirely different?

Materials needed for this DIY project:

  • 2 yards outdoor fabric
  • staple gun with staples
  • star screwdriver
  • scissors
  • utility knife


There are a few tricks to doing this type of spruce up yourself but again it isn't difficult at all:

  • remove the part to be recovered if at all possible - In this case the seat and back rests were unscrewed from the golf cart.  Then the hand rail was unscrewed from the seat and metal portion unscrewed from the back rests.
  • use the existing cover as your pattern - Carefully remove any existing cover to use as a pattern to cut material for the new cover.
  • corners - If you are covering something like the seat and back rests shown corners can easily be formed by tacking sides and end in a couple of spots so they don't move.  Then bring one long end piece and one short end piece tightly together for form a flag.  Tack the fabric on each side mitre of the flag piece.  Pull the flag up and over forming a man's tie shape.  Secure into place and trim the pointed portion from the tie shape.  This sounds complicated but it isn't.  The end result is a nice corner.
  • take your time -  While this type of DIY project is not difficult, taking your time and paying attention to detail will give a much nicer result. 


Garden Gnome
©2006-2010


Monday, September 20, 2010

Cleaning Out the Refrigerator

I routinely clean out our refrigerator on a weekly basis but not the deep purging that sometimes becomes necessary.  When our kids were young we did a fair amount of camping, quite often every weekend possible as well as extended camping trips.  We had a large RV with good size refrigerator so I got into the habit of making a few things like salads and meals like lasagna or chili to take with us.  The day before I'd turn on the refrigerator then once cooled would pack it with any specially prepared camping dishes as well as things like eggs and condiments.  So basically food we would have used at home simply went right along with us.  This saved us a great deal of time and money because it really lessened what we had to buy when we got to our destination.  I do the same thing for any extended boating trips.  Now that we have the vacation home I had to change that game plan.  The main reason is logistics.  If we fly out we are restricted what we can bring and if we drive we are also restricted due to the length of the drive.  Furthermore, there are border (US Customs) restrictions on the way down and back (CDN Customs) as to what can enter into the country so mainly the beautiful local produce I am so used to has to be left at home.

cleaned refrigerator
About 10 days before leaving for the vacation home I start paring down the refrigerator contents.  If we run out of something, we simply go without.  This provides the perfect opportunity to clean the refrigerator from top to bottom as well a cull through any sauces, cheeses or leftover bits it jars and bottles.  Anything unopened with an expiry date after we plan on returning is returned to the refrigerator after it is cleaned.

Cleaning the refrigerator in this manner helps to control any of the clutter that just seems to happen.  I have a bad habit of wanting to try a sauce or gourmet type item that only uses a small amount for the dish but the bottles end up being left in the refrigerator just in case.  Here's my method for deep cleaning the refrigerator:

  • remove everything from the refrigerator
  • cull though items checking for expiry dates
  • fill sink with hot, soapy water
  • remove crispers, cheese and meat keepers
  • wash the inside compartment from top to bottom
  • wash crispers, cheese keeper, meat keepers
  • drain sink and refill with hot water and about a half cup of baking soda
  • wipe down the inside compartment from top to bottom
  • rinse the crispers and keepers with the baking soda solution
  • dry inside compartment, crispers and keepers
  • replace crispers and keepers
  • replace the food items that are being kept
The refrigerator is now ready for another round of abuse.  I say this with tongue in cheek but like anyone our refrigerator takes a fair amount of abuse especially during the heaviest of the canning season when things tend to get pushed to the back and accidently forgotten.  Other periods of heavy use like having all the kids home or entertaining also take a huge toll on the refrigerator.  I try to do this type of refrigerator cleaning at least once a month in addition to my normal weekly refrigerator cleaning.  


Garden Gnome
©2006-2010


Tuesday, September 14, 2010

Labeling Canning Jar Boxes

I do a lot of canning which means I use a lot of jars.  As a result of the amount of canning some filled and empty jars must be stored in the original boxes.  I'm rather protective of my boxes because they are perfect for storing jars waiting to be put onto the pantry shelves.  I don't like writing on the boxes because they are used over and over until they fall apart.  That means the contents are constantly changing.

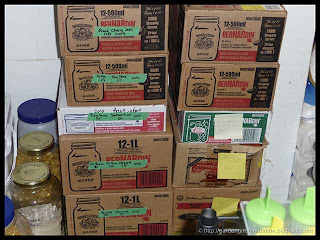
labeling canning jar boxes
Pictured is 2 of the filled box stacks when I started organizing.  Part of the top is cut off so there were actually 15 cases of 12 jars each (180 jars) of food.  I previously had been using a post-it note method for labeling (right) then changing the numbers with respect to content as the jars moved to the shelves while filling the empty spaces with empty jars.  While the system made a lot of sense to me what ended up happening is I would have part cases of food and occasionally a jar or two would be missed so would go beyond my 2 year comfort level for storing home canned foods.  Even worse is in trying to maximize space jars of food from 2 different years sometimes got mixed into the boxes.  So with the help of my husband we came up with a better plan.

In the lower right hand corner is the black shelf unit that was were the boxes are now stacked.  It is now holding the few plastic containers I still use.  The Tattler reusable canning lids (full review) I was testing out presented a labeling issue.  Since I could no longer use my method of writing on the lids with a Sharpie and writing on the jars wasn't working for me I rummaged through the utility room where I found a roll of painter's tape.  That solved my lid labeling problem but then I thought it would be a low cost way of labeling the stacked boxes as well.

My husband moved all of the empty cases of jars to the other side of the pantry.  They he started stacking the filled cases.  I'm now using painter's tape to label the boxes (left) which should pull cleanly off the boxes without damaging them.  This method gives me a good visual of what is in the box and what needs to be moved to the shelves.  I like that it is neat, tidy, cheap and effective!

Garden Gnome
©2006-2010


Monday, September 13, 2010

Stove Cartridge Clean-up

I can on a Jenn-Air® customized slide-in range with cartridges so that I can change the stovetop features as desired.  I bought a special canning element to customize one of the coil cartridges.This time of year my stove takes a huge beating!  While I can year round usually at least once weekly this is the busiest of the canning season when I am canning oodles of tomato products.  That means the canners run two or three times a day. 

dirty stove cartridge
The problem with both boiling water bath (BWB) and pressure canner (PC) is both spew out water droplets over the stove surface.  The PC spits out water droplets but only until it comes to pressure whereas the BWB canner spits water droplets during the entire canning process.  These water droplets seem harmless but they turn into ugly black spots on the stove.  Compounding the problem is the splattering from various sauces cooking prior to being canned. 

As you can see the canning cartridge becomes quite unsightly.  Quite frankly I could leave it as is because the cartridge is only on the stove for canning so no one really sees it other than my husband or me but that's not the point.  I don't like it looking this grungy.  When I canned on a regular stovetop I had the same problem so I learned a few tricks to cleaning up after a canning session to keep the stovetop looking good.

cleaned stove cartridge
One of the best stovetop cleaners I've found is Bar Keepers Friend.  This cleanser comes in both powder and liquid form.  I like the liquid but they both work well and it is one of the best commercial cleansers I've found for stainless steel.  It's one of the very few commercial cleansers I buy.  This cleanser contains citric acid so it is quite effective on most surfaces including smoothtop stove surfaces.  A 13 oz bottle costs $4 so is a fraction of the cost of other smoothtop stove cleansers.

Pictured is the cleaned stove cartridge.  It's not perfect but it looks a lot better than after the canning session.  The majority of the cleaning was done simply by wiping on Bar Keepers Friend, letting it sit for a minute then rubbing.  Some small spots that remained were easily flicked off with the side of a paring knife tip.  Once the busiest of the canning is over I will take the canning element out, clean the drip pan well and clean up the rest of the cartridge.  Then I will be able to give the entire cartridge a good cleaning that will remove all of the spotting but for now it at least looks presentable.

Garden Gnome
©2006-2010


Friday, September 10, 2010

The Down and Dirty on Keyboards

Mac keyboard
My Keyboard
September 6, 2010

I am not a germaphobe but I like things reasonably clean.  Our main computer keyboard is used on a daily basis several times a day unless we are away.  While it is used mainly by my husband and me, it is also used on occasion by one or more of our kids and friends.  I do the old dust off routine so it usually doesn't look too bad.  The other day my husband said he heard that computer keyboards were less sanitary than toilets.  Well that doesn't surprise me all that much since most kitchen sinks are less sanitary than toilets [something to think about].  So I pondered his statement then decided to act because I couldn't remember the last time I gave the keyboard a good cleaning.  Note that I said I couldn't remember when not that I haven't cleaned it.  I've heard a lot of ways to clean a keyboard including putting it into the dishwasher.  Here's the way I clean ours:
  • unplug from the computer - Ours is a MAC but this method works on a PC as well.
  • turn the keyboard over and hold on an angle resting on solid surface
  • lightly tap the keyboard to dislodge any larger pieces dust or dirt
  • vacuum the keyboard to get any remaining dust or dirt
  • wipe the surface of the keys with rubbing alcohol
  • dip a Q-tip into rubbing alcohol to clean between each key, changing Q-tip as needed
  • any stains that remain can be removed with a Mr. Clean magic eraser
  • wipe the surface again with rubbing alcohol
  • plug the keyboard back into the computer - The keyboard is now clean and sanitized ready for use.
This method also works well for other well used surfaces like telephones handsets, cell phones, computer mouse and control devices.  Tapping may not be necessary for some items. Using the rubbing alcohol will not only get the surfaces squeaky clean but help spread germs during cold and flu season.

Garden Gnome
©2006-2010


Thursday, September 9, 2010

We Are Now on Hydro One's TOU Pricing

We received a letter from Hydro One mid-August that said our Smart Meter would switch over to Time of Use (TOU) pricing on September 8.  We've had the meter since February 4, 2008 then activated on May 5, 2010.  The period between May and September was likely a testing period for Hydro One to make sure all meters installed at that time were working properly before switching over to TOU pricing.  Now that we are on TOU pricing we can go to Hydro One's website, sign into our account then check out electricity usage which is rather interesting.

The home page for the TOU pricing shows a pie graph of your electricity usage for the last 30 days.  I'm pleased to say that 55% of our electricity usage over the last 30 days has been in the off-peak hours at the cheapest cost per kWh of 5.3¢.  Twenty-seven percent of our electricity usage was in the mid-peak hours (8¢ per kWh) and the remaining 18% was at the on-peak hours (9.9¢ per kWh).  Really this is rather good considering we had to have our air conditioning on a few times over the last month.  Clicking a tab took me to the hourly electricity usage which is again quite interesting.  I noticed a spike between 8 and 9 pm when I decided to deep fry chicken wings for an evening spike.  It wasn't a big or costly spike just noticeable.  The next tab shows a bar graph of daily electricity use and the following tab show the monthly bar graph both divided into the three peak hour designation.  These visuals will help bring awareness to energy usage. 

In all honesty not much will change here in the way we use electricity because we have been energy conscious for quite some time.  We are part of the every kWh counts challenge and we are constantly looking at ways to reduce our electricity consumption.  We are gradually moving towards solar with a goal of being off the grid within 5 years.  Over the last 30 days we used a total of 653 kWh and that's with the AC on a few times.  The average house hold use is a little over 1,000 kWh each month so we are well below that level making us very good candidates for going solar. 

Garden Gnome
©2006-2010


Wednesday, September 8, 2010

When to Use a Residual Insecticide

Chemical insecticides can be quite useful in and around the garden when used properly.  They are available in two types.  The first is a quick action, complete no residual effect like most typical insect sprays.  The second is a quick kill with residual action that may last from 3 months to a year.  If you have an exterminator in they will use an insecticide with residual action to give you lasting protection for 6 months to a year.  So how do you know when to use a residual insecticide?

First you have to understand the insect or arachnid you are trying to control.  In many cases the use of any chemical insecticide can be avoided by manual removal and this method doesn't harm beneficial insects like honey bees.  So that should always be your first line of attack.  If you have a large infestation of something like termites, house centipedes, carpenter ants, certain spiders or cockroaches you may need to us an insecticide that has residual effects.  The reason for this is these insects are problematic to begin with causing potential risk to humans (eg. insect bites, asthma) and in the case of termites and carpenter ants the potential risk for property damage. 

Use an insecticide that kills on contact with at least a 3 month residual action that will effectively kill off any of the babies the initial spraying did not affect.  Pay special attention to any sources of entry into your house these pests may find.  Once the spray has dried go back and seal any of the entry points possible.  The next step is to identify any problem areas.  For example house centipedes feed off of other insects that like moisture like earwigs and pill bugs.  So they are an indicator species.  If you treated for house centipedes look for any areas where moisture is a problem in and around your house then correct the problem.  Spiders indoors are a sign of air leakage so check for any drafts wherever you find spider webs.  A residual insecticide gives you a bit of time to get control of these types of infestations while taking the necessary steps to correct the problem.

A residual insecticide should not be used for:

  • surfaces or areas where it will come into contact with food
  • insect control for edible plants
  • temporary insect control
  • minor insect infestations
  • in high winds or adverse weather conditions or on high heat/very sunny days
  • as a permanent solution to an infestation that has other corrective methods

Garden Gnome
©2006-2010


Tuesday, September 7, 2010

Spider Control

When we moved here in 2007 we expected critter problems so they came as no surprise.  The house is in a rural location on waterfront property which exposes us to a few more critters than if we were living in a urban setting.  It did not help that much of the property was over grown providing the perfect habitat for many critters  and while we have done a lot of ripping out there are still plenty of hiding spots for critters.  We have dealt with centipedes, millipedes, pill bugs, earwigs, spiders, black ants, yellow jackets, wasps, mice, voles, skunks, rabbits and racoons.   Critters tend to controlled by natural predators so unless a critter becomes a problem indoors or presents the risk of physical harm to humans my philosophy is to leave them be.   

golden orb weaver spider
Spiders by an large are beneficial critters that should allowed to remain in your gardens providing there is a low risk of being bit and the spider is not toxic.  Indoors spiders are wonderful indicators of drafts that should be sealed because they spin their webs where their egg sacks can be kept cool.  Outdoors spiders keep insects in check.  In most cases manual removal of the spider and any egg sacs is enough to solve any spider over population problems when combined with sealing them out of the house.  Regular web removal outdoors will help control them as well.

I've been using the spider identification chart to help identify some of the harmful spiders here.  Pictured is a golden orb-weaving spider that while large (about the size of a quarter) is non-agressive and non-toxic to humans.  I have identified several problem spiders around our house with the worst ones being the brown recluse spider and house spider both aggressive and toxic spiders.

funnel spider
I blogged about the funnel spiders on my gardening blog.  While these are non-aggressive, low risk of a bit spiders this year they are presenting a problem just in their shear numbers.  These spiders are toxic which could be very problematic with three little grandchildren running around.  All of the cedar hedges and English boxwoods are covered with these spiders.  I've only seen a couple indoors though so that is a good thing. 

Manual removal of these fast moving spiders is impossible although sweeping down the hedges helps somewhat.  Given their numbers I am going to spray the hedges to do a good but not total knockdown.  A total knockdown of spiders outdoors is virtually impossible and not desirable anyway.  All I'm looking for is a reasonable knockdown that will lessen the chances of any spider bite problems.

insecticides
Insecticides are something I prefer not to use if at all possible.  Insecticides when used indiscriminately knock out all insects and arachnids including the beneficial ones like pollinators and the golden orb-weaving spider.  I garden organically so don't want any overspray getting onto my vegetables or into the soil.  I also don't want insecticides making their way into the natural body of water where they can do a lot of damage. 

I'm using two specific application insecticides.  The first is Bio-Mist by Green Earth.  This product is safe for use on vegetation and can be used to do a rapid knockdown aroung the perimeter of the house if necessary.  It kills on contact without a residual effect.  I will be using this on the cedars and boxwoods to lower the funnel spider population.  SpiderBan® by Wilson® is a targetted indoor/outdoor spider killer that kills on contact as well as a residual effect.  This product has a low mammalian toxicity but is highly toxic to fish and bees.  It will kill spiders on the house and has enough of a residual effect to continue killing any spiders that come into contact with the surfaces sprayed with this insecticide will continue to be killed.  This insecticide is specifically useful for treating outdoor surfaces like siding and brick as well as indoor cracks and crevices.  While most residual insecticides will give the residual time frame Wilson® does not but from experience this product will give a good 6 month effect.  I will be using SpiderBan® to treat only the house and garage directly on the buildings.

pressurized pump sprayer
When we moved here we called a pest control company for the spiders.  They quoted us a price of $250 for outdoor spraying only.  I decided to look for a way to do this ourselves.  The ideal applicator is a pressurized pump sprayer.  You mix the concentrate with water in the sprayer then put the lid on and pump the handle until it is very stiff then tighten it down.  The contents can then be sprayed under pressure through the nozzle by pressing the red lever (middle of hose).  At under $25 a pressurized pump sprayer is a low cost, low tech, mecanical way to apply pesticides.  If you use natural pesticides (eg. vinegar), chemical herbicides (eg. Round-up), chemical insecticides (eg. SpiderBan) or natural insecticides (eg. soap solution) you will want 4 of these sprayers well marked with their intended uses so you don't make the mistake of spraying a chemical insecticide on your organic vegetable garden.

Garden Gnome
©2006-2010


Monday, September 6, 2010

More Information on Magnavox Television Problem With DIY Solution

Yesterday I wrote about our Magnavox television problem.  Last night I did a bit more research and stumbled upon a site that explained how to fix the problem yourself.  Our television is a Magnavox 37MF331D/37 that was manufactured in July of 2006.  We bought it in early 2007.  The television power problem is bad enough that there are talks of a class action lawsuit against Phillips/Magnavox.  According to some sources the part costs $9 but labour to do the repair costs about $800.

What I found out was there is a 25V capacitor marked 2074 on the power supply circuit board that goes.  The capacitor is easy to identify when it goes because the top bulges and the ooze a black liquid.  Replacing these capacitors with Radio Shack part # 227 - 1020 (35V).  The problem in these televisions is when Phillips/Magnavox outsourced the assembly a 25 V capacitor was used when it should have been a 35 V capacitor.  I found a great series of photos from someone who fixed their television so we know what to look for.  He fixed his television for about $5 with the most time consuming part of the DIY project being removing all of the screws. 

My husband is going to pick up a new capacitor tomorrow then do the repair either tomorrow night or Wednesday morning.  At this point we have nothing to loose.  The television is not worth spending $800 on and now that it is refusing to power on without a great deal of effort, steadily getting worse it won't be long before it doesn't power on at all rendering the television garbage.  If all goes well with this DIY repair our television will be back to normal operating condition.  I will post how the repair goes.


Sunday, September 5, 2010

Avoid Phillips/Magnavox Televisions! Our Lemon of a Television

Back in mid May of 2007 we bought a LCD Magnvox flat screen television.  It was on sale, had a great picture with high definition (HD) and was bought on a whim to replace a dead television.  As a result we did not do any research on this television, something that is rather odd for us.  What we have ended up with is a lemon!

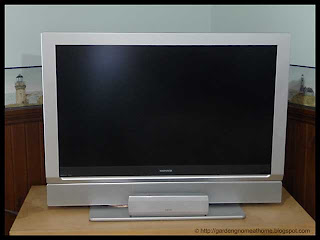
Magnavox television
The television is just a little over 3 years old.  A few months ago the power light started blinking rather than just turning on when pressed.  After several minutes we could finally get a picture.  My husband figured out a couple of tricks to get it going.  Over the last few weeks the situation has worsened.  A friend recommended we get the television checked but we put it off because a service call is $80.  It's a good thing we did.  A few days ago I did a Google search to find out that this is a common problem with Phillips/Magnavox televisions to the point there were complaints filed with the FTC and there is a class action lawsuit by dissatisfied customers underway.

There is no way a new television should fail within a 3 year period!  According to several sources the actual part is $8 but the costs to replace the part hover around the $800 mark.  Phillips/Magnavox is not standing behind their product essentially ripping off thousands of consumers.  I haven't called them but those who have are reporting horribly rude customer service over this issue.  Many have reported their Phillips/Magnavox television failing within a short period to a year after purchase so perhaps we were very lucky our television lasted 3 years.  We are now doing the research to replace this failed television.  I can guarantee you it will not be replaced with a Phillips/Magnavox television.  I can also guarantee that all of our friends, family and anyone else who will listen that they won't be buying a television for them either!